Bestsellers
-

Weller Weller WT1013 Digitaal Soldeerstation (95 W)
The Weller WT 1013 soldering station set includes the WT 1 supply unit, the WP 80 soldering iron and the WSR 201 safety rest. It is stackable and thus creates more space in the workplace. With an integrated usage sensor, the soldering tool switches off automatically. Specifications Channels 1 Voltage 230 V Power 95 W Display Backlit LCD Temperature range 50 °C - 450 °C Temperature stability ±2 °C Temperature accuracy ±9 °C Fuse 0.5 A Equipotential bonding on WT compatible on ESD-safe on Power cable EMEA Dimensions 149 x 138 x 101 mm Weight (approx.) 1.9 kg
€ 441,65
-

Uni-Trend UNI-T UPO1202CS 2-ch Oscilloscope (200 MHz)
De UNI-T UPO1202CS is een goedkope multifunctionele 2-kanaals digitale fosforoscilloscoop met 200 MHz bandbreedte en een sampling rate van 1 GSa/s. Hij kan op brede schaal worden gebruikt bij elektronisch en elektrotechnisch ontwerp, foutopsporing, onderwijs en industrieel design.In de UPO1000CS serie wordt gebruik gemaakt van parallelle digitale signaal verwerkingstechnologie, die de data processing snelheid en de golfvorm capture rate aanzienlijk verbetert. De originele Ultra Fosfor technologie kan het cumulatieve effect van het geteste signaal weergeven door meerlagig na te gloeien. Vergeleken met traditionele oscilloscopen met digitale opslag kan de persistence van digitale fosforoscilloscopen de driedimensionale golfvorm van amplitude, tijd en signaalsterkte weergeven. Fast Acquire technologie kan abnormale signalen zoals video, jitter, ruis en runt signalen nauwkeurig vastleggen.Specificaties UPO1102CS UPO1202CS Bandbreedte 100 MHz 200 MHz Analoge kanalen 2 2 Sampling rate 1 GSa/s 1 GSa/s Storage capaciteit 56 Mpts per kanaal 56 Mpts per kanaal Stijgtijd ?3.5ns ?1.8ns Capture rate 500.000 wfms/s 500.000 wfms/s Golfvorm opslag 100.000 frames 100.000 frames Kenmerken 7' WVGA (800 x 480) TFT LCD Ultra Phosphor super fluorescerend weergave effect, tot 256 grijsniveaus Ondersteunt RS232, I²C, SPI, CAN en LIN trigger Innovative RS232, I²C, SPI, CAN en LIN hardware decodering Verticale schaal: 1 mV/div-20 V/div Lage background noise: <100 ?Vrms Verbeterde FFT-functie met 1 M punten. Ondersteunt frequentie-instelling, watervaldiagram, detectie-instelling en metingen met markers enz 36 soorten golfvorm patronen kunnen automatisch worden gemeten Ruim scala aan triggerfuncties (edge, pulse width, video, slope, runt, overshoot, delay, timeout, duration, setup and hold, Nth edge and pattern trigger) Multi-Scopes ondersteunt dual-channel onafhankelijke trigger fluorescentieweergave Meerkanaals onafhankelijke 7-bits hardware frequentieteller DVM ondersteunt tweekanaals onafhankelijke AC en DC true RMS meting Rekenkundige functies op de golfvorm (FFT, +, -, ×, ÷, digitale filtering, logische bewerkingen en geavanceerde bewerkingen) Diverse interfaces: USB Host, USB Device, LAN, EXT Trig, AUX Out (Trig Out, Pass/Fail) Ondersteuning van SCPI, Standard Commands for Programmable Instruments Support voor WEB-toegang en controle Downloads Datasheet Programmeer manual Gebruikershandleiding Quick Start Guide Software
€ 369,00
-

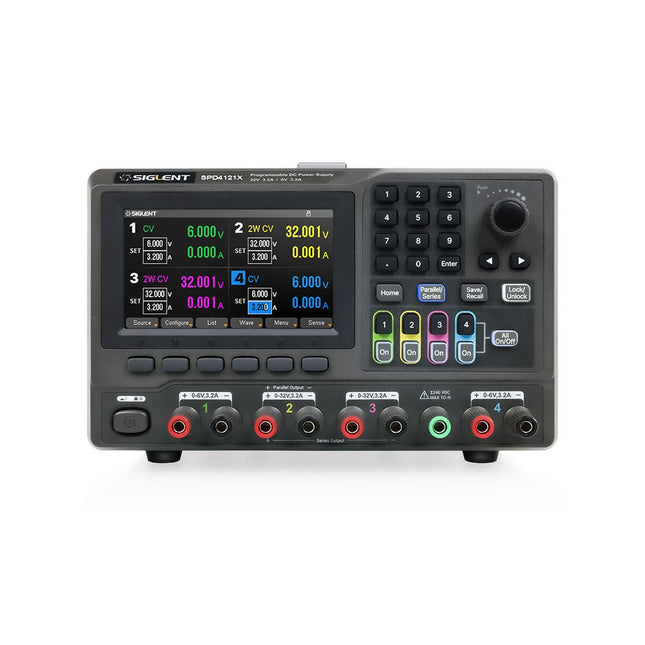
Siglent Siglent SPD4323X 4-kanaals Voeding (240 W)
The Siglent SPD4323X is a 4-channel DC Linear Programmable Power Supply equipped with a 4.3-inch TFT-LCD display, friendly human-machine interface, and excellent performance indicators. Real-time waveform display provides engineers with an informative user interface. SPD4323X offers a total output power of 240 W with a resolution of 1 mV/1 mA. The maximum voltage and current for each channel are as follows: CH1: 6 V/3.2 A CH2: 32 V/3.2 A CH3: 32 V/3.2 A CH4: 6 V/3.2 A Kenmerken Rated output power: 240 W Rated voltage: 32 V, 12 V, 30 V Up to four high-precision power supplies with independent controllable outputs, supporting CH2 and CH3 series and parallel connections Clear graphical interface with waveform and timer display modes 5-digit voltage and current display with minimum resolution of 1 mV, 1 mA Fast output response time: <50us The high current channel support remote voltage compensation sense function. The maximum compensation voltage is 0.6 V Overvoltage protection and overcurrent protection or safe and accurate operation Equipped with a 4.3-inch TFT-LCD display (480 x 272 resolution) USB and LAN standard communication USB-GPIB module is optional Excellent channel density with up to 4 channels in a 3U half rack package Internal data storage for setups and parameters Embedded Web Server with instrument communication that doesn’t require software installation Fully SCPI programming command set support as well as a LabView driver for remote control and system automation Specificaties SPD4323X SPD4121X SPD4306X Channel Output CH1: Voltage 0 to 6 V Current 0 to 3.2 ACH2: Voltage 0 to 32 V Current 0 to 3.2 ACH3: Voltage 0 to 32 V Current 0 to 3.2 ACH4: Voltage 0 to 6 V Current 0 to 3.2 A CH1: Voltage 0 to 15 V Current 0 to 1.5 ACH2: Voltage 0 to 12 V Current 0 to 10 ACH3: Voltage 0 to 12 V Current 0 to 10 ACH4: Voltage 0 to 15 V Current 0 to 1.5 A CH1: Voltage 0 to 15 V Current 0 to 1.5 ACH2: Voltage 0 to 30 V Current 0 to 6 ACH3: Voltage 0 to 30 V Current 0 to 6 ACH4: Voltage 0 to 15 V Current 0 to 1 A Resolution 1 mV, 1 mA 1 mV, 1 mA 1 mV, 1 mA Setting Accuracy Voltage: ±(0.03% of reading+10) mV, Current: ±(0.3% of reading+10) mA Voltage: ±(0.03% of reading+10) mV, Current: ±(0.3% of reading+10) mA Voltage: ±(0.03% of reading+10) mV, Current: ±(0.3% of reading+10) mA Readback Accuracy Voltage: ±(0.03% of reading+10) mV, Current: ±(0.3% of reading+10) mA Voltage: ±(0.03% of reading+10) mV, Current: ±(0.3% of reading+10) mA Voltage: ±(0.03% of reading+10) mV, Current: ±(0.3% of reading+10) mA Display 4.3" TFT-LCD 5-digit voltage and current display 4.3" TFT-LCD 5-digit voltage and current display 4.3" TFT-LCD 5-digit voltage and current display Output power 240 W 285 W 400 W Inbegrepen 1x Siglent SPD4323X Power Supply 1x Power cord (EU) 1x Output test cord (3 A) 1x USB cable 1x Quick start guide Downloads Datasheet Manual Quick start
€ 762,30
-

Elektor Digital Retrotronica (E-book)
50 maal 'elektronica van vroeger'. In het januarinummer 2005 van het elektronica-maandblad Elektor zag de rubriek 'Retrotronica' voor het eerst het licht. Onder supervisie van Elektor-redacteur Jan Buiting wordt sindsdien elke maand een stukje 'elektronica van vroeger' opgerakeld. Tegenwoordig worden de meeste elektronische schakelingen opgebouwd rond een microcontroller die het 'denkwerk' voor zijn rekening neemt. Nog niet zo heel lang geleden echter bestonden die dingen nog niet (of waren ze onbetaalbaar); niettemin slaagden de ontwerpers van toen er (naar huidige maatstaven) verbijsterend goed in om uiterst betrouwbaar en nauwkeurig werkende schakelingen en apparatuur te bouwen. Veel apparaten blijken, na jaren op een stoffige zolder of in een vochtige kelder te hebben gestaan, na een schoonmaakactie nog perfect te functioneren -- er is dus geen reden om de 'elektronica van vroeger' met een meewarige blik te bekijken; integendeel: het zijn vaak wondertjes van vernuft en vakmanschap! In dit boek hebben we 50 bijdragen uit de rubriek 'Retrotronica' voor u gebundeld - een must voor iedereen die geïnteresseerd is in 'oude' elektronica of in de geschiedenis van het maandblad Elektor (destijds Elektuur), aangezien enkele 'klassieke' Elektuur-schakelingen prominent aan bod komen!
€ 19,95
Leden: € 17,96
-

Elektor Digital 50 PIC Microcontroller projecten (E-BOOK)
Dit boek bevat 50 leuke en spannende projecten met PIC microcontrollers zoals een laser alarm, USB plaagmuis, eierwekker, jongerenverjager, geluidsschakelaar, capacitieve vloeistofniveau meting, 'vinger in het water' sensor, bewaking van een ruimte met een camera, 220 volt lichtdimmer, pratende microcontroller en nog veel meer. Er komen talloze technieken aan de orde zoals relais, wisselstroomregeling (ook 220 volt), I2C, SPI, RS232, USB, puls breedte modulatie, rotary encoder, interrupts, infrarood, analoog-digitaal conversie (en andersom), 7-segment display en zelfs CAN bus. U kunt dit boek gebruiken om de verschillende projecten na te bouwen en daarna in de praktijk te brengen. Door de duidelijke uitleg, schema's en zelfs foto's van de opstelling is het nabouwen een leuke bezigheid. Bij ieder project wordt uitgelegd waarom het juist op die manier is uitgevoerd, en wordt kort de theorie behandeld. U kunt dit boek dus gebruiken als studieboek, of als basis voor grotere en ingewikkeldere projecten. Alle schakelingen zijn op een steekbord uitgevoerd zodat uitbreiden en aanpassen gemakkelijk is. De drie PIC microcontrollers die in dit boek gebruikt worden, zijn de 16f877A, 18f4455 en 18f4685. Daarnaast komt aan de orde hoe u de programma's van de ene naar de andere microcontroller kunt overzetten (er worden 15 types ondersteund) inclusief twee praktijkvoorbeelden. Alle benodigde software kunt u gratis downloaden. Dat geldt ook voor de open source programmeertaal JAL. Deze krachtige maar toch eenvoudig te leren taal wordt zowel door hobbyisten als professionals gebruikt. Dit boek is ook goed te gebruiken als naslagwerk. U kunt er de uitleg van alle opdrachten van de programmeertaal JAL in terugvinden, en tevens van de gebruikte uitbreidingsbibliotheken. Via de index vindt u gemakkelijk projecten die als voorbeeld kunnen dienen voor de belangrijkste JAL opdrachten. Zelfs wanneer u alle projecten een keer gemaakt hebt, zal dit boek nog lang een plekje naast uw PC behouden. Voor meer informatie en downloadlinks ga naar de bijbehorende supportpagina ATTACHMENTS / DOWNLOADS Inhoudsopgave 50 mini-microcontroller projecten (Grootte: 1.12 MB) Software-50 PIC Microcontroller projects (Grootte: 11.72 MB)
€ 29,95
Leden: € 26,96
-

Elektor Digital Meten en regelen via Android (E-BOOK)
Hebt u altijd al uw elektronicaproject willen aansturen vanuiteen kleurrijke app op een Android smartphone of tablet? Dat is mogelijk met het in dit boek beschreven Android I/O-board. Met de bijbehorende software-library kunt u in Android Studio eenvoudig zelf een app programmeren die dit mogelijk maakt.Het Android I/O-board (los verkrijgbaar, wordt niet met boek meegeleverd!) bezit 22 pennen die u vanuit een app kunt aansturen als digitale I/O, ADC, PWM, touch-sensing en counter. Het Android I/O-board kan met de Android smartphone communiceren via Bluetooth, WiFi of USB. Het board is ook als datalogger te gebruiken. Kortom, dit is een veelzijdig board dat in ieder project past.Dit boek beschrijft stap voor stap hoe u uw project tot een succes kunt maken. Het boek behandelt gestructureerd de volgende onderwerpen:• Een snelle handleiding hoe u uw Android I/O-board up and running krijgt.• Een uitleg van alle mogelijkheden van het Android I/Oboard, met uitgebreide voorbeelden bij de verschillende opties.• Een stap-voor-stap handleiding hoe u een app kunt programmeren in Android Studio.• Een beschrijving van de firmware op het Android I/O-board en hoe u dit zelf met MPLAB-X kunt aanpassen.• Voorbeeld-projecten om inspiratie op te doen hoe u uw eigen project kunt aansturen met het Android I/O-board.Alle software in dit boek is als gratis download beschikbaar.
€ 34,95
Leden: € 31,46
-

Elektor Digital Elektor Gastredactie door Espressif 2023 (PDF)
Elektor GREEN en GOLD leden kunnen deze uitgave hier downloaden. Nog geen lid? Klik hier om een lidmaatschap af te sluiten. IoT-innovatie in galop Een E-Ink WiFi kleuren-fotolijst ESP-Launchpad tutorialvan nul tot flashen in een paar minuten ESP32 en ChatGPTop weg naar een zelf-programmerend systeem… Walkie-talkie met ESP-NOWniet echt WiFi, niet echt Bluetooth, maar... Van idee tot schakeling met de ESP32-S3zo bouw je een prototype met Espressif-chips AIoT chip-innovatieeen vraaggesprek met Teo Swee-Ann, CEO van Espressif Simuleer ESP32 met Wokwide digitale tweeling van je project Test van de ESP32-S3-BOX-3een uitgebreid AIoT-ontwikkelplatform voor je elektronica-werkplekoverwegingen en tips van Espressif-technici Het ESP RainMaker-verhaalhoe we “jouw” IoT-cloud bouwden Bouw van de Elektor Cloc 2.0een Elektor-product uitgepakt door Espressif De ESP32-P4 ontketendde volgende microcontroller-era Rust + embeddedeen krachtig ontwikkelduo Wie zijn de onvervaarde embedded Rust-ontwikkelaars?zo cultiveert Espressif embedded Rust voor de ESP32 de SoC-serie van Espressif Een PLC met oplossingen van Espressifmet de mogelijkheden en functionaliteit van het ISOBUS-protocol Het ESP32-S3 VGA-boardvolg Bitluni tijdens het ontwerpproces Acoustic fingerprinting met de ESP32songherkenning met het open-source project Olaf Ronde kerstboom 2023een high-tech manier om de feestdagen te vieren Een eenvoudiger en handiger leveneen amateurproject op basis van de ESP8266-module van Espressif IoT-apps bouwen zonder software-expertisemet het Blynk IoT-platform en Espressif-hardware Bouw een slimme gebruikersinterface op ESP32 Snelle en gemakkelijke IoT-ontwikkeling met M5Stack Prototype van een ESP32-gebaseerde energiemeter Een distributeur met meerwaarde voor IoT en meer Achter de schermen: vraaggesprek met Arduino over de Nano ESP32Alessandro Ranellucci en Martino Facchin over de samenwerking met Espressif achter de schermen van Espressif Stroomlijnen van MCU-ontwikkeling met ESP-IDF Privilege Separation Een open-source spraakherkenningsserver......en de ESP BOX Het denkende ooggezichtsherkenning en meer met de ESP32-S3-EYE Knoopcel-schakelaar met ESP32-C2prestatiegericht ontwerpen Matter stuwt het slimme huis voorwaartsontsluit het potentieel van Smart Home IoT Tech the Future: Waarheen met Smarthome IoT?
€ 9,95
-

Elektor Digital Elektor Juli/Augustus 2020 (PDF)
ELEKTOR AIDE L'électronique dans des temps difficiles AFFICHAGE D'INFORMATION POUR LA MAISON avec Windows sur le Raspberry Pi DÉMARRER AVEC NODE-RED un outil de programmation open source basé sur des blocs visuels LA tombola d'ÉTÉ d'ELEKTOR GREATSCOTT ! CONSTRUIRE UN SYSTÈME D'ALARME LORA REVUE : ALIMENTATION DE LABORATOIRE JOY-IT RD6006 (KIT) REVUE : INTERFACEBOARD GREATFET ONE QUI N'HONNE PAS LES PETITS – XXL de la boîte à suggestions d'Elektor ANTENNE WIFI EXTERNE 2,4 GHZ POORLUIS CONTRÔLE FACILE DE LA TEMPÉRATURE MARCHE/ARRÊT AVEC CHAPEAU RASPBERRY PI COMMENT PRENDRE DE (BONNES) PHOTOS DÈS L'IMPRESSION... ...et les composants électroniques ? REVUE : NOYAU I2CDRIVER ÉCRAN TACTILE JOY-VIEW 13 DE JOY-IT BOOSTER LED POUR MICROCONTRÔLEURS avec un seul composant ! MACHINE À LAVER À ULTRASONS EXPÉRIMENTALE REVUE : GÉNÉRATEUR DE SIGNAUX JOY-IT JDS2915 générateur de signaux doubles avec compteur de fréquence dans un boîtier métallique PROGRAMMATION DES FEUX DE SIGNALISATION EN LANGAGE PIC ASSEMBLY LED CLIGNOTANT PERMANENT CAPTEUR DE HALL EXPÉRIMENTAL DÉTECTER LES COURT-CIRCUITS AVEC UN MILLIOHM OU ESR MÈTRE KIT PRATIQUE ÉLECTRIQUE SDR PIPELINE DE LABORATOIRES ÉLECTRIQUES KICK-STARTER ÉLECTRIQUE ....eh bien, vous voyez ce que nous voulons dire. AVEZ-VOUS VRAIMENT BESOIN DE TOUT ÇA ??? ici, je passe de nombreuses heures sur des projets électroniques... LABORATOIRE EST OUEST MEILLEUR un aperçu du plus saint des saints, où naissent des projets intéressants BONJOUR LE MONDE! NOUS SOMMES ELEKTOR ET NOUS SOMMES SOCIAUX M4 + A7 + GPU : UNE ÉQUIPE DE RÊVE INÉGALE le nouveau SoC STM32MP1 pour les travaux plus lourds CONFIGURATION DE TEST POUR LE 16F18877 ET AUTRES GRANDES PHOTOS COMMUNICATION INTER-ΜC AVEC LE BUS SPI ET ATMEGA328P SIX VARIANTES DE L'OSCILLATEUR LF/AF (et la capacité de M. Miller) BBC MICRO:BIT oscilloscope absolument minimaliste avec affichage LED FEU DE RUNNING À LED 'KNIGHT RIDER' AVEC ESP32 GÉNÉRATEUR DE SIGNAUX AM LW/MW AVEC ATTINY13 DIPMÈTRE ABSOLUMENT MINIMALISTE SCOOTERS ÉLECTRIQUES BON MARCHÉ quelle est la qualité d'un scooter électrique « homologué » à 300 euros de Lidl ? AIDE AU STATIONNEMENT À ULTRASONS AVEC ARDUINO UNO PÉDALE DE DISTORSION AVEC AMPLI OP ET TUBES DE CHARGE SPATIALE INDISPENSABLE POUR CHAQUE LABORATOIRE D'ÉLECTRONIQUE HEXADOKU IA POUR DÉBUTANTS (2) réseaux de neurones avec Linux et Python
€ 9,95
-

Elektor Juillet/Août 2026 (FR)
Le téléchargement intégral de ce numéro est disponible pour nos membres GOLD et GREEN sur le site Elektor Magazine ! Pas encore membre ? Cliquez ici. carte de développement MultiRFUne plateforme pour évaluer les protocoles sans fil à courte et longue portée Elektor fête ses 65 ansAu cœur de l'électronique depuis 1961 détection de personnes par Wifi sur un ESP32Quand votre routeur devient un capteur de mouvement balances sans filQuatre petites balances = une grande balance Walter, le module IoT compactSoC ESP32-S3, modem 5G LTE-M/NB-IoT et récepteur GNSS conditionnement des capteurs RTD à 3 et 4 filsAvec ajustement d’échelle et compensation des câbles oscilloscope/générateur/multimètre à 2 voies 3-en-1Revue du Fnirsi 2D15P electronica Fast Forward 2026 ouvre ses candidatures aux startups et partenaires industriels EcologgingUne station IoT environnementale modulaire pour la recherche de terrain la connectivité sans fil dans les applications médicalesAu rythme du pouls avec le Bluetooth LE audiotroniqueRéduction du ronflement optimiser les rendements agricoles grâce à la modélisation par IA et aux capteursAméliorer la productivité agricole OPC UA : un aperçuÉchange de données indépendant des plateformes redox-mètre amplificateur d’instrumentation pour expériences de physique et d’ingénierie filtres audio actifs différentielsPour les crossovers et plus encore perspectives de la communauté Elektor sur l’IdO et les capteurs module d’interface pour chauffe-eau piloté via TelegramUne solution basée sur un ESP32 et Arduino 2026 : une odyssée de l'IALa logique floue a-t-elle disparu ? projet 2.0 injecteur de signal d’alarme plus secteuroutils pour localiser les coupures de fil
€ 16,50
-

Elektor Digital Embedded Electronics 2 (E-BOOK)
De werking van veruit de meeste moderne elektronische apparaten is niet slechts op één enkel principe gebaseerd. Vaak staat een of andere computer (doorgaans een microcontroller) centraal. Uit deze fundamentele opzet – een computer die is ingebed in een bepaalde toepassingsschakeling – is de algemene benaming Embedded Systems voortgekomen. De meeste van deze systemen moeten vanuit het niets worden ontwikkeld, en daarbij komt het op elk detail aan. Vindingrijkheid en veelzijdigheid zijn dan een vereiste. De problemen die opgelost moeten worden, vormen niet zelden een ware uitdaging en betreffen niet alleen de analoge en digitale elektronica maar ook de systeemarchitectuur, programmering en programma-organisatie. De delen van deze reeks zijn geschreven voor iedereen – leerling, student of beginnend elektronicus – die zich terdege wil bekwamen in de professionele hardware- en systeemontwikkeling. En ze richten zich tot de allround-elektronicus die geen tijd heeft om specialist op een van de vele deelgebieden te worden maar die weet dat hij met standaard huis-, tuin- en keukenoplossingen niet ver komt. Ze bieden wat studenten en professionele elektronici nodig hebben: een opfrissing en verdieping van de basiskennis, een bron van inspiratie en een schat aan details en spitsvondigheden. Dit deel behandelt de theoretische principes en de basisschakelingen van digitale technieken: signalen, bits en binaire getallen • propositielogica en Booleaanse algebra • schakelalgebra • het vereenvoudigen van schakelingen • combinatorische en sequentiële schakelingen • parameters • halfgeleidertechnologieën • signaalwegen • geïntegreerde schakelingen • impulsen • kloksystemen • initialisatie • combinatorische basisschakelingen • latches en flipflops • registers • adresseerbare geheugens • sequentiële basisschakelingen Andere delen in deze reeks: Passieve componenten • Hard- en software • Signaalwegen • Basisschakelingen
€ 39,95
Leden: € 35,96
-

Elektor Digital Elektor Januari/Februari 2020 (PDF)
Touch-GUI voor ESP32 en Raspberry & cografische gebruikersinterface met de LittlevGL-bibliotheek “Niet zomaar een project”vraaggesprek met Gábor Kiss-Vámosi, ontwikkelaar van LittlevGL Capaci-metermet tweecijferig LED-display in dekatron-stijl Hoe... een mechanisch contact of schakelaar ontdendereneen schakelaar is open of gesloten – toch? Developer's Zonetips & trucs, vakkunstigheden en andere nuttige informatie Uitbreidbaar milieumonitorsysteempubliceert gegevens op IoT-platforms Multitasking met de ESP32Multitasking met de ESP32 taakgeoriënteerd programmeren met FreeRTOS en de Arduino IDE Interactiefcorrecties & updates || vragen & antwoorden Autoverlichting tunenlegaal, illegaal – maakt wél uit! Review Toolcraft digitaal soldeerstation Arduino Pro IDEeen eerste indruk Twee warmtebeeldcamera’s vergeleken Uit het leven gegrepende inrichting van een lab en werkplaats Monsanto MAN1 LED-displayvreemde onderdelen Theetimereen experiment met energy harvesting Eenfase 1 kW AC-motorsturingdrie bedrijfsmodi: perioderegeling, fase-afsnijding en fase-aansnijding Snel 3,5'-touchscreen voor de Raspberry Pipresteert beter voor hetzelfde geld Oost West Lab Besteen blik in het allerheiligste, waar onbevoegden geen toegang hebben... Eerste stappen met RISC-Vhet LoFive-board onder de loep LoRa-Tracker: een uitdaging voor het labproblemen en oplossingen bij de ontwikkeling van elektronica Met de vos in het IoT (2)aanmelden in het Sigfox-netwerk Alle begin......hoeft niet zo moeilijk te zijn Analoge elektronica ontwerpencase-study #1 – deel 1: MEMS-microfoon... test-een-twee-drie Wie het kleine niet eertuit de ideeënbus van Elektor In het kort: teksten voor microcontrollersspaar geheugen met compressie In de schijnwerpers: de autonome autooverzicht van de stand van de techniek Leidende start-ups en innovatoren over “Innovation 4.0” in München Lego Electronic anno 1968elektronisch speelgoed fascineert na 50 jaar nog steeds Beyond ElectronicsThe MX3D Bridge Senses the City Hexadoku
€ 9,95
-

Elektor Bundles Physical AI with Raspberry Pi (Bundle)
This bundle combines the SunFounder AI Fusion Lab Kit with the new book Physical AI with Raspberry Pi, providing a complete hands-on introduction to AI, electronics, and Python programming. Build practical projects that combine computer vision, voice interaction, sensors, motors, and large language models. The included book guides you step by step from Raspberry Pi setup and hardware control to advanced applications using OpenCV, MediaPipe, YOLO, OpenAI services, and local Ollama models. SunFounder AI Fusion Lab Kit for Raspberry Pi The SunFounder AI Fusion Lab Kit transforms a Raspberry Pi into a complete platform for learning artificial intelligence, electronics, and Python programming. It supports Raspberry Pi 5, 4B, 3B+, 3B, and Zero 2 W, as well as popular AI models and services including ChatGPT, Gemini, Grok, DeepSeek, Qwen, Doubao, and Ollama. With its camera, Pan-Tilt HAT, 10-axis sensor module, microphone, speaker, and electronic components, the kit enables users to build interactive AI projects that combine voice, vision, movement, and sensor data. It is suitable for beginners, students, makers, and anyone who wants to explore practical AI applications. Build Multimodal AI Projects Combine large language models with speech recognition, text-to-speech, camera vision, sensors, and breadboard circuits. Create projects that can listen, speak, see, react, and interact with their environment while learning how modern AI systems work. Explore AI Vision and Object Tracking Use YOLO, OpenCV, and MediaPipe to detect and track objects, colors, faces, and human movement. The motorized Pan-Tilt HAT allows the camera to follow targets automatically, demonstrating how computer vision and motion control work together. Voice AI with the Fusion HAT+ The Fusion HAT+ simplifies hardware control through a unified Python library and supports safe Raspberry Pi shutdown. Its integrated microphone and speaker make it easy to develop voice-controlled assistants and other conversational AI applications. Compatible with Raspberry Pi 5, 4B, 3B+, 3B, and Zero 2 W Supports multiple cloud-based and local AI models Includes camera, Pan-Tilt HAT, 10DOF module, microphone, and speaker Projects covering voice AI, computer vision, sensors, and electronics Guided video lessons, documentation, and sample code Book: Physical AI with Raspberry Pi Create Intelligent Vision, Voice, and Sensor Projects Using AI Fusion Lab Kit Using the Raspberry Pi and the AI Fusion Lab Kit, this book takes you step by step from the fundamentals of hardware interfacing to the development of intelligent systems capable of seeing, listening, speaking, and making decisions. Whether you are a student, educator, maker, or professional engineer, you will gain valuable experience through projects designed to build both knowledge and confidence. Beginning with system setup, GPIO programming, sensors, displays, motors, and automation techniques, the book gradually introduces more advanced topics, including speech recognition, text-to-speech synthesis, conversational AI, object recognition, and machine learning. Along the way, you will learn how to create voice-controlled devices, intelligent assistants, camera tracking systems, environmental monitoring solutions, and AI-powered embedded applications. Explore modern technologies such as OpenAI services, Ollama local large language models, OpenCV, MediaPipe, and YOLO object detection while gaining practical experience with real-world applications used in robotics, industrial automation, smart devices, and autonomous systems. You’ll discover how intelligent software can interact with sensors, cameras, motors, and displays to create systems that respond naturally to the world around them. Rather than simply following code examples, you will be encouraged to experiment, customize, and expand every project. The techniques and skills developed throughout this book provide a solid foundation for future innovation, rapid prototyping, research, and product development. If you are ready to move beyond traditional electronics and explore the future of intelligent embedded systems, this book will guide you every step of the way. This bundle contains: SunFounder AI Fusion Lab Kit for Raspberry Pi (normal price: €100) Book: Physical AI with Raspberry Pi (normal price: €45) Not included Raspberry Pi
€ 144,95€ 129,95Beste prijs
-

Elektor Juli/Augustus 2026 (PDF) NL
Elektor GREEN en GOLD leden kunnen deze uitgave hier downloaden. Nog geen lid? Klik hier om een lidmaatschap af te sluiten. MultiRF ontwikkelboardEen platform voor het evalueren van draadloze protocollen op korte en lange afstand Elektor wordt 65Baanbrekend op het gebied van elektronica sinds 1961 Persoonsdetectie via wifi op een ESP32Wanneer uw router een bewegingssensor wordt Draadloze weegschalenVier kleine weegschalen maken een grote weegschaal Walter, de compacte IoT-moduleESP32-S3 SoC, LTE-M/NB-IoT 5G-modem en GNSS-ontvanger 3- en 4-draads RTD-sensorconditioneringMet volledige afstelling en kabelcompensatie 3-in-1 2-kanaals oscilloscoop/generator/multimeterEen review van de Fnirsi 2D15P electronica Fast Forward 2026 nodigt start-ups en partners uit de industrie uit EcologgingEen modulair IoT-milieustation voor onderzoek in het veld Draadloze connectiviteit in medische toepassingenAltijd op de hoogte met Bluetooth LE AudiotronicaBromonderdrukking De efficiëntie in de landbouw verhogen met AI-modellen en sensorenDe landbouwproductiviteit verhogen OPC UA, een overzichtPlatform-onafhankelijke gegevensuitwisseling Redoxmeter Instrumentation amplifier voor fysica- en techniekexperimenten Actieve differentiële audiofiltersVoor professionele cross-overs en meer Communityperspectieven van Elektor op IoT & sensoren Telegramgestuurde interface module voor een boilerEen oplossing op basis van een ESP32 en Arduino software 2026: An AI OdysseyWat is er gebeurd met fuzzy logic? Err-lectronics Alarmsignaalinjector en bruut geweldHulpmiddelen om kabelbreuken op te sporen
€ 9,95
-
Siglent Siglent SPD4121X 4-kanaals Voeding (285 W)
The Siglent SPD4121X is a 4-channel DC Linear Programmable Power Supply equipped with a 4.3-inch TFT-LCD display, friendly human-machine interface, and excellent performance indicators. Real-time waveform display provides engineers with an informative user interface. SPD4121X offers a total output power of 285 W with a resolution of 1 mV/1 mA. The maximum voltage and current for each channel are as follows: CH1: 15 V/1.5 A CH2: 12 V/10 A CH3: 12 V/10 A CH4: 15 V/1.5 A Kenmerken Rated output power: 285 W Rated voltage: 32 V, 12 V, 30 V Up to four high-precision power supplies with independent controllable outputs, supporting CH2 and CH3 series and parallel connections Clear graphical interface with waveform and timer display modes 5-digit voltage and current display with minimum resolution of 1 mV, 1 mA Fast output response time: <50us The high current channel support remote voltage compensation sense function. The maximum compensation voltage is 0.6 V Overvoltage protection and overcurrent protection or safe and accurate operation Equipped with a 4.3-inch TFT-LCD display (480 x 272 resolution) USB and LAN standard communication USB-GPIB module is optional Excellent channel density with up to 4 channels in a 3U half rack package Internal data storage for setups and parameters Embedded Web Server with instrument communication that doesn’t require software installation Fully SCPI programming command set support as well as a LabView driver for remote control and system automation Specificaties SPD4323X SPD4121X SPD4306X Channel Output CH1: Voltage 0 to 6 V Current 0 to 3.2 ACH2: Voltage 0 to 32 V Current 0 to 3.2 ACH3: Voltage 0 to 32 V Current 0 to 3.2 ACH4: Voltage 0 to 6 V Current 0 to 3.2 A CH1: Voltage 0 to 15 V Current 0 to 1.5 ACH2: Voltage 0 to 12 V Current 0 to 10 ACH3: Voltage 0 to 12 V Current 0 to 10 ACH4: Voltage 0 to 15 V Current 0 to 1.5 A CH1: Voltage 0 to 15 V Current 0 to 1.5 ACH2: Voltage 0 to 30 V Current 0 to 6 ACH3: Voltage 0 to 30 V Current 0 to 6 ACH4: Voltage 0 to 15 V Current 0 to 1 A Resolution 1 mV, 1 mA 1 mV, 1 mA 1 mV, 1 mA Setting Accuracy Voltage: ±(0.03% of reading+10) mV, Current: ±(0.3% of reading+10) mA Voltage: ±(0.03% of reading+10) mV, Current: ±(0.3% of reading+10) mA Voltage: ±(0.03% of reading+10) mV, Current: ±(0.3% of reading+10) mA Readback Accuracy Voltage: ±(0.03% of reading+10) mV, Current: ±(0.3% of reading+10) mA Voltage: ±(0.03% of reading+10) mV, Current: ±(0.3% of reading+10) mA Voltage: ±(0.03% of reading+10) mV, Current: ±(0.3% of reading+10) mA Display 4.3" TFT-LCD 5-digit voltage and current display 4.3" TFT-LCD 5-digit voltage and current display 4.3" TFT-LCD 5-digit voltage and current display Output power 240 W 285 W 400 W Inbegrepen 1x Siglent SPD4121X Power Supply 1x Power cord (EU) 1x Output test cord (3 A) 1x USB cable 1x Quick start guide Downloads Datasheet Manual Quick start
€ 871,20
-

Siglent Siglent SPD4306X 4-kanaals Voeding (400 W)
The Siglent SPD4306X is a 4-channel DC Linear Programmable Power Supply equipped with a 4.3-inch TFT-LCD display, friendly human-machine interface, and excellent performance indicators. Real-time waveform display provides engineers with an informative user interface. SPD4306X offers a total output power of 400 W with a resolution of 1 mV/1 mA. The maximum voltage and current for each channel are as follows: CH1: 15 V/1.5 A CH2: 30 V/6 A CH3: 30 V/6 A CH4: 15 V/1 A Kenmerken Rated output power: 400 W Rated voltage: 32 V, 12 V, 30 V Up to four high-precision power supplies with independent controllable outputs, supporting CH2 and CH3 series and parallel connections Clear graphical interface with waveform and timer display modes 5-digit voltage and current display with minimum resolution of 1 mV, 1 mA Fast output response time: <50us The high current channel support remote voltage compensation sense function. The maximum compensation voltage is 0.6 V Overvoltage protection and overcurrent protection or safe and accurate operation Equipped with a 4.3-inch TFT-LCD display (480 x 272 resolution) USB and LAN standard communication USB-GPIB module is optional Excellent channel density with up to 4 channels in a 3U half rack package Internal data storage for setups and parameters Embedded Web Server with instrument communication that doesn’t require software installation Fully SCPI programming command set support as well as a LabView driver for remote control and system automation Specificaties SPD4323X SPD4121X SPD4306X Channel Output CH1: Voltage 0 to 6 V Current 0 to 3.2 ACH2: Voltage 0 to 32 V Current 0 to 3.2 ACH3: Voltage 0 to 32 V Current 0 to 3.2 ACH4: Voltage 0 to 6 V Current 0 to 3.2 A CH1: Voltage 0 to 15 V Current 0 to 1.5 ACH2: Voltage 0 to 12 V Current 0 to 10 ACH3: Voltage 0 to 12 V Current 0 to 10 ACH4: Voltage 0 to 15 V Current 0 to 1.5 A CH1: Voltage 0 to 15 V Current 0 to 1.5 ACH2: Voltage 0 to 30 V Current 0 to 6 ACH3: Voltage 0 to 30 V Current 0 to 6 ACH4: Voltage 0 to 15 V Current 0 to 1 A Resolution 1 mV, 1 mA 1 mV, 1 mA 1 mV, 1 mA Setting Accuracy Voltage: ±(0.03% of reading+10) mV, Current: ±(0.3% of reading+10) mA Voltage: ±(0.03% of reading+10) mV, Current: ±(0.3% of reading+10) mA Voltage: ±(0.03% of reading+10) mV, Current: ±(0.3% of reading+10) mA Readback Accuracy Voltage: ±(0.03% of reading+10) mV, Current: ±(0.3% of reading+10) mA Voltage: ±(0.03% of reading+10) mV, Current: ±(0.3% of reading+10) mA Voltage: ±(0.03% of reading+10) mV, Current: ±(0.3% of reading+10) mA Display 4.3" TFT-LCD 5-digit voltage and current display 4.3" TFT-LCD 5-digit voltage and current display 4.3" TFT-LCD 5-digit voltage and current display Output power 240 W 285 W 400 W Inbegrepen 1x Siglent SPD4306X Power Supply 1x Power cord (EU) 1x Output test cord (3 A) 1x USB cable 1x Quick start guide Downloads Datasheet Manual Quick start
€ 1.101,10
-
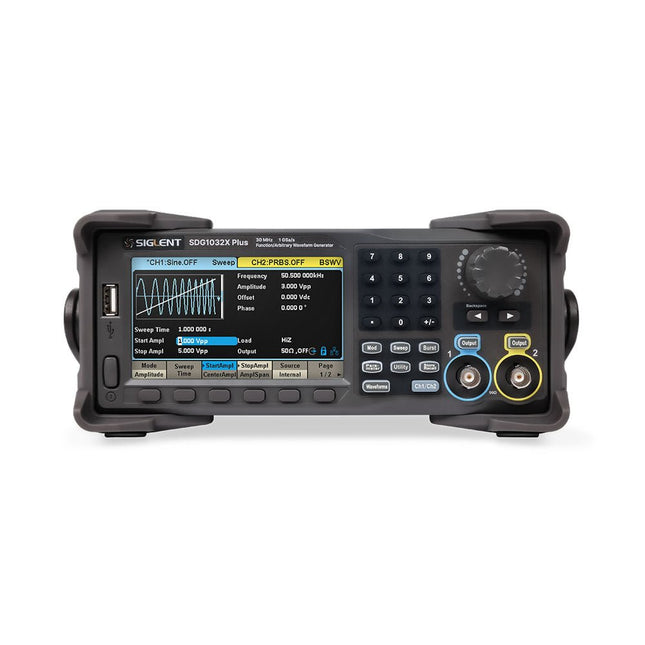
Siglent Siglent SDG1032X Plus 2-kanaals Arbitraire Golfvormgenerator (30 MHz)
De Siglent SDG1032X Plus is een krachtige dual-channel functie/willekeurige golfvormgenerator met een maximale frequentie van 30 MHz, een resolutie van 16 bits en een bemonsteringssnelheid van 1 GSa/s voor uitstekende signaalgetrouwheid. Het beschikt over TrueArb voor golfvormen met lage vervorming, EasyPulse voor jittervrije pulsen en robuuste sequentieweergave. Met een amplitude van ±10 V, een scherm van 4,3-inch en veelzijdige modulatie is dit een betrouwbare keuze voor ingenieurs en onderzoekers. Kenmerken Dual Channels: Onafhankelijke output met maximale frequentie van 30 MHz Hoge bemonsteringssnelheid: 1 GSa/s voor nauwkeurige golfvormgeneratie Hoge verticale resolutie: 16-bits resolutie voor nauwkeurige signaalreproductie TrueArb-technologie: Genereert willekeurige golfvormen met lage vervorming en hoge betrouwbaarheid EasyPulse-technologie: Produceert jittervrije blok- en pulssignalen met nauwkeurige controle over de stijg-/daltijden Willekeurige golfvormlengte: Ondersteunt tot 8 Mpts per kanaal voor complex golfvormontwerp Breed amplitudebereik: ±10 V maximale uitgangsamplitude Ingebouwde modulatiefuncties: AM, FM, PM, PWM, PSK, FSK, ASK en meer Multipulsuitgang: Maakt het meten van schakelparameters van elektrische apparatuur mogelijk PRBS-patroongeneratie: Ondersteunt tot 40 Mbps voor geavanceerde testbehoeften Sweep- en Burst-modi: Flexibele testmogelijkheden met aanpasbare parameters Sequence Playback-functie: Slaat complexe golfvormen efficiënt op en speelt deze af Frequentieteller: Meet frequenties tot 200 MHz met hoge precisie Gebruiksvriendelijk display: 4,3-inch kleuren-LCD met een duidelijke interface Ondersteuning voor afstandsbediening: Ingebouwde webserver voor bediening via een webbrowser Compact ontwerp: Draagbare en ruimtebesparende vormfactor Specificaties Bandbreedte 30 MHz Kanalen 2 Samplingsnelheid 1 GSa/s (4x interpolatie) Verticale resolutie 16 bits (per kanaal) Golfvormlengte 8 Mpts Max. amplitude ±10 V Display 4,3-inch TFT-LCD-kleurenscherm (480 x 272) Interfaces USB-host, USB-apparaat, LAN Afmetingen 260 x 107 x 296 mm Gewicht 4,35 kg Inbegrepen 1x Siglent SDG1032X Plus Arbitraire Golfvormgenerator 1x Netsnoer 1x USB-kabel 1x Garantiekaart 1x Quick Start Guide Downloads Datasheet User Manual Programming Guide Software
€ 446,49
-

Elektor Digital ARM Microcontrollers 1 (E-book)
Dit is een ideaal boek voor hobbyisten, studenten en ingenieurs die op een eenvoudige manier C en het gebruik van een mbed ARM microcontroller willen leren, rechtstreeks op internet zonder ingewikkelde software installatie. ARM mbed microcontroller NXP LPC1768 De projecten in dit boek zijn bedoeld voor beginners op het gebied van ARM microcontrollers of de programmeertaal C. Dat wil niet zeggen dat de projecten allemaal eenvoudig zijn, maar wel dat ze gemakkelijk te begrijpen zijn. We maken bijvoorbeeld gebruik van USB communicatie, een onderwerp dat door de mbed zo eenvoudig wordt gemaakt dat het geschikt is voor een beginners boek. Cloud technologie De mbed NXP LPC1768 maakt gebruik van cloud technologie, een revolutionair concept voor software ontwikkeling. Dit houdt in dat u geen software hoeft te installeren om de mbed te kunnen programmeren! Het enige dat u nodig heeft is een internet browser zoals Microsoft Internet Explorer, en een USB poort op uw PC. U kunt vanaf elke willekeurige PC waar dan ook ter wereld toegang krijgen tot uw project en er aan verder werken. Wanneer u klaar bent kunt u met een paar eenvoudige klikjes met uw muis het programma overzetten naar uw mbed hardware. Uiteraard kunt u de projecten ook downloaden en op uw eigen PC opslaan wanneer u dat liever heeft. Onderwerpen die aan de orde komen Leer het programmeren van een ARM microcontroller via cloud technologie. Geen moeilijke software installatie op uw eigen PC. Leer de programmeertaal C door leuke en interessante projecten uit te voeren. Geen ervaring of kennis noodzakelijk. Voorbeelden van projecten in dit boek: knipperlicht, tijdschakelaar, donkerschakelaar, digitale thermometer, mensen detector, USB communicatie, pratende microcontroller, fout zoeken, geluidsschakelaar, en nog veel meer - totaal 35 projecten. Voorbeelden van C onderwerpen in dit boek: variabelen, opdrachten, functies, programmaverloop, pointers (inleidend).
€ 29,95
Leden: € 26,96
-

Elektor Digital PIC Microcontollers Programmeren (E-BOOK)
Met behulp van de lessen in dit boek leert u hoe u zelf een microcontroller kunt programmeren. We maken daarbij gebruik van JAL, een gratis maar uiterst krachtige programmeertaal voor PIC microcontrollers, die in de hobbywereld erg populair is.We starten aan het absolute begin, en bouwen vandaar de kennis op. U heeft dus geen voorkennis nodig: iedereen kan met dit boek aan de slag. Wanneer u alle lessen volgt (dat wil zeggen: de oefeningen ook daadwerkelijk maakt) dan kunt u wanneer u het boek uit heeft zelf PIC microcontroller programma’s schrijven, en programma’s van anderen lezen.JAL opdrachtenU leert de functie van JAL opdrachten zoals include, pin, delay, forever loop, while loop, case, exit loop, repeat until, if then, en het gebruik van functies, procedures en timer- en poortinterrupts.JAL programma’sU laat een LED knipperen, maakt een tijdschakelaar, meet de stand van een potmeter, maakt geluiden, voorkomt contactdender en regelt de helderheid van een LED. En uiteraard leert u debuggen: hoe u in uw programma’s fouten kunt vinden en oplossen.HardwareU leert verschillende onderdelen zoals PIC microcontroller, potmeter en kristal herkennen, en hoe u een PIC microcontroller aan moet sluiten en met uw PC moet verbinden. U maakt hierbij gebruik van een steekbord zodat u de opstelling gemakkelijk kunt aanpassen om verder te experimenteren.U kunt bij dit boek de benodigde software (zoals de programmeertaal JAL) gratis downloaden. Daarnaast kunt u een hardware pakket bestellen zodat u niet op zoek hoeft te gaan naar de benodigde onderdelen. Zeker voor een beginner is dit de gemakkelijkste manier om te starten met deze unieke hobby. Kijk op de speciale supportpagina voor meer informatie over de hard- en software.
€ 29,95
Leden: € 26,96
-

Techwatch Books ASML's Architects
The story of the engineers who shaped the world's most powerful chip machines How do you transform a hopeless research and business activity into a billion-dollar machine and a world-leading company? The Dutch enterprise ASML pulled it off, and the book ASML’s Architects by renowned technology writer René Raaijmakers reveals exactly how. ASML's Architects travels back to the origins, struggles, success factors and sheer luck of a company that was barely alive at the beginning of the 80s, yet managed to become the uncontested world leader in chip lithography. Today, ASML determines the pace at which all information technology advances. The book covers the technology and the business, but the real story is in the people behind them. Throughout its pages, the interviewed engineers, scientists and managers speak frankly about their struggles, their fights and the grueling teamwork behind the scenes. Downloads Preface and Introduction The Violin Maker (Chapter 5) The Reunion (Chapter 23) A Movie for IBM (Chapter 64)
€ 59,00
Leden: € 53,10
-

The Ton Giesberts Collection (USB-stick)
Praktische projecten in analoge elektronica, audio en meer Ontdek een bijzondere verzameling van meer dan 250 elektronicaprojecten die in Elektor Magazine zijn gepubliceerd en zorgvuldig zijn geselecteerd door de gerenommeerde Elektor-labingenieur Ton Giesberts. De USB-stick brengt een grote verscheidenheid aan schakelingen, ontwerpen en praktische projectideeën samen die in de loop der jaren door talrijke Elektor-auteurs en engineers zijn ontwikkeld. Dit uitgebreide archief bestrijkt een breed scala aan elektronicatopics en vormt een waardevolle bron van kennis en inspiratie voor engineers, makers, studenten en elektronicahobbyisten. Meer dan 250 geselecteerde Elektor-projecten Zorgvuldig samengesteld door Elektor-engineer Ton Giesberts Ideaal om na te bouwen, te experimenteren en nieuwe ideeën te ontdekken Ontdek tientallen jaren Elektor-expertise in één uitgebreide projectcollectie. Highlights Q-Watt audioversterker Fortissimo-100 high-end versterker Buffer bord voor de Raspberry Pi 400 USB-naar-multiprotocol-serieelconverter DDS-functiegenerator AC/DC-vermogensmeter Charge-a-Phone Specificaties Geheugen 8 GB Connectoren 1x USB-A1x USB-C Systeemeisen Computer geschikt voor Adobe Reader vanaf versie 7 Webbrowser
€ 49,95€ 39,95Beste prijs
-

tinySA tinySA Ultra+ ZS407 Spectrumanalyzer
The tinySA Ultra+ ZS-407 is a compact, handheld spectrum analyzer and signal generator. Covering 100 kHz to 7.3 GHz in Ultra mode, it lets you visualize and analyze RF signals from HF right through many modern wireless bands – and can even spot signals up to ~12 GHz thanks to harmonic tracking. The intuitive 4-inch resistive touchscreen and rechargeable battery make it great for fieldwork, while features like a built-in signal generator, switchable bandpass filters, step attenuator, USB-PC control and auto-calibration add serious versatility. Kenmerken Screen size: 4 inch (480 x 320) Spectrum Analyzer for 0.1-900 MHz or, with Ultra mode enabled up to 7.3 GHz, level calibrated up to 7.3 GHz. Can observe signals up to 12 GHz Signal Generator with sine wave output between 0.1-900 MHz or square wave up to 6.3 GHz or RF test signal output up to 7.3 GHz when not used as Spectrum Analyzer. Switchable resolution bandpass filters from 200 Hz to 850 kHz Built-in 20 dB optional LNA Color display showing max 450 points providing gapless covering up to the full frequency range. MicroSD card slot for storing measurements, settings and screen captures. Specificaties (Spectrumanalyzer) Input frequency range from 100 kHz to 900 MHz in normal mode and up to 7.3 GHz with ULTRA mode enabled Input impedance 50 ohm when input attenuation set to 10 dB or more. Selectable manual and automatic input attenuation between 0 dB and 31 dB in 1 dB steps when LNA not active Maximum +/-5V DC input Absolute maximum input level of +6 dBm with 0 dB internal attenuation Absolute maximum short term peak input power of +20 dBm with 30 dB internal attenuation Suggested maximum input power of +0 dBm with internal attenuation in automatic mode For best measurements keep input power below -25 dBm Input Intercept Point of third order modulation products (IIP3) of +15 dBm with 0 dB internal attenuation 1 dB compression point at -1 dBm with 0 dB internal attenuation Power detector resolution of 0.5 dB and linearity versus frequency of ±2 dB below 5.3 GHz, ±5dB between 5.3 GHz and 6 GHz Minimum burst length for correct level measurement at 850 kHz RBW in zero span mode of 50 microseconds Absolute power level accuracy after power level calibration of ±2 dB Built-in optional 20 dB LNA with Noise Figure of 5 dB up to 6 GHz Lowest discernible signal without LNA at 30 MHz using a resolution bandwidth of 30 kHz of -102 dBm Lowest discernible signal with LNA at 30 MHz using a resolution bandwidth of 200 Hz of -145 dBm Frequency accuracy equal to the selected resolution bandwidth Phase noise at 30 MHz of -108 dB/Hz at 100 kHz offset and -115 dB/Hz at 1MHz offset Spur free dynamic range when using a 30 kHz resolution bandwidth of 70 dB Resolution filters with a width of 0.2, 1, 3, 10, 30, 100, 300, 600 and 850 kHz On screen resolution of 51, 101, 145, 290 or 450 measurement points. Scanning speed of over 1000 points/second using largest resolution filters. Automatic optimization of actual scanning points to ensure coverage of the whole scan range regardless of the chosen resolution bandwidth Spur suppression option for assessing if certain signals are internally generated or actually present in the input signal Headphone output for listening to the demodulated audio (AM only). Stereo connector with or without microphone, high impedance is louder, short protected Specificaties (Signaalgenerator) Sine wave output with harmonics below -40 dB of fundamental from 100 kHz to 900 MHz Output level selectable in 1 dB steps between -115 dBm and -19 dBm Above 800 MHz choice of two output modes: Cleanest signal mode: square wave, up to 6 GHz with coarse frequency steps and less accurate output level Highest accuracy mode: reduced harmonics with possibly strong spurs up to 7.3 GHz with frequency resolution equal to below 800 MHz and fine output level steps Level accuracy ±2 dB up to 800 MHz between -72 dBm and -19 dBm, less accuracy below -72 dBm, even less accuracy below -110 dBm Output frequency resolution 57.2 Hz Optional AM or FM modulation frequencies between 50 Hz and 5 kHz (AM) or 1 kHz (FM) or sweep over selectable frequency span AM modulation depth between 10% and 100% FM deviation between 1 kHz and 300 kHz Optional output level sweep over maximum the entire output level range Inbegrepen 1x tinySA Ultra+ ZS407 Spectrum Analyzer 2x SMA connection cables 1x Barrel connector 1x Antenna with SMA connector 1x USB-C cable 1x microSD card (32 GB) Downloads Wiki
€ 196,02
-

Siglent Siglent SDS2102X Plus 2-kanaals oscilloscoop (100 MHz)
De Siglent SDS2000X Plus serie oscilloscopen met digitale opslag zijn verkrijgbaar met bandbreedtes van 100 MHz, 200 MHz en 350 MHz, en hebben een maximale sample rate van 2 GSa/s, een maximale record length van 200 Mpts/ch, tot 4 analoge kanalen, en mixed-signal analysemogelijkheden tot 16 digitale kanalen. De SDS2000X Plus-serie maakt gebruik van de SPO technologie van Siglent met een maximale golfvorm capture snelheid van 120.000 wfm/s (bij normale modus, tot 500.000 wfm/s in Sequence modus), een 256-laags intensity grading weergavefunctie, plus een weergavemodus voor color temperature. Hij maakt ook gebruik van een innovatief digitaal triggersysteem met hoge gevoeligheid en lage jitter. Het triggersysteem ondersteunt meerdere krachtige triggermodi, waaronder seriële bustriggering. Functies als History Waveform Recording, Sequence Acquisition, Search en Navigate maken het mogelijk om uitgebreide golfvorm gegevens vast te leggen, op te slaan en te analyseren. Andere kenmerken van de SDS2000X Plus zijn de indrukwekkende reeks aan meet- en rekenmogelijkheden, de opties voor een 50 MHz golfvorm generator, en ook seriële decodering, mask test, bode plot en power analyse. De 10-bits acquisition modus is van nut bij toepassingen die een resolutie van meer dan 8 bits vereisen. Het grote capacitieve touchscreen van 10,1 inch ondersteunt multi-touch bewegingen, en ook is er ondersteuning voor webbediening op afstand, een muis en een extern toetsenbord, wat de bedieningsefficiëntie van de SDS2000X Plus aanzienlijk verbetert. Kenmerken 100 MHz, 200 MHz, 350 MHz (uitbreidbaar tot 500 MHz) modellen Real-time sample rate tot 2 GSa/s Record length tot 200 Mpts Seriële bustriggering en decoder, ondersteunt I²C, SPI, UART, CAN, LIN, CAN FD, FlexRay, I²S en MIL-STD-1553B Bied een 10-bits modus, verticale en horizontale zoom Capacitief touchscreen ondersteunt multi-touch bewegingen Siglent SDS2000X Plus oscilloscopen SDS2102X Plus SDS2104X Plus SDS2204X Plus SDS2354X Plus Bandbreedte 100 MHz 100 MHz 200 MHz 350 MHz Kanalen 2 4 4 4 Real-time sample rate 2 GSa/s 2 GSa/s 2 GSa/s 2 GSa/s Capture snelheid 120.000 wfm/s 120.000 wfm/s 120.000 wfm/s 120.000 wfm/s Memory depth 200 mf/ch 200 mf/ch 200 mf/ch 200 mf/ch Inbegrepen Siglent SDS2102X Plus oscilloscoop Passieve sondes Netsnoer USB kabel Handleiding Downloads Datasheet Service manual Quick guide Handleiding Firmware
€ 855,20
-
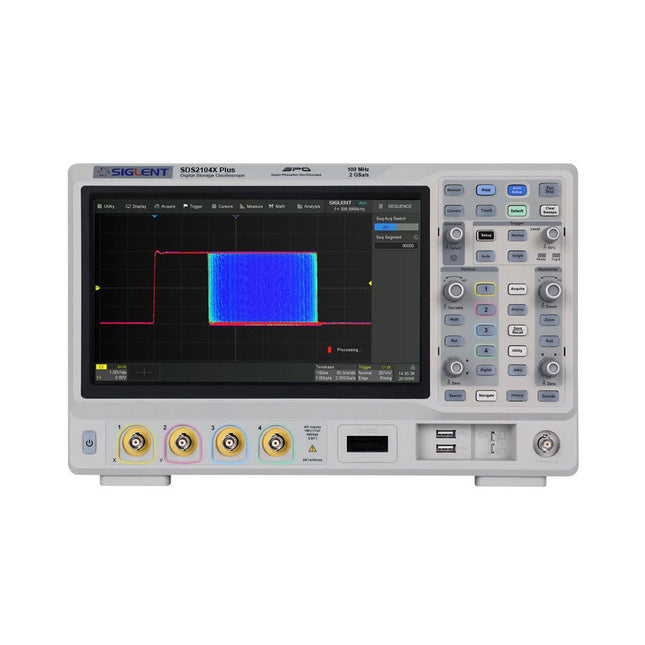
Siglent Siglent SDS2104X Plus 4-ch Oscilloscope (100 MHz)
Siglent's SDS2000X Plus series Digital Storage Oscilloscopes are available in bandwidths of 100 MHz, 200 MHz, and 350 MHz, have a maximum sample rate of 2 GSa/s, a maximum record length of 200 Mpts/ch, and up to 4 analog channels + 16 digital channels mixed-signal analysis ability. The SDS2000X Plus series employs Siglent’s SPO technology with a maximum waveform capture rate of up to 120,000 wfm/s (normal mode, up to 500,000 wfm/s in Sequence mode), 256-level intensity grading display function plus a color temperature display mode. It also employs an innovative digital trigger system with high sensitivity and low jitter. The trigger system supports multiple powerful triggering modes including serial bus triggering. History waveform recording, Sequence acquisition, Search and Navigate functions allow for extended waveform records to be captured, stored, and analyzed. An impressive array of measurement and math capabilities, options for a 50 MHz waveform generator, as well as serial decoding, mask test, bode plot, and power analysis are also features of the SDS2000X Plus. A 10-bit acquisition mode helps to satisfy applications that require more than 8-bit resolution. The large 10.1’’ capacitive touch screen supports multi-touch gestures, while the remote web control, mouse and external keyboard support greatly improve the operating efficiency of the SDS2000X Plus. Features 100 MHz, 200 MHz, 350 MHz (upgradable to 500 MHz) models Real-time sampling rate up to 2 GSa/s Record length up to 200 Mpts Serial bus triggering and decoder, supports I²C, SPI, UART, CAN, LIN, CAN FD, FlexRay, I²S and MIL-STD-1553B Provide 10 bit mode, Vertical and Horizontal Zoom Capacitive touch screen supports multi-touch gestures Siglent SDS2000X Plus Oscilloscopes SDS2102X Plus SDS2104X Plus SDS2204X Plus SDS2354X Plus Bandwidth 100 MHz 100 MHz 200 MHz 350 MHz Channels 2 4 4 4 Real-time sampling rate 2 GSa/s 2 GSa/s 2 GSa/s 2 GSa/s Capture rate 120,000 wfm/s 120,000 wfm/s 120,000 wfm/s 120,000 wfm/s Memory depth 200 Mpts/ch 200 Mpts/ch 200 Mpts/ch 200 Mpts/ch Included Siglent SDS2104X Plus Oscilloscope Passive probes Power cord USB cable Manual Downloads Datasheet Manual Quick guide User manual Firmware
€ 1.160,63
-

Siglent Siglent SSA3015X Plus Spectrum Analyzer (9 kHz 1,5 gHz)
De Siglent SSA3015X Plus spectrum analyzer is een krachtig en flexibel hulpmiddel voor RF signaal- en netwerkanalyse. Met een frequentiebereik van 1,5 GHz levert de analyzer betrouwbare automatische metingen en meerdere werkingsmodi: spectrum analyzer als basisfunctie, en optionele functies als RF-vermogensmeting, vectorsignaal-modulatieanalyse, reflectiemeting en EMI-test.Toepassingen zijn onder meer monitoring/evaluatie van zendsignalen, metingen op locatie, S-parameter meting, analoge/digitale modulatie analyse, EMI pre-compliance test, onderzoek en ontwikkeling, onderwijs, productie en onderhoud.Kenmerken Spectrum analyzer frequentiebereik van 9 kHz tot 1,5 GHz –156 dBm/Hz Displayed Average Noise Level (typ.) –99 dBc/Hz. @ 10 kHz Offset Phase Noise (1 GHz, typ.) Level Measurement Uncertainty< 1,2 dB (typ.) 1 Hz minimale Resolution Bandwidth (RBW) Voorversterker (standaard) Tracking generator (inbegrepen, gratis) Analoge en digitale signaalmodulatie-analyse modus (optioneel) Reflectie meetkit (optioneel) EMI filter en quasi-peak detector kit (optioneel) Advanced Measurement Kit (optioneel) 10,1-inch multi-touch scherm, muis en toetsenbord ondersteund Webbrowser afstandsbediening op pc en mobiele terminals, en bediening via files Specificaties SSA3015X Plus SSA3021X Plus SSA3032X Plus SSA3075X Plus Frequentiebereik 9 kHz ~ 1,5 GHz 9 kHz ~ 2,1 GHz 9 kHz ~ 3,2 GHz 9 kHz ~ 7,5 GHz Resolutie bandbreedte 1 Hz ~ 1 MHz 1 Hz ~ 1 MHz 1 Hz ~ 1 MHz 1 Hz ~ 3 MHz Phase Noise <–99 dBc/Hz <–98 dBc/Hz <–98 dBc/Hz <–98 dBc/Hz Total Amplitude Accuracy < 1,2 dB < 0,7 dB < 0,7 dB < 0,7 dB Display Average Noise Level –156 dBm/Hz –161 dBm/Hz –161 dBm/Hz –165 dBm/Hz Inbegrepen Siglent SSA3015X Plus spectrum analyzer USB kabel Netsnoer Quick Start gids Downloads Datasheet Manual Documentation Firmware
€ 1.402,39


