Elektor GREEN en GOLD leden kunnen deze uitgave hier downloaden.Nog geen lid? Klik hier om een lidmaatschap af te sluiten.
High-end uit het Elektor-lab
Fortissimo-100 high-end versterkervolledig symmetrische audio-eindtrap levert 100/190 W
Controleer de frequentie van afgestemde kringen en kristallen
Printen ontwerpentips en trucs
Solderen – nou en?moderne soldeertechnologie nader bekeken
Bluetooth-garagedeurbediening met geringe latentiemet korte BLE-berichten vanaf een smartphone
Ideale diode-controllerdiodeschakelingen met geringe vermogensdissipatie
LED-slingers met ESP32 en FreeRTOSknipperen dat het een lieve lust is
Alle begin......zenert er vrolijk op los
FM/DAB+ ontvangerhet beste van twee werelden
Uit het leven gegrepenelektronica obscura
De oorzaak van software-bugs draadloos opsporencirculaire buffer en webserver op de ESP32
Heeft Covid de innovatie gestimuleerd?innovatieve componenten en oplossingen uit 2022
Ersa i-CON TRACEhet IoT-soldeerstation voor makers
Elektor Infographics
Wat moeten we met al die computers?
Aansturing van het e-paper display van Ynvisible
InnoFaith: innovatie en nog eens innovatievraaggesprek met Walter Arkesteijn
Industriële automatiseringeenvoudige en schaalbare IoT-retrofitting
Reed-relaisvreemde onderdelen
Low-profile lineaire connectorenvereenvoudigen multisignaal-databeheer
Slim – Innovatief – KosteneffectiefGateMate FPGA’s worden ontwikkeld en geproduceerd in Duitsland
Tools voor de ontwikkeling van goedkope sensoren
Polyfusesvreemde onderdelen
Geïsoleerde analoge uitgang voor Arduino Uno
Oost West Lab Best...ontdekt de Theremin
electronica fast forward 2022 – powered by Elektorde deelnemers en het programma
Radiorichtingzoekerspoor verloren weersensoren op
Schat de interne ruis van een ICeen eenvoudige methode
Ethiek in actiepowered by WEEF
Zonder ethiek geen duurzaam ondernemenvraaggesprek met professor Stefan Heinemann
De WEEF Index 2023
Filtersoftwareontwerp-tools voor analoge filters
TV-B-Gone!...of tenminste TV tabee
Meting van de luchtkwaliteitop basis van de RP2040
elekterminal
Snelstart met Python 3voorbeeldhoofdstuk: digitale beeldbewerking en de Wand-bibliotheek
SOLARPUNKeen mooiere toekomst in het verschiet
Hexadoku
Deze bundel bevat de Red Pitaya STEMlab 125-14 PRO Gen 2 Starter Kit en het nieuwe boek "Experimenteren met Red Pitaya STEMlab Gen 2".
De Red Pitaya STEMlab 125-14 PRO Gen 2 Starter Kit is een krachtig en flexibel platform voor signaalverwerking, data-acquisitie en elektronische meettoepassingen. Deze kit is ontworpen voor ingenieurs, ontwikkelaars, onderzoekers en docenten en biedt alles wat nodig is om te beginnen met het bouwen van geavanceerde meet- en besturingssystemen.
De kern van de kit wordt gevormd door het STEMlab 125-14 PRO Gen 2-bord, een geüpgradede en ultralichte ontwikkeling. Aangedreven door de Xilinx Zynq-7010 SoC met 512 MB RAM, combineert het de programmeerbaarheid van een FPGA met de verwerkingskracht van een ARM-processor om hoogwaardige instrumentatie en aangepaste signaalverwerkingsoplossingen mogelijk te maken.
Het bord biedt een 14-bits ADC- en DAC-resolutie, een bemonsteringsfrequentie van 125 MS/s, een ingangsbereik van ±20 V en een bandbreedte tot 60 MHz. Dankzij de verbeterde ruisarme analoge front-end, USB-C-connectiviteit en het compacte ontwerp is het geschikt voor veeleisende toepassingen zoals RF-ontwikkeling, radarsystemen, fotonica-onderzoek, softwaregedefinieerde radio (SDR) en industriële automatisering.
De Starter Kit bevat alle essentiële accessoires voor onmiddellijk gebruik: een microSD-kaart met vooraf geïnstalleerd besturingssysteem, voeding, ethernetkabel voor toegang op afstand, twee 100 MHz-oscilloscoopprobes en SMA-naar-BNC-adapters voor flexibele signaalaansluitingen.
De Red Pitaya STEMlab 125-14 PRO Gen 2 Starter Kit is een uitstekend platform voor rapid prototyping, FPGA-ontwikkeling, meetinstrumentatie en geavanceerde elektronica-experimenten.
Kenmerken
14-bits ADC- en DAC-resolutie
125 MS/s samplingfrequentie
±20 V ingangsbereik
Tot 60 MHz bandbreedte
Xilinx Zynq-7010 SoC (FPGA + ARM-processor)
512 MB RAM
Ruisarme analoge front- en back-ends
Toepassingen
RF-ontwikkeling en -testen
Radar- en draadloze systemen
Software Defined Radio (SDR)
Fotonica en optisch onderzoek
Industriële automatisering en besturingssystemen
Signaalanalyse en instrumentatie
Snel prototypen van elektronische meetsystemen
Specificaties
Processor
Dual-core ARM Cortex-A9
FPGA
AMD Xilinx Zynq-7010 SoC
RAM
512 MB (4 Gb)
Opslag
microSD-kaart (tot 32 GB)
Besturingssysteem
Linux-gebaseerd Red Pitaya OS
ADC-resolutie
14-bits
DAC Resolutie
14-bits
Bandbreedte
60 MHz (DC)
Sampling rate
125 MS/s
Analoge ingangskanalen
2
Analoge uitgangskanalen
2
Ingangsspanningsbereik
±1 V (LV) / ±20 V (HV)
Ingangsimpedantie
1 MΩ / 10 pF
Uitgangsspanningsbereik
±1 V
Ethernet
1x Gigabit Ethernet (RJ45)
USB
2x USB-C 2.0 (voor voeding en console)
Digitale I/O
16x GPIO (3,3 V)
Communicatie-interfaces
I²C, SPI, UART, CAN
Voeding
5 V/3 A via USB-C
Afmetingen
106,8 x 60,0 x 17,9 mm
Inbegrepen
1x Red Pitaya STEMlab 125-14 PRO Gen 2 Board
2x 100 MHz oscilloscoopprobes
2x SMA-naar-BNC-adapters
1x microSD-kaart met voorgeïnstalleerd besturingssysteem
1x USB-C-voeding
1x Ethernetkabel
Downloads
Documentation
Schematics
Book: Experimenting with Red Pitaya STEMlab Gen 2
Met dit nieuwe boek gaat Red Pitaya verder dan een veelzijdig board. Het wordt een krachtig laboratoriuminstrument voor nauwkeurige metingen, analyse en besturing.
Van de basisprincipes van elektronische projectontwikkeling, monitoring, besturing en ontwerp tot testen: dit boek begeleidt u stap voor stap door alles wat u moet weten om het volledige potentieel van de Red Pitaya-hardware en -software te benutten.
Het boek presenteert real-time, FPGA-gebaseerde projecten die op een PC worden ontwikkeld met de Vivado-omgeving en vervolgens naar de Red Pitaya worden overgebracht voor uitvoering en testen.
U leert over verbeterde prestaties, uitgebreide I/O-mogelijkheden, verbeterde FPGA-functionaliteiten en geavanceerde connectiviteitsopties die nieuwe mogelijkheden openen voor nauwkeurige metingen, monitoring en besturing in uw embedded toepassingen.
In dit boek ontdekt u:
Een diepgaande verkenning van de Red Pitaya-architectuur en het hardwareontwerp
Elektronische experimenten met Red Pitaya voor meting en monitoring
Praktische projecten met de programmeertaal Python
Praktische richtlijnen voor FPGA-programmering met Red Pitaya
Red Pitaya FPGA-projecten met Verilog HDL in de Vivado IDE
Praktisch ontwerp van elektronische projecten inclusief meting en testen
Stapsgewijze voorbeelden die theorie en praktijk met elkaar verbinden
Of u nu uw eigen elektronische schakelingen ontwerpt, tools voor signaalanalyse ontwikkelt of real-time besturings- of monitoringssystemen creëert, dit boek biedt u de kennis en het vertrouwen om het Red Pitaya-platform volledig te leren kennen en aan te passen.
Le téléchargement intégral de ce numéro est disponible pour nos membres GOLD et GREEN sur le site Elektor Magazine !
Pas encore membre ? Cliquez ici.
programmation PIO sur le Raspberry Pi PicoNeuf instructions, de multiples possibilités
l'IA en ligne de commandeDéveloppement, compilation et validation de projets embarqués depuis le terminal
le Scrutiny DebuggerDéboguer, visualiser et tester du code C/C++ embarqué
carte breakout Sigfox (1)Développement d’une BoB radio
alimentation à faible bruit (2)Construction, assemblage et mise en œuvre pratique
générateur de signaux simple basé sur le RP2040Signaux analogiques et numériques
à la découverte du futur de la domotique avec Matter et l’IA EdgeLes dernières versions de Matter et l’essor de l’IA en périphérie de réseau (edge) donnent-ils enfin aux ingénieurs les outils nécessaires pour construire les maisons intelligentes et parfaitement intégrées promises aux utilisateurs ?
capteurs de pression différentielleLa maintenance prédictive appliquée aux systèmes CVC
la sécurité dès la conceptionPrincipes d’ingénierie pour limiter les défaillances
la sécurité des systèmes embarqués n’est plus une option
la CRA et la PQC redéfinissent les priorités de la sécurité embarquéePourquoi même les petites entreprises IoT et industrielles doivent prévoir une mise à niveau
embedded world 2026Entretien avec Benedikt Weyerer, directeur d’embedded world
prise en main du bus I3CUtilisation de matériel de ST et Microchip
le projet BLEnkyPrototypage rapide d’applications Bluetooth Low Energy
modulation de largeur d’impulsionDu thermostat tout ou rien à un signal analogique continu filtré
audiotroniqueDes circuits audio agréables à l’écoute, à réaliser soi-même
sur le vifLisez donc le manuel !
carte émetteur-récepteur audio ESP32 (4)Réglage des horloges et une option filaire
2026 : une odyssée de l’IAConséquences du vibe coding
charge CC symétriqueCharge CC symétrique, statique ou dynamique
comptage de visages avec MaixCAMUne méthode simple pour estimer la taille d’un public
Elektor GREEN en GOLD leden kunnen deze uitgave hier downloaden.
Nog geen lid? Klik hier om een lidmaatschap af te sluiten.
PIO programmeren op de Raspberry Pi PicoNegen instructies, veel mogelijkheden
AI buiten de browser brengenAI-CLI's gebruiken voor het coderen, compileren en valideren van embedded projecten
De Scrutiny DebuggerDebuggen, visualiseren en testen van code in Embedded C/C++
Sigfox breakout board (1)Een zelfgebouwde radio BoB
Low-Noise voeding (2)Constructie, montage en praktische implementatie
Eenvoudige signaalgenerator met de RP2040Analoge en digitale signalen voor ongeveer €10
De toekomst van slimme huizen verkennen met Matter en Edge AIBieden de nieuwste updates van Matter en de opkomst van Edge AI technici eindelijk de tools om de intelligente, slimme huizen te bouwen die gebruikers zijn beloofd?
Differentiële druksensorenVoorspellend onderhoud in HVAC-systemen
Security by designTechnische basisprincipes beperken storingen
Embedded security is niet langer optioneel
CRA en PQC herzien prioriteiten voor embedded securityWaarom zelfs kleine IoT- en industriële bedrijven een upgradeplan nodig hebben
embedded world 2026Een interview met Benedikt Weyerer, Executive Director embedded world
Praktijkervaring met I3CGebruik van hardware van ST en Microchip
Het BLEnky-projectSnelle prototyping voor Bluetooth Low Energy toepassingen
Pulsbreedtemodulatievan een eenvoudige aan/uit-thermostaat naar een rimpelloos DC-signaal
AudiotronicaOorstrelende elektronica voor zelfbouw
Uit het leven gegrepenRead the f...ing manual!
ESP32 audio transceiver board (Deel 4)Afstemmen van de kloksignalen en een bekabelde versie
2026: An AI OdysseyDe kater van Vibe-Coding in 2025
Symmetrische DC-belastingStatische of dynamische en symmetrische gelijkstroombelasting
Gezichten tellen met MaixCAMEen eenvoudige methode om de omvang van het publiek vast te leggen
Le téléchargement intégral de ce numéro est disponible pour nos membres GOLD et GREEN sur le site Elektor Magazine !
Pas encore membre ? Cliquez ici.
alimentation de labo à très faible bruit (1)Une source silencieuse pour les circuits sensibles
STM32 Edge AI Contest 2025 : les gagnants
les batteries aujourd’huiTechnologies et différences entre les batteries au lithium
charge électronique réglableCharge CC statique et dynamique
convertisseur abaisseur de 48 V à 5 Vune réalisation pratique
nœud de capteurs autonome v2.0Partie 2 : validation matérielle et optimisations énergétiques
varistancesDrôles de composants, la série
compteur graphique de fréquence du réseauSurveillance de la qualité du réseau
démarrer en électronique…Touche à sa fin
ferrites CMS à charge de courant de crêteplus résistantes aux pics de courant
Elektor Live! Expert Day 2025
la récupération d’énergie propulse l’IoT et l’IIoT vers une nouvelle èreLa récupération d’énergie affranchit l’IoT de la dépendance au réseau
Fnirsi DPS-150Alimentation portable compacte et convertisseur
source d’alimentation USB-C réglableTransformez votre chargeur USB-C en alimentation réglable
chargeur simple et testeur de capacitéAvec deux modules économiques « prêts à l’emploi »
détecteur de couleurs intelligent avec synthèse vocale et lecture audio basées sur l’IA
PbMonitor v2.0Présentation du système de surveillance de batteries mis à jour
un ventilateur pour la mini-plaque de refusionDes modifications astucieuses pour des résultats optimisés
sur le vifL’excès d’indulgence
projet 2.0Corrections, mises à jour et courriel des lecteurs
2026 : une odyssée de l’IAQuand les modèles commencent à orienter le matériel
picoampèremètre de précision (2)Assemblage, étalonnage et test
alimentation sans fil des appareilsavec technologie inductive
conduite autonome basée sur l’IALe Self Driving Challenge 2024 du RDW
carte son comme générateur de signauxUn PC utilisé comme émetteur de test DCF77
The Siglent SDS1204X-E is a powerful 200 MHz four-channel oscilloscope that is built on the same platform as the very popular SDS1202X-E but with several significant improvements, including two 1 GSa/s ADCs and two 14 Mpt memory modules. Waveform capture rates are up to 100,000 wfms/s in normal mode and 400,000 wfms/s in sequence mode. The SDS1000X-E scopes feature a large 7” 256-level color display with intensity grading and color temperature features.
Specificaties
Bandwidth
200 MHz
Sampling Rate (Max.)
1 GSa/s
Channels
2CH+EXT4CH
Memory Depth (Max.)
7 Mpts/CH (not interleave mode); 14 Mpts/CH (interleave mode)
Waveform Capture Rate (Max.)
100,000 wfms/s (normal mode), 400,000 wfms/s (sequence mode)
Trigger Types
Edge, Slope, Pulse width, Window, Runt, Interval, Dropout, Pattern, Video
Serial Trigger (Standard)
I2C, SPI, UART/RS232, CAN, LIN
Decode Type (Standard)
I2C, SPI, UART/RS232, CAN, LIN
16 Digital Channels (four channel series only, option)
Maximum waveform capture rate up to 1 GSa/s, Record length up to 14 Mpts/CH
USB AWG module (four channel series only, option)
One channel, 25 MHz, sample rate of 125 MHz, wave length of 16 kpts
Bode plot ( four channel series only)
Minimum start frequency of 10 Hz, minimum scan bandwith of 500 Hz, maximum scan bandwidth of 120 MHz (dependent on Oscilloscope and AWG bandwidth), 500 maximum scan frequency points
USB WIFI adapter (four channel series only, option)
802.11b/g/b, WPA-PSK, the adapter must be supplied by Siglent to ensure proper functioning
Downloads
Datasheet
Manual
Programming Guide
Le téléchargement intégral de ce numéro est disponible pour nos membres GOLD et GREEN sur le site Elektor Magazine !
Pas encore membre ? Cliquez ici.
L'architecture de processeur open-source RISC-V16 cartes et MCU à connaître
un lecteur audio avec égaliseur basé sur un FPGAMixage audio numérique avec un Arduino MKR Vidor 4000
tête laser pour l’horloge de sable basé sur Raspberry Pi PicoDessiner avec la lumière
participez au concours STM32 Edge AI
système de contrôle environnemental multi-capteurs pour les plantesMesure sans fil de l'approvisionnement en eau et de la luminosité
porte automatique contrôlée par l'IA et MaixduinoReconnaissance faciale avec une caméra
l’électronique embarquée en 2024L’IA va redéfinir l’industrie
Calcul en mémoire basé sur la charge chez EnCharge AI
des opérations d'IA avec 10 fois moins d'énergie et des coûts divisés par 20
Une carte pour le développement et l’entraînement des modèles ML d’analyse des vibrations
Elektor Mini-WheelieKit robot gyropode (robot autostabilisé)
MCUViewerMCUViewer outil de débogage open source multiplateforme
isolateur USB 2.0Isolation éléctrique pour les périphériques USB
anticipation et actionApplication pratique de la maintenance prédictive
SPoE – compatibilité électromagnétiquePaire unique avec Power-over-Ethernet à travers les yeux d'EMC
rétro-techCréer un monde nouveau avec la télévision couleur
surveillance ECGavec des modules Hexabitz et STM32CubeMonitor
la bataille pour l’IA en périphérie
HaLow atteint une distance Wifi record de 16 km à 900 MHz
première puce embarquée CHERI RISC-V et programme d'accès anticipé
la détection des incendies de forêt de troisième génération utilise des liaisons satellites
sur le vifDélices et supplices du choix
démarrer en électronique......Filtrage et contrôle de la tonalité
Kit d'horloge quasi-analogiqueNouvelle version d'un classique d'Elektor
une approche modulaire de test des capteursCarte de test de capteurs basée sur l'ESP32-S3
2025 : une odyssée de l'IAL'essor des modèles de fondation et leur impact sur l'accessibilité de l'IA
Synthétiseur MIDI autonome Raspberry Pi (1)Préparation d'une plateforme pour des expériences d’IA en périphérie
projet 2.0Corrections, mises à jour et courrier des lecteurs
Le RISC-V AI, un processeur à tout faire : CPU, GPU, DSP, FPGA
paroles de PDG : fraîcheur, silence et finesse
programmation Dual-Core avec le Raspberry Pi PicoLe monde de la programmation parallèle
Elektor GREEN en GOLD leden kunnen deze uitgave hier downloaden.
Nog geen lid? Klik hier om een lidmaatschap af te sluiten.
Het AlertAlfred AI-beveiligingssysteemmet Raspberry Pi 5 en Hailo 8L-module
AI in elektronica-ontwikkelingeen update na slechts één jaar
AI-algoritmen – een inleidingprompt: welke algoritmen implementeren AI-tools?
Single-board computers voor AI-projectenachtergrond en overzicht
Van sensordata naar machine learning-modelgebarendetectie met een versnellingsmeter en Edge Impulse
Bouw uw eigen lekkend integreer-en-vuur neuronkunstmatige intelligentie zonder software
Elektronica ontwerpen met ChatGPTdoet GPT-4o het beter?
Breng AI naar de edgemet ESP32-P4
Spraakfuncties verkennen met een Raspberry Pi Zerooverklokken geeft recht van spreken
De groeiende rol van Edge-AIeen trend die de toekomst vormgeeft
De kracht van Edge-AI ontsluiteneen gesprek met François de Rochebouët van STMicroelectronics
Een VHDL-klok gemaakt met ChatGPThoe AI de manier waarop we leren transformeert
De werkelijke impact van AISayash Kapoor over ‘Haarlemmer AI-olie’ en meer
Het laatste nieuws van BeagleBoardBeagleY-AI, BeagleV-Fire, BeagleMod, BeaglePlay en BeagleConnect Freedom
Muggen detecterenmet open datasets en Arduino Nicla Vision
AI nu en morgen:gedachten van Espressif, Arduino en SparkFun
Tijdlijn kunstmatige intelligentie
BeagleY-AIde nieuwste SBC voor AI-toepassingen
AI in beeldgedachten uit de Elektor-community
Machine vision met OpenMVmaak een frisdrankblik-detector
Een gesprek met het digitale breinChatGPT versus Gemini
“Skilling Me Softly with This Bot?”mislukt de AI-revolutie op elektronisch gebied door een gebrek aan sociale precisie?
Bouw uw eigen RISC-V-controllerEerste stappen met de NEORV32 RISC-V softcore voor goedkope FPGA’s
Het gebruik van Arduino’s seriële plotterGrafieken plotten met Arduino is gemakkelijk
CLUE van AdafruitEen slimme oplossing voor IoT-projecten
Bufferboard voor de Raspberry Pi 400Bescherm uw I/O’s
Raspberry Pi RP2040-boards in overvloed
Een handboek voor DHZ elektronische beveiliging en spionageSRAM – gebakken of diepgevroren
Onderdelen identificerenTips & trucs, vakkunstigheden en andere nuttige informatie
DHZ aanraakloze lichtschakelaar
Alle begin......gaat compenseren en transformeren
Nieuwe embedded-ontwikkelingenRust en het up-to-date houden van IoT-implementaties
Infographics
Hoe de industrie- en automobielsector zullen profiteren van 5G
Relais met bewegende spoelVreemde onderdelen
Oost West Lab BestAlles draait om de bank...
Kennismaking met neuronen in neurale netwerkenDeel 4: embedded neuronen
Magnetische levitatie “the very easy way”De derde en meest compacte versie
PLC-programmering met de Raspberry Pi en het OpenPLC-projectVisualisatie van PLC-programma’s met AdvancedHMI
Uit het leven gegrepenInpakken en wegwezen
Onder de radarMicrocontrollers die u zou moeten kennen
Draadloos monitoren en debuggenvoor Arduino, ESP32 en co.
Draagbare temperatuur- en vochtigheidsmetermet gebruiksklare modules
Lithium-accupacks reparerenSpaart geld + geeft meer kracht!
GUI's maken met PythonMeme-Generator
De drie grote vraagtekensWaarom wat wie
Hexadoku
ZELFBOUW LIPO-SUPERCHARGER KITvan prototype tot productie
ELEKTOR @ 60gedachten bij zestig jaar elektronica
SIGLENT SDM3045X TAFELMULTIMETER
DC-STROOMKLEMHall-sensor + ferrietkern + Arduino
SOLDEERSTATION 2021makkelijk om te bouwen!
KENNISMAKING MET DE PARALLAX PROPELLER 2 (DEEL 2)de ontwikkelomgeving en de code
WIFI VOOR DE LORA SWITCHgeïntegreerd in Home Assistant met ESPHome
GEEN ANGST VOOR DE CELLULAIRE MODULE!
HOUD DE TIJD BIJ MET ESP32 EN TOGGLwerken met de M5Stack
KENNISMAKING MET HET RASPBERRY PI PICO-BOARD EN DE RP2040
MICROPYTHON VOOR MICROCONTROLLERStechnieken voor kleine displays
12–200 V DC/DC-CONVERTERvoor buizenversterkers
WARMTEZOEKERde Seek Shot Pro warmtebeeldcamera
OBJECTGEORIËNTEERD PROGRAMMERENeen korte inleiding met C++
OOST WEST LAB BEST...waar Kurt Diedrich synthesizers bouwt
JAVA OP DE RASPBERRY PIdeel 1: GPIO’s
DIP-SCHAKELAARSvreemde onderdelen
INTERACTIEFcorrecties & updates || brieven van lezers
WIENS PRODUCT IS HET EIGENLIJK?recht-op-reparatie beweging laat van zich horen
UIT HET LEVEN GEGREPENhet grote blunderboek
MICRO-PROFESSORassembleertaal leren op een Z80
ALLE BEGIN......hoeft niet zo moeilijk te zijn – zelfs als het om condensatoren gaat
HEXADOKUThe Original Elektorized Sudoku
De SDRplay RSPdx-R2 is een breedbandige, volledig uitgeruste 14-bit SDR-ontvanger met één tuner die het volledige RF-spectrum van 1 kHz tot 2 GHz bestrijkt, met een spectrumbereik tot 10 MHz. Hij bevat drie antennepoorten, waarvan er twee SMA-connectoren gebruiken en werken over het volledige bereik van 1 kHz tot 2 GHz, en de derde een BNC-connector heeft die werkt tot 200 MHz.
De RSPdx-R2 is een verbeterde versie van de RSPdx met verdere ontwerpverbeteringen voor gebruik bij frequenties lager dan 2 MHz. De RSPdx-R2 is gehuisvest in een stevige stalen behuizing en biedt, naast de functionaliteit van de RSP1B, drie softwarematig selecteerbare antenne-ingangen en een externe klokingang. Hij biedt uitstekende prestaties op HF- en VHF-frequenties tot wel 2 GHz. De RSPdx-R2 ondersteunt ook een "HDR-modus" die geoptimaliseerd is voor de veeleisende radio-ontvangstomstandigheden onder de 2 MHz.
De RSPdx-R2 introduceert, in combinatie met de eigen software van SDRplay, een speciale HDR-modus (High Dynamic Range) voor ontvangst binnen geselecteerde banden onder de 2 MHz. De HDR-modus levert verbeterde intermodulatieprestaties en minder storende signalen voor die uitdagende banden.
Kenmerken
Bestrijkt alle frequenties van 1 kHz via VLF, LF, MW, HF, VHF, UHF en L-band tot 2 GHz, zonder onderbrekingen
Ontvang, bewaak en neem tot 10 MHz spectrum tegelijk op
Aanzienlijk verbeterde ruisprestaties onder 1 MHz (d.w.z. voor sommige MF, LF en lager)
Verbeterd dynamisch bereik onder 2 MHz, zowel in tunermodus als HDR-modus
HDR-modus onder 2 MHz biedt voordelen op het gebied van algemeen dynamisch bereik en selectiviteit
Softwarematig selecteerbare keuze uit 3 antennepoorten
Externe klokingang voor synchronisatiedoeleinden, of aansluiting op GPS-referentieklok voor extra frequentienauwkeurigheid
Uitstekend dynamisch bereik voor uitdagende ontvangstomstandigheden
Gratis gebruik van Windows-gebaseerde SDRuno-software (raadpleeg de website voor ondersteunde versies)
Gratis gebruik van SDRconnect SDR- en serversoftware voor Windows, MacOS en Linux (raadpleeg de website voor ondersteunde versies)
Ondersteuning voor multiplatform drivers en API's, waaronder Windows, Linux, Mac en Raspberry Pi 4/5
Sterk en groeiend softwareondersteuningsnetwerk
Gekalibreerde S-meter/RF-vermogens- en signaal-ruisverhoudingsmeting met SDRuno (inclusief datalogging naar .CSV-bestanden)
Gedocumenteerde API beschikbaar voor demodulator- of applicatieontwikkeling op meerdere platforms
Toepassingen (Amateur)
Luisteren naar kortegolfradio
Uitzending DX (AM/FM/TV)
Panadaptor
Vliegtuigen (ADS-B en ATC)
Slow Scan TV
Monitoring van multi-amateurbanden
WSPR & digitale modi
Weerfax (HF en satelliet)
Satellietmonitoring
Geostationaire omgevingssatellieten
Trunked radio
Monitoring van nutsbedrijven en hulpdiensten
Snelle en effectieve antennevergelijking
Toepassingen (Industrieel)
Spectrum Analyser
Bewaking
Draadloze microfoonbewaking
RF-meting
IoT-ontvangerketen
Signaalregistratie
RFI/EMC-detectie
Bewaking van de uitzendintegriteit
Spectrumbewaking
Vermogensmeting
Toepassingen (Educatief/Wetenschappelijk)
Onderwijs
Ontwerp van ontvangers
Radioastronomie
Passieve radar
Ionosonde
Spectrumanalysator
Ontvanger voor IoT-sensorprojecten
Antenneonderzoek
Specificaties
Frequentiebereik
1 kHz – 2 GHz
Antenne-aansluiting
SMA
Antenne-impedantie
50 ohm
Stroomverbruik (typisch)
190 mA bij >60 MHz (excl. Bias-T)120 mA bij <60 MHz (excl. Bias-T)
USB-aansluiting
USB-B
Maximaal ingangsvermogen
+0 dBm Continu+10 dBm korte duur
ADC-samplefrequenties
2-10,66 MSPS
ADC-aantal bits
14 bit 2-6,048 MSPS12 bit 6,048-8,064 MSPS10 bit 8,064-9,216 MSPS8 bit >9,216 MSPS
Bias-T
4,7 V100 mA gegarandeerd
Referentie
0,5 ppm 24 MHz TCXOFrequentiefout trimbaar tot 0,01 ppm in het veld
Bedrijfstemperatuur
−10˚C tot +60˚C
Afmetingen
113 x 94 x 35 mm
Gewicht
315 g
Downloads
Datasheet
Software
RSPdx-R2 vs RSPduo
RSPdx-R2
RSPduo
Continue dekking van 1 kHz tot 2 GHz
✓
✓
Tot 10 MHz zichtbare bandbreedte
✓
✓
14-bits ADC siliciumtechnologie plus meerdere krachtige ingangsfilters
✓
✓
Softwarematig selecteerbare AM/FM & DAB broadcast band notch filters
✓
✓
4,7 V Bias-T voor voeding van externe antenneversterker
✓
✓
Voedt de USB-kabel met een eenvoudige aansluiting type B
✓
✓
50Ω SMA-antenne-ingang(en) voor werking van 1 kHz tot 2 GHz (softwarematig instelbaar)
2
2
Extra softwarematig selecteerbare Hi-Z ingang voor werking tot 30 MHz
✓
Extra softwarematig selecteerbare 50Ω BNC-ingang voor werking tot 200 MHz
✓
Extra LF/VLF-filter voor onder 500 kHz
✓
24 MHz referentieklokingang (+ uitgang op RSPduo)
✓
✓
Dubbele tuners voor ontvangst op 2 totaal onafhankelijke 2 MHz-bereiken
✓
Dubbele tuners voor diversiteitsontvangst met SDRuno
✓
Robuuste zwartgelakte stalen behuizing
✓
✓
Algemene prestaties onder 2 MHz voor MW en LF
++
+
Meerdere gelijktijdige toepassingen
+
++
Prestaties in uitdagende fading-omstandigheden (*met gebruik van diversiteitsafstemming)
+
*++
De OWON SPS3081 ventilatorloze programmeerbare DC-voeding (120 W) levert ultrastille, uiterst nauwkeurige prestaties met een nauwkeurigheid van 10 mV/1 mA en geavanceerde warmteafvoer voor betrouwbaarheid op lange termijn. Met uitgebreide bescherming, een USB-interface met SCPI-ondersteuning voor afstandsbediening en een 2,8-inch TFT LCD-scherm, is dit de perfecte keuze voor laboratoria, elektronicatests en onderzoek.
Kenmerken
Ontwerp zonder ventilator: ultrastille werking, vermindert trillingsgeluid en minimaliseert de potentiële storingsrisico's die gepaard gaan met traditionele koelventilatoren.
Uitstekend ontwerp voor warmteafvoer: zorgt voor een gecontroleerde temperatuurstijging, waardoor langdurig gebruik onder volledige belasting mogelijk is en de levensduur van de interne componenten wordt verlengd.
Lichtgewicht en ultradun ontwerp.
Uitgangsnauwkeurigheid tot 10 mV/1 mA.
Ondersteunt het bewerken en uitvoeren van golfvormen in de lijst, met vier geheugensnelkoppelingsparameters voor snelle en gemakkelijke toegang.
Geïntegreerde beveiligingsfuncties omvatten bescherming tegen overspanning, overstroom, oververhitting en onderspanningsbeveiliging voor verbeterde veiligheid.
Ingebouwd ontladingscircuit voorkomt resterende hoogspanningsrisico's wanneer de stroom wordt uitgeschakeld.
USB-communicatie-interface met SCPI-protocolondersteuning, waardoor pc-programmering en afstandsbediening mogelijk zijn voor vereenvoudigd gebruikersbeheer.
2,8-inch TFT LCD-scherm
Specificaties
Model
SPS6051
SPS3081
Nominaal vermogen (0°C-40°C)
Spanning
0-61 V
0-31 V
Stroom
0-5,1 A
0-8,1 A
Vermogen
150 W
120 W
Belastingsregeling
Spanning
≤30 mV
Stroom
≤20 mA
Vermogensregeling
Spanning
≤30 mV
Stroom
≤20 mA
Resolutie instellen
Spanning
10 mV
Stroom
1 mA
Leesresolutie
Spanning
10 mV
Stroom
1 mA
Instelnauwkeurigheid (25°C ±5°C)
Spanning
≤0,05% ±20 mV
≤0,1% ±20 mV
Stroom
≤0,05% ±20 mA
≤0,2% ±20 mA
Leesnauwkeurigheid (25°C ±5°C)
Stroom
≤0,05% ±20 mV
≤0,1% ±20 mV
Spanning
≤0,05% ±20 mV
≤0,2% ±20 mA
Rimpeling/ruis
Spanning
≤30 mVp-p
≤30 mVp-p
Spanning
≤4 mVrms
≤5 mVrms
Stroom
≤10 mAp-p
≤30 mAp-p
Uitgangstemperatuurcoëfficiënt (0°C-40°C)
Spanning
100 ppm/°C
Stroom
200 ppm/°C
Teruglezen temperatuurcoëfficiënt
Spanning
100 ppm/°C
Stroom
200 ppm/°C
Responstijd (50-100% nominale belasting)
≤1,0 ms
Opslag
4 groepen gegevens
Werktemperatuur
0-40°C
Display
2,8-inch LCD-kleurenscherm
Interface
USB
Afmetingen (B x H x D)
82 x 142 x 226 mm
Gewicht
1,8 kg
Inbegrepen
1x OWON SPS3081 Voeding
2x Testleads
1x Netsnoer
1x Manual
Downloads
Datasheet
User Manual
Programming Manual
PC Software
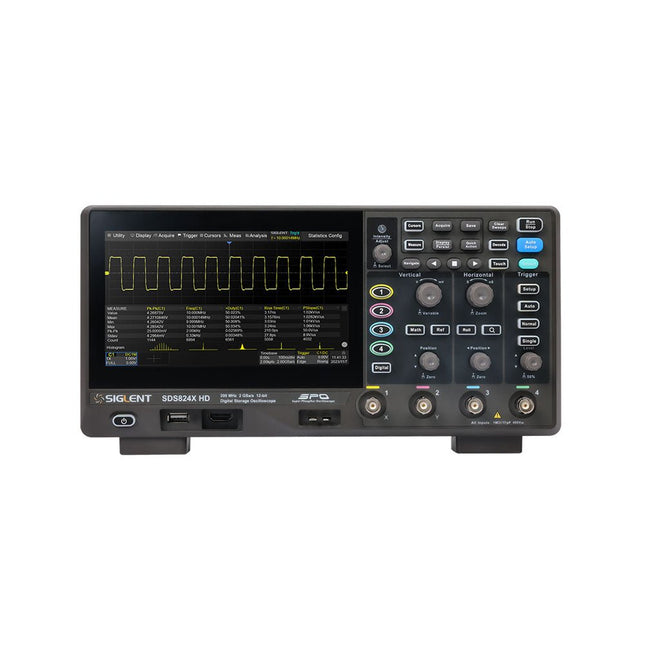
The Siglent SDS814X HD digital storage oscilloscope is based on 2 GSa/s, 12-bit Analog-Digital Converters and front ends with excellent noise floor performance. With a 100 MHz bandwidth, and a maximum record length of 50 Mpts, and the capability to analyze 4 analog channels alongside 16 digital channels, the SDS814X HD is perfectly suited for mixed signal analysis.
Kenmerken
12-bit High Resolution
12-bit Analog-Digital Convertors with sample rate up to 2 GSa/s
Front ends with 70 μVrms noise floor @ 100 MHz bandwidth
2/4 analog channels, up to 700 MHz bandwidth
SPO technology
Waveform capture rate up to 80,000 wfm/s (normal mode), and 500,000 wfm/s (sequence mode)
Supports 256-level intensity grading and color temperature display modes.
Up to 50 Mpts record length
Digital trigger system
Intelligent trigger: Edge, Slope, Pulse width, Window, Runt, Interval, Dropout, Pattern, Video (HDTV supported), Qualified, Nth edge, Delay, Setup/Hold time.
Serial bus triggering and decoder, supports protocols I²C, SPI, UART, CAN, LIN.
Segmented acquisition (Sequence) mode, dividing the maximum record length into multiple segments (up to 80,000), according to trigger conditions set by the user, with a very small dead time between segments to capture the qualifying event.
History waveform record (History) function, the maximum recorded waveform length is 80,000 frames.
Automatic measurements on 50+ parameters, supports statistics with histogram, track, trend, Gating measurement, and measurements on Math, History and Ref.
4 Math traces (2 Mpts FFT, addition, subtraction, multiplication, division, integration, differential, square root, etc.), supports formula editor.
Abundant data analysis functions such as Search, Navigate, Counter, Bode plot and Power Analysis
High Speed hardware-based Mask Test function, with Mask Editor tool for creating user-defined masks
16 digital channels (optional)
25 MHz waveform generator (optional)
7" TFT-LCD display with 1024 x 600 resolution; Capacitive touch screen supports multi-touch gestures.
Interfaces include: USB Hosts, USB Device (USBTMC), LAN (VXI-11/Telnet/Socket), Pass/Fail, Trigger Out
Built-in web server supports remote control over the LAN port using a web browser. Supports SCPI remote control commands. Supports external mouse and keyboard. Supports NTP.
Specificaties
Analog Channels
4
Bandwidth
100 MHz
Vertical resolution
12-bit
Sample rate (Max.)
One channel mode: 2 GSa/sTwo channel mode: 1 GSa/sFour channel mode: 500 MSa/s
Memory depth (Max.)
One channel mode: 50 Mpts/chTwo channel mode: 25 Mpts/chFour channel mode: 10Mpts/ch
Waveform capture rate (Max.)
Normal mode: 80,000 wfm/sSequence mode: 500,000 wfm/s
Trigger type
Edge, Slope, Pulse width, Window, Runt, Interval, Dropout, Pattern, Video, Qualified, Nth edge, Delay, Setup/Hold time, Serial
Serial trigger and decode (Standard)
I²C, SPI, UART, CAN, LIN
Measurement
50+ parameters, statistics, histogram, trend, and track supported
Math
4 traces 2 Mpts FFT, Filter, +, -, x, ÷, ∫dt, d/dt, √, Identity, Negation, Absolute, Sign, ex, 10x, ln, lg, Interpolation, MaxHold, MinHold, ERES, Average. Supports formula editor
Data analysis
Search, Navigate, History, Mask Test, Counter, Bode plot, and Power Analysis
Digital channel (optional)
16-channel; maximum sample rate up to 1 GSa/s; record length up to 10 Mpts
USB AWG module (option)
One channel, 25 MHz, sample rate of 125 MHz, wave length of 16 kpts, isolated output
I/O
2x USB 2.0 Host, USB 2.0 Device, 10/100 M LAN, Auxiliary output (TRIG OUT, PASS/FAIL), SBUS (Siglent MSO)
Probe (Standard)
Passive probe PB470 for each channel
Display
7 TFT-LCD with capacitive touch screen (1024x600)
Inbegrepen
1x Siglent SDS814X Oscilloscope
4x Passive probe (100 MHz) PP510
1x Power cord (EU)
1x USB cable
1x Certificate of calibration
1x Quick start
Downloads
Datasheet
Manual
Programming guide
Elektor GREEN en GOLD leden kunnen deze uitgave hier downloaden.
Nog geen lid? Klik hier om een lidmaatschap af te sluiten.
Wat is Edge-AI nu eigenlijk?Intelligentie naar het apparaat brengen
Maak kennis met Edge Impulse StudioEenvoudig Edge-AI modellen bouwen en implementeren
Keyword spotting met Edge ImpulseVerzamelen, trainen en implementeren
Slimme apparaten bedienen via spraakbesturing met de Nordic Thingy:53
Sleutelbegrippen voor het begrijpen van Edge AI en Machine Learning
Snelcursus: Aan de slag met Edge ImpulseLeer een ML-model te verzamelen, trainen en implementeren met de Arduino Nano 33 BLE Sense
Een nieuw hoofdstuk voor ArduinoVan hobbyboard tot Edge computing-krachtpatser
Aan de slag met objectdetectie op edge-apparaten
Detectie van defecten op printplatenComputer Vision met de Raspberry Pi
AI op maat maken voor de kleinste apparaten
Optimalisatie van het energieverbruik in batterijgevoede Edge-AI apparaten
AI ToasterWanneer Edge-AI en ontbijt samenkomen
Thundercomm Rubik Pi 3Raspberry Pi ervaring in combinatie met Edge AI
Leiderschap, Embedded ML en de Edge-revolutie
Vision language models voor EdgeModel-cascadering voor betere betrouwbaarheid
Maak kennis met Edge ImpulseVragen van de Elektor-community
Projectupdate #5: Energiemeter op basis van ESP32Edge-AI gebruiken voor herkenning van huishoudelijke verbruikers
Bewegingsherkenning met anomalie-detectieEen uitgebreide training
Slim ventilatiesysteem: integratie van geluids- en omgevingsgegevensEen machine learning toepassing met dubbele MCU voor geautomatiseerde bediening van ramen en lamellen
Spraakbesturing voor oordopjes en headsets
Edge-AI: de volgende generatie apparaten mogelijk maken
Elektor GREEN en GOLD leden kunnen deze uitgave hier downloaden.
Nog geen lid? Klik hier om een lidmaatschap af te sluiten.
De open-source processorarchitectuur RISC-V16 boards en MCU's die je moet kennen
Een FPGA-gebaseerde audiospeler met equalizer (1)Digitaal audio mixen met een Arduino MKR Vidor 4000
Laserkop voor pico-gebaseerde zandklokTekenen met licht
Doe mee aan de STM32 Edge AI Contest
Een multi-sensor plantenmonitor-systeemdraadloze meting van watertoevoer en lichtomstandigheden
Maixduino AI-gestuurde automatische portiergezichtsdetectie met een camera
Embedded Electronics 2024AI gaat de industrie opnieuw vormgeven
Lading-gebaseerde in-Memory computing bij EnCharge AI
AI-Inferentie met 10 Keer Lager Energieverbruik en 20 Keer Lagere Kosten
Click board ondersteunt het ontwikkelen en trainen van ML-modellen voor trillingsanalyse
De Elektor Mini-WheelieEen kit voor een zelfbalancerende robot
MCU, ik zie jeMCUViewer: open-source multiplatform debugging-tool
USB 2.0-isolatorelektrisch geïsoleerde USB-aansluiting
Voorkomen is betervoorspellend onderhoud in de praktijk
SPoE – Elektromagnetische compatibiliteitSingle pair met Power-over-Ethernet door de ogen van EMC
Retro techEen nieuwe wereld met kleurentelevisie
ECG-monitorimplementatie met Hexabitz-modules en een STM32CubeMonitor
De strijd om AI aan de edge
Met HaLow Wi-Fi is een record afstand bereikt van 16 km op 900 MHz
Eerste CHERI RISC-V Embedded Chip en Early Access programma
Derde generatie bosbranddetectie maakt gebruik van satellietverbindingen
Uit het leven gegrepenkeuzestress
Alle begin......filtert verder en regelt tonen
Quasi-analoog uurwerkwedergeboorte van een Elektor-klassieker
Een modulaire sensortesterSensor-evaluatieboard met ESP32-S3
2025: Een AI-OdysseeDe opkomst van foundation modellen en hun rol in het democratiseren van AI
Raspberry Pi standalone MIDI-synthesizer (1)voorbereiding van een platform voor enkele edge-AI-experimenten
Err-lectronicsCorrecties, updates en brieven van lezers
Universele AI RISC-V processor doet ze allemaal - CPU, GPU, DSP, FPGA
Interview met de CEO: Ventiva's dunne en coole technologie
Dual-core programmeren met een Raspberry Pi Picoduik in de wereld van parallel programmeren
310 Schakelingen – alweer het elfde boek uit de bekende „driehonderd“-reeks. De 310 schakelingen, tips en ideeën in dit boek vormen een (bijna) onuitputtelijke schatkamer op alle terreinen die de elektronica rijk is: audio en video, hobby en modelbouw, hoogfrequenttechniek, huis en tuin, meten en testen, microprocessor, PC-hardware en -software, voedingen en acculaders plus al dat andere dat niet zo gemakkelijk in een van deze categorieën kan worden ondergebracht. 310 Schakelingen – bevat veel complete oplossingen of in elk geval de aanzet daartoe. En de 310 beschreven schakelingen vormen in elk geval een bron van inspiratie voor nieuwe eigen ontwikkelingen! 310 Schakelingen – samengesteld uit de Halfgeleidergidsen van 2006, 2007 en 2008. De Halfgeleidergids is het jaarlijkse dubbeldikke juli/augustus-zomernummer van het maandblad Elektor. 310 Schakelingen – een must voor iedereen die creatief met elektronica bezig is, beroepsmatig of als hobby. 310 Schakelingen – met dit jaar een speciaal aan robots en robotica gewijde sectie.
De werking van veruit de meeste moderne elektronische apparaten is niet slechts op één enkel principe gebaseerd. Vaak staat een of andere computer (doorgaans een microcontroller) centraal. Uit deze fundamentele opzet – een computer die is ingebed in een bepaalde toepassingsschakeling – is de algemene benaming Embedded Systems voortgekomen. De meeste van deze systemen moeten vanuit het niets worden ontwikkeld, en daarbij komt het op elk detail aan. Vindingrijkheid en veelzijdigheid zijn dan een vereiste. De problemen die opgelost moeten worden, vormen niet zelden een ware uitdaging en betreffen niet alleen de analoge en digitale elektronica maar ook de systeemarchitectuur, programmering en programma-organisatie. De delen van deze reeks zijn geschreven voor iedereen – leerling, student of beginnend elektronicus – die zich terdege wil bekwamen in de professionele hardware- en systeemontwikkeling. En ze richten zich tot de allround-elektronicus die geen tijd heeft om specialist op een van de vele deelgebieden te worden maar die weet dat hij met standaard huis-, tuin- en keukenoplossingen niet ver komt. Ze bieden wat studenten en professionele elektronici nodig hebben: een opfrissing en verdieping van de basiskennis, een bron van inspiratie en een schat aan details en spitsvondigheden. Dit deel behandelt de passieve componenten: vaste weerstanden • instelbare weerstanden • NTC- en PTC-weerstanden • spanningsafhankelijke weerstanden • condensatoren • spoelen • transformatoren • contactelementen Andere delen in deze reeks: Digitale technieken • Hard- en software • Signaalwegen • Basisschakelingen
Eerste stappen met een ESP32-C3 en het IoTWiFi-knop en -relais
IoT Cloud à la Arduino
Arduino-shield met dubbele Geiger-Müller buisuiterst gevoelige en zeer zuinige stralingssensor
CO2-wachterluchtkwaliteit bewaken – doe het zelf!
MonkMakes Air Quality Kit voor de Raspberry Pimeet temperatuur en eCO2
Alle begin......verwelkomt de diode
Tips & trucs voor het testen van componentenzonder kostbare apparatuur
Reduceer het stroomverbruik van uw mollenverjagerATtiny13 in plaats van 555
Lichtschakelaar DeLuxuiterst nauwkeurig lichtgestuurd schakelen
Uitdagingen bij het op de markt brengen van IoT-oplossingenzorgen over veiligheid, schaalbaarheid en de concurrentie
Elektor Infographics
Toch beter bedraadTips voor het ontwikkelen van een 1 Gbit/s interface in de industriële omgeving
Edge Impulse FOMOreal-time objectdetectie voor MCU’s
Lopende-golfbuisVreemde onderdelen, de serie
Smalband-Internet of Thingsstandaarden, dekking, overeenkomsten en modules
Dragino LPS8 indoor-gatewayLoRaWAN-gateway snel geïnstalleerd
Ontdek ATtiny-microcontrollers met behulp van C en assemblervoorbeeldhoofdstuk: ATtiny I/O-poorten
Project 2.0correcties, updates en brieven van lezers
LoRa GPS-tracker updateontvang en toon de locatie met een Raspberry Pi
Schakelingen simuleren met TINA Design Suite & TINACloudvoorbeeldhoofdstuk: sinusoscillatoren
Uit het leven gegrepenlopendebandwerk
Het WinUI grafische framework voor Windows-appseen kleine demo-applicatie
GUI's maken met Python's Werelds slechtste GUI
Off-grid PV-systeemelektrische energie onafhankelijk van het net
De 10-jaar-smartphonestel uw verwachtingen bij
Hexadoku
Le téléchargement intégral de ce numéro est disponible pour nos membres GOLD et GREEN sur le site Elektor Magazine !
Pas encore membre ? Cliquez ici.
mise à jour du PbMonitor v2.0Surveillance de batterie avec un circuit analogique améliorée
mesure de la latence audioUn outil autonome pour évaluer les erreurs et la latence de la transmission audio
onde carrée vs. diagramme de BodeVérification des performances d’un appareil audio
embedded world 2026
coder intelligemment avec l’IAL’IA dans le développement logiciel pour les électroniciens
analyseur audio QA403Une précision accessible pour les professionnels et les amateurs d’audio
EasyGimbalAutonomous Camera Tracking with AI, Stepper and Servo Motors
carte breakout Sigfox (2)Envoi de messages
protection de circuitsContrôle des surtensions avec des diodes TVS
tests de batteriesDes approches innovantes à l’aube d’une nouvelle ère diagnostique
audiotroniqueUn premier préampli
CANopenTermExplorer les réseaux CAN avec un outil open source
stabilisation des amplificateurs opérationnelsstabilisation-des-amplificateurs-operationnels
projet 2.0Corrections, mises à jour et courrier des lecteurs
conditionnement du signalAstuces pour adapter des plages de tension
adaptateur TDR pour oscilloscopeLongueur, court-circuit, désadaptation : tester les câbles par réflectométrie !
sur le vifLED It Be
oscillateur de haut-parleur et testeur de résonanceUn projet expérimental dédié aux haut-parleurs
perspectives de la communauté Elektor sur le test et la mesure
carte émetteur-récepteur audio ESP32 (5)Traitement audio et contrôle à distance
2026 : une odyssée de l’IAL’IA a un problème de contexte
solutions de stockage par batterie pour installation solaire sur balconPetites batteries, grand impact
The Weller WT 1013 soldering station set includes the WT 1 supply unit, the WP 80 soldering iron and the WSR 201 safety rest. It is stackable and thus creates more space in the workplace. With an integrated usage sensor, the soldering tool switches off automatically.
Specifications
Channels
1
Voltage
230 V
Power
95 W
Display
Backlit LCD
Temperature range
50 °C - 450 °C
Temperature stability
±2 °C
Temperature accuracy
±9 °C
Fuse
0.5 A
Equipotential bonding
on
WT compatible
on
ESD-safe
on
Power cable
EMEA
Dimensions
149 x 138 x 101 mm
Weight (approx.)
1.9 kg
De UNI-T UPO1202CS is een goedkope multifunctionele 2-kanaals digitale fosforoscilloscoop met 200 MHz bandbreedte en een sampling rate van 1 GSa/s. Hij kan op brede schaal worden gebruikt bij elektronisch en elektrotechnisch ontwerp, foutopsporing, onderwijs en industrieel design.In de UPO1000CS serie wordt gebruik gemaakt van parallelle digitale signaal verwerkingstechnologie, die de data processing snelheid en de golfvorm capture rate aanzienlijk verbetert. De originele Ultra Fosfor technologie kan het cumulatieve effect van het geteste signaal weergeven door meerlagig na te gloeien. Vergeleken met traditionele oscilloscopen met digitale opslag kan de persistence van digitale fosforoscilloscopen de driedimensionale golfvorm van amplitude, tijd en signaalsterkte weergeven. Fast Acquire technologie kan abnormale signalen zoals video, jitter, ruis en runt signalen nauwkeurig vastleggen.Specificaties
UPO1102CS
UPO1202CS
Bandbreedte
100 MHz
200 MHz
Analoge kanalen
2
2
Sampling rate
1 GSa/s
1 GSa/s
Storage capaciteit
56 Mpts per kanaal
56 Mpts per kanaal
Stijgtijd
?3.5ns
?1.8ns
Capture rate
500.000 wfms/s
500.000 wfms/s
Golfvorm opslag
100.000 frames
100.000 frames
Kenmerken
7' WVGA (800 x 480) TFT LCD
Ultra Phosphor super fluorescerend weergave effect, tot 256 grijsniveaus
Ondersteunt RS232, I²C, SPI, CAN en LIN trigger
Innovative RS232, I²C, SPI, CAN en LIN hardware decodering
Verticale schaal: 1 mV/div-20 V/div
Lage background noise: <100 ?Vrms
Verbeterde FFT-functie met 1 M punten. Ondersteunt frequentie-instelling, watervaldiagram, detectie-instelling en metingen met markers enz
36 soorten golfvorm patronen kunnen automatisch worden gemeten
Ruim scala aan triggerfuncties (edge, pulse width, video, slope, runt, overshoot, delay, timeout, duration, setup and hold, Nth edge and pattern trigger)
Multi-Scopes ondersteunt dual-channel onafhankelijke trigger fluorescentieweergave
Meerkanaals onafhankelijke 7-bits hardware frequentieteller
DVM ondersteunt tweekanaals onafhankelijke AC en DC true RMS meting
Rekenkundige functies op de golfvorm (FFT, +, -, ×, ÷, digitale filtering, logische bewerkingen en geavanceerde bewerkingen)
Diverse interfaces: USB Host, USB Device, LAN, EXT Trig, AUX Out (Trig Out, Pass/Fail)
Ondersteuning van SCPI, Standard Commands for Programmable Instruments
Support voor WEB-toegang en controle
Downloads
Datasheet
Programmeer manual
Gebruikershandleiding
Quick Start Guide
Software
The Siglent SPD4323X is a 4-channel DC Linear Programmable Power Supply equipped with a 4.3-inch TFT-LCD display, friendly human-machine interface, and excellent performance indicators. Real-time waveform display provides engineers with an informative user interface.
SPD4323X offers a total output power of 240 W with a resolution of 1 mV/1 mA. The maximum voltage and current for each channel are as follows:
CH1: 6 V/3.2 A
CH2: 32 V/3.2 A
CH3: 32 V/3.2 A
CH4: 6 V/3.2 A
Kenmerken
Rated output power: 240 W
Rated voltage: 32 V, 12 V, 30 V
Up to four high-precision power supplies with independent controllable outputs, supporting CH2 and CH3 series and parallel connections
Clear graphical interface with waveform and timer display modes
5-digit voltage and current display with minimum resolution of 1 mV, 1 mA
Fast output response time: <50us
The high current channel support remote voltage compensation sense function. The maximum compensation voltage is 0.6 V
Overvoltage protection and overcurrent protection or safe and accurate operation
Equipped with a 4.3-inch TFT-LCD display (480 x 272 resolution)
USB and LAN standard communication
USB-GPIB module is optional
Excellent channel density with up to 4 channels in a 3U half rack package
Internal data storage for setups and parameters
Embedded Web Server with instrument communication that doesn’t require software installation
Fully SCPI programming command set support as well as a LabView driver for remote control and system automation
Specificaties
SPD4323X
SPD4121X
SPD4306X
Channel Output
CH1: Voltage 0 to 6 V Current 0 to 3.2 ACH2: Voltage 0 to 32 V Current 0 to 3.2 ACH3: Voltage 0 to 32 V Current 0 to 3.2 ACH4: Voltage 0 to 6 V Current 0 to 3.2 A
CH1: Voltage 0 to 15 V Current 0 to 1.5 ACH2: Voltage 0 to 12 V Current 0 to 10 ACH3: Voltage 0 to 12 V Current 0 to 10 ACH4: Voltage 0 to 15 V Current 0 to 1.5 A
CH1: Voltage 0 to 15 V Current 0 to 1.5 ACH2: Voltage 0 to 30 V Current 0 to 6 ACH3: Voltage 0 to 30 V Current 0 to 6 ACH4: Voltage 0 to 15 V Current 0 to 1 A
Resolution
1 mV, 1 mA
1 mV, 1 mA
1 mV, 1 mA
Setting Accuracy
Voltage: ±(0.03% of reading+10) mV, Current: ±(0.3% of reading+10) mA
Voltage: ±(0.03% of reading+10) mV, Current: ±(0.3% of reading+10) mA
Voltage: ±(0.03% of reading+10) mV, Current: ±(0.3% of reading+10) mA
Readback Accuracy
Voltage: ±(0.03% of reading+10) mV, Current: ±(0.3% of reading+10) mA
Voltage: ±(0.03% of reading+10) mV, Current: ±(0.3% of reading+10) mA
Voltage: ±(0.03% of reading+10) mV, Current: ±(0.3% of reading+10) mA
Display
4.3" TFT-LCD 5-digit voltage and current display
4.3" TFT-LCD 5-digit voltage and current display
4.3" TFT-LCD 5-digit voltage and current display
Output power
240 W
285 W
400 W
Inbegrepen
1x Siglent SPD4323X Power Supply
1x Power cord (EU)
1x Output test cord (3 A)
1x USB cable
1x Quick start guide
Downloads
Datasheet
Manual
Quick start
Lichtgevende dioden in theorie en praktijk
Door verbetering van de lichtopbrengst en goedkopere productiemethoden is het toepassingsgebied van de LED uitgebreid van optische indicator tot energiezuinige lichtbron. Deze tweede Elektor LED Special biedt niet alleen theoretische informatie, maar laat ook zien hoe en waar LED’s tegenwoordig toegepast worden. Bovendien bevat deze uitgave enkele beproefde elektronische schakelingen voor zelfbouw, zodat elke (aspirant)elektronicus zelf met LED’s aan de slag kan gaan.
Een greep uit de inhoud
Theorie & Toepassingen
UV-vermogenslichtbron met lichtgevende dioden
Waterzuivering met UV-LED’s
Cool Down: koeling van LED’s in de praktijk
Aansturing van hoogvermogen-LED-verlichtingssystemen
Ombouw: referentie-ontwerp voor hanglampen
Multicolour-driver voor vermogens-LED’s
Zelfbouwprojecten
Optische meettechnieken voor lichtgevende dioden
Vallende ster: een meteoor van LED’s
LED-interface met 64 uitgangen
50 maal 'elektronica van vroeger'. In het januarinummer 2005 van het elektronica-maandblad Elektor zag de rubriek 'Retrotronica' voor het eerst het licht. Onder supervisie van Elektor-redacteur Jan Buiting wordt sindsdien elke maand een stukje 'elektronica van vroeger' opgerakeld. Tegenwoordig worden de meeste elektronische schakelingen opgebouwd rond een microcontroller die het 'denkwerk' voor zijn rekening neemt. Nog niet zo heel lang geleden echter bestonden die dingen nog niet (of waren ze onbetaalbaar); niettemin slaagden de ontwerpers van toen er (naar huidige maatstaven) verbijsterend goed in om uiterst betrouwbaar en nauwkeurig werkende schakelingen en apparatuur te bouwen. Veel apparaten blijken, na jaren op een stoffige zolder of in een vochtige kelder te hebben gestaan, na een schoonmaakactie nog perfect te functioneren -- er is dus geen reden om de 'elektronica van vroeger' met een meewarige blik te bekijken; integendeel: het zijn vaak wondertjes van vernuft en vakmanschap! In dit boek hebben we 50 bijdragen uit de rubriek 'Retrotronica' voor u gebundeld - een must voor iedereen die geïnteresseerd is in 'oude' elektronica of in de geschiedenis van het maandblad Elektor (destijds Elektuur), aangezien enkele 'klassieke' Elektuur-schakelingen prominent aan bod komen!