RF circuit design is now more important than ever as we find ourselves in an increasingly wireless world. Radio is the backbone of today’s wireless industry with protocols such as Bluetooth, Wi-Fi, WiMax, and ZigBee. Most, if not all, mobile devices have an RF component and this book tells the reader how to design and integrate that component in a very practical fashion. This book has been updated to include today's integrated circuit (IC) and system-level design issues as well as keeping its classic ‘wire lead’ material.
Design Concepts and Tools Include
The Basics: Wires, Resistors, Capacitors, Inductors
Resonant Circuits: Resonance, Insertion Loss
Filter Design: High-pass, Bandpass, Band-rejection
Impedance Matching: The L Network, Smith Charts, Software Design Tools
Transistors: Materials, Y Parameters, S Parameters
Small Signal RF Amplifier: Transistor Biasing, Y Parameters, S Parameters
RF Power Amplifiers: Automatic Shutdown Circuitry, Broadband Transformers, Practical Winding Hints
RF Front-End: Architectures, Software-Defined Radios, ADC’s Effects
RF Design Tools: Languages, Flow, Modeling
This comprehensive book on audio power amplifier design will appeal to members of the professional audio engineering community as well as the student and enthusiast.
Designing Audio Power Amplifiers begins with power amplifier design basics that a novice can understand and moves all the way through to in-depth design techniques for very sophisticated audiophiles and professional audio power amplifiers.
This book is the single best source of knowledge for anyone who wishes to design audio power amplifiers. It also provides a detailed introduction to nearly all aspects of analog circuit design, making it an effective educational text.
Develop and hone your audio amplifier design skills with in-depth coverage of these and other topics:
Basic and advanced audio power amplifier design
Low-noise amplifier design
Static and dynamic crossover distortion demystified
Understanding negative feedback and the controversy surrounding it
Advanced NFB compensation techniques, including TPC and TMC
Sophisticated DC servo design
MOSFET power amplifiers and error correction
Audio measurements and instrumentation
Overlooked sources of distortion
SPICE simulation for audio amplifiers, including a tutorial on LTspice
SPICE transistor modeling, including the VDMOS model for power MOSFETs
Thermal design and the use of ThermalTrak transistors
Four chapters on class D amplifiers, including measurement techniques
Professional power amplifiers
Switch-mode power supplies (SMPS)
Getting Started with Python
This fully updated guide shows how to create inventive programs and fun games on your powerful Raspberry Pi--with no programming experience required.
Programming the Raspberry Pi, Third Edition addresses physical changes and new setup procedures as well as OS updates to the current version 4. You will discover how to configure hardware and software, write Python scripts, create user-friendly GUIs, and control external electronics. Step-by-step projects include a digital clock prototype and a fully functioning Raspberry Pi robot.
Configure your Raspberry Pi and explore its features
Start writing and debugging Python programs
Use strings, lists, functions, and dictionaries
Work with modules, classes, and methods
Apply object-oriented development methods
Create user-friendly games using Pygame
Build intuitive user interfaces with guizero
Interface with hardware using the gpiozero library
Attach external electronics through the GPIO port
Add powerful Web features to your projects
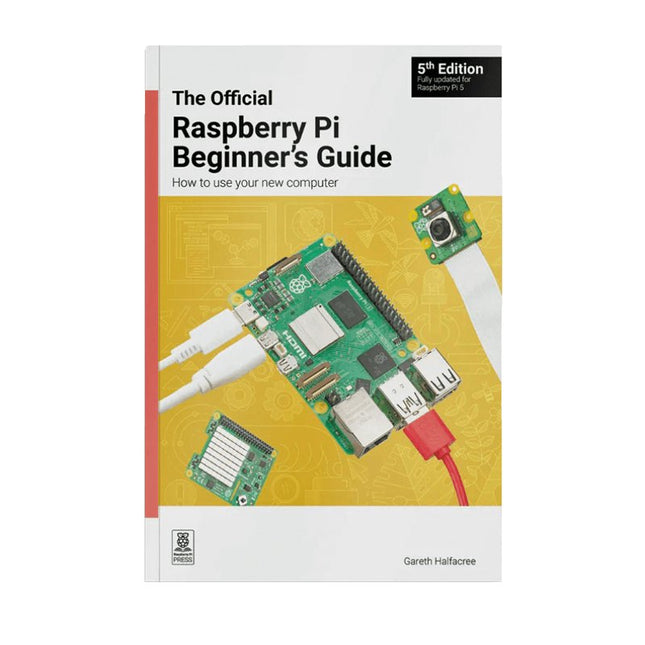
Fully updated for Raspberry Pi 5
Raspberry Pi is a small, clever, British-built computer that's packed with potential. Made using a desktop-class, energy-efficient processor, Raspberry Pi is designed to help you learn coding, discover how computers work, and build your own amazing things. This book was written to show you just how easy it is to get started.
Learn how to:
Set up your Raspberry Pi, install its operating system, and start using this fully functional computer.
Start coding projects, with step-by-step guides using the Scratch 3, Python, and MicroPython programming languages.
Experiment with connecting electronic components, and have fun creating amazing projects.
New in the 5th edition:
Updated for the latest Raspberry Pi computers: Raspberry Pi 5 and Raspberry Pi Zero 2 W.
Covers the latest Raspberry Pi OS.
Includes a new chapter on the Raspberry Pi Pico.
Downloads
GitHub
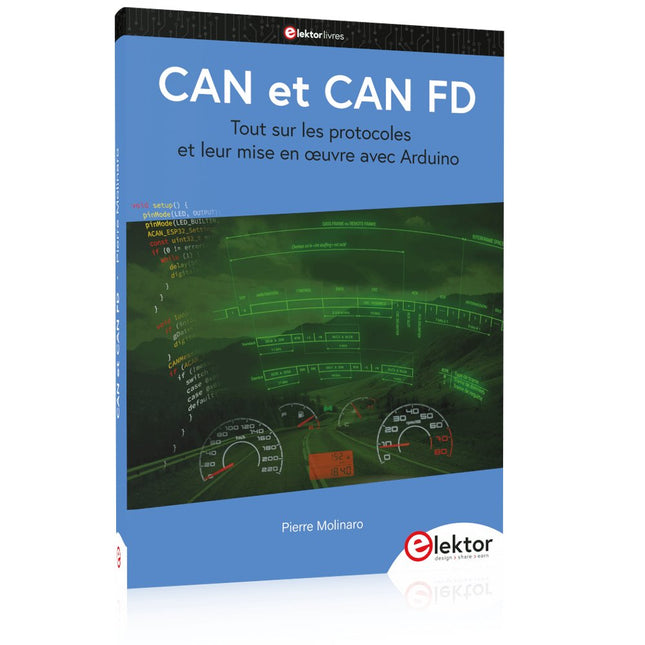
Tout sur les protocoles et leur mise en œuvre avec Arduino
Initialement destiné aux véhicules routiers, le réseau CAN (« Controller Area Network ») et son successeur le réseau CAN FD (« Flexible Data ») ont vu leurs champs d’application s’élargir à de nouveaux domaines. L’industrie propose de nombreux modules microcontrôleurs dotés d’une interface CAN et/ou CAN FD. L’environnement de développement Arduino a démocratisé la programmation de ces modules et il existe des bibliothèques qui implémentent un pilote CAN et/ou un pilote CAN FD.
La première partie dresse un rapide historique des réseaux CAN et CAN FD et expose la problématique des lignes de transmission en abordant succinctement leur théorie et présentant des résultats de simulation Spice.
La deuxième partie est consacrée au réseau CAN, en détaillant successivement la fonction logique du réseau, les transcepteurs, les contrôleurs, la topologie la plus classique (le bus) et d’autres moins courantes, les répéteurs et les passerelles. Les aspects particuliers du protocole, tels que le bit stuffing, l’arbitrage, les trames d’erreur, la détection des erreurs sont exposés. La discussion de la fiabilité du protocole est illustrée par des exemples mettant en évidence ses faiblesses.
La troisième partie présente le protocole CAN FD, ses deux variantes CAN FD ISO et CAN FD non ISO, leurs fiabilités, leurs faiblesses, mises en évidence par des exemples. Différents transcepteurs et contrôleurs CAN FD sont décrits.
La quatrième partie est dédiée aux applications : comment utiliser les services d’un pilote, concevoir une messagerie, utiliser un analyseur logique. Deux exemples d’application terminent cette partie.
Ce livre s’adresse aux amateurs et aux ingénieurs non spécialistes pour comprendre les possibilités qu’offre un réseau CAN et comment on le met en œuvre. Un enseignant trouvera des informations pour approfondir ses connaissances et pour concevoir des travaux pratiques. Une connaissance des microcontrôleurs, de leur programmation, de l’électronique numérique aidera à la lecture des schémas. La connaissance du langage C++ et du langage de simulation électronique Spice facilitera la compréhension des programmes qui sont décrits dans le livre. Tous les codes source sont disponibles sur le dépôt GitHub de l’auteur.
Téléchargements
GitHub
Il n'existe que quelques séries de 50 projets passionnés pour initier la programmation JAL et maîtriser les microcontrôleurs PIC. La simple LED clignotante à la vision artificielle, l'alarme laser à la souris USB taquine, l'indicateur de niveau capacitif et le gradateur de lumière, ces projets s'appuient sur des consignes et des distrayants. Il est nécessaire d'étudier les techniques de base utilisées pour communiquer la commande d'un relais, et les caractéristiques des signaux utilisés par différents capteurs (constitués par l'exemple d'un codeur rotatif), la communication par bus I²C, SPI, RS232, USB , affiches de 7 segments et avec le bus CAN. On y apprend à pratiquer la commande de largeur d'impulsion, la conversion analogique-numérique et inversement, le traitement des interruptions, et bien des astuces.
L'auteur doit être enthousiaste et désireux de progresser dans son appréciation.
Abordez-le comme une récréatif et pédagogique : assemblez et utilisez les projets proposés. Les explications claires, les schémas et les photographies servent à révéler une activité enrichissante et captivante.
Considérez la conception, le style et les détails du projet. A l'aide de microcontrôleurs et de l'utilisation de compositions et de projets, l'exploitation des techniques est pleinement expliquée. Avec l'augmentation de l'apprentissage après la spécification, l'auteur continue avec les contrôles : le 16f877A, le 18f4455, et le18f4685. N'hésitez pas à nous contacter pour plus d'informations sur le projet et à utiliser l'adaptateur pour garantir une bonne utilisation. Vous apprendrez d'ailleurs comment transposer vos programmes d'un microcontrôleur à Utre. La procédure de transfert du programme du microcontrôleur via le programmateur Wisp648 est la procédure de test finale.
C'est aussi un guide de référence, comprenant des sources d'informations : une explication de la durée de la programmation des JAL et de l'utilisation des bibliothèques d'extension. Les outils de programmation (environnement de développement JALedit/XWisp, bibliothèques JAL, programmes décrits) sont téléchargeables gratuitement (voir ci-dessous). L'index permet de retrouver rapidement un projet et donc les principales commandes dans le contexte. En tant qu'expert, vous êtes le guide principal !
Build Trust and Convert Buyers with Technical Content
Research shows that this analytical, skeptical buyer conducts a great deal of independent research before engaging with vendors. Companies that share expertise through high-quality content on a consistent basis are not only seen as trusted resources, they also spend less per lead and achieve greater pipeline efficiency.
Content Marketing, Engineered guides you through the key steps in creating content to inform, educate, and help your technical buyers on their journey to purchase and beyond. By the time you reach the last page, you’ll be familiar with the entire end-to-end content marketing process, from planning and writing to publishing, promoting, and measuring the performance of your content.
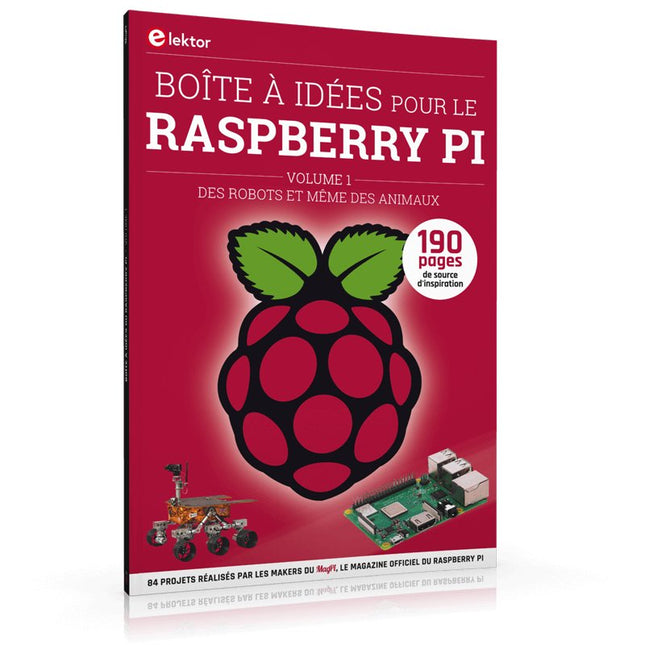
Lancé en mars 2012, plus les 30 millions d'exemples nanométriques du Raspberry Pi exposés. Il s’agit d’une contribution à la révolution des technologies de l’information et d’un grand stimulant pour le développement du monde de l’électronique. Le succès de la « tarte à la framboise » (traduction littérale de Raspberry Pie) est le résultat de l'industrie micro-électronique de transformation des produits.
Eben Upton, son créateur, âme à l'origine, les acheteurs étaient presque tous des makers , adultes en général. Cependant la plupart d'entre eux étaient également des ingénieurs professionnels. Rapidité, les gens sont responsables de leurs activités personnelles lors de l'utilisation du Raspberry Pi avec une plateforme informatique stable, et ils sont également adoptés pour leur métier.
La Fondation Raspberry Pi édite un magazine édité par la communauté Raspberry Pi : le MagPi (en anglais). Le magazine aborde les passions selon la nature du numérique nano-ordonné et global. Il contient des bancs d'essai de nouveaux produits, de nombreux tutoriels et un grand nombre de projets. Les membres de la communauté Raspberry Pi participent à leur expérience.
La maison d'édition Elektor s'associe à la Fondation Raspberry Pi pour la publication dans le magazine français MagPi. Il est conçu pour assembler 84 projets publics du MagPi en développant l'utilisation du Raspberry Pi et son inspiration.
Grâce à la taille fine et aux possibilités du Raspberry Pi, les créateurs du monde sont fiers des idées des plus folles.
Partez en voyage dans un monde où est faisable !
Le Raspberry Pi à toutes les sauces pour ?
s'inspirateur des projets réalisés par les membres de la communauté
dénicher des utilisations inouïes
découvrir des accessoires et technologies diverses
entrer dans une communauté intégrée et active de Raspberry Pi
A Practical Guide to AI, Python, and Hardware Projects
Welcome to your BeagleY-AI journey! This compact, powerful, and affordable single-board computer is perfect for developers and hobbyists. With its dedicated 4 TOPS AI co-processor and a 1.4 GHz Quad-core Cortex-A53 CPU, the BeagleY-AI is equipped to handle both AI applications and real-time I/O tasks. Powered by the Texas Instruments AM67A processor, it offers DSPs, a 3D graphics unit, and video accelerators.
Inside this handbook, you‘ll find over 50 hands-on projects that cover a wide range of topics—from basic circuits with LEDs and sensors to an AI-driven project. Each project is written in Python 3 and includes detailed explanations and full program listings to guide you. Whether you‘re a beginner or more advanced, you can follow these projects as they are or modify them to fit your own creative ideas.
Here’s a glimpse of some exciting projects included in this handbook:
Morse Code Exerciser with LED or BuzzerType a message and watch it come to life as an LED or buzzer translates your text into Morse code.
Ultrasonic Distance MeasurementUse an ultrasonic sensor to measure distances and display the result in real time.
Environmental Data Display & VisualizationCollect temperature, pressure, and humidity readings from the BME280 sensor, and display or plot them on a graphical interface.
SPI – Voltmeter with ADCLearn how to measure voltage using an external ADC and display the results on your BeagleY-AI.
GPS Coordinates DisplayTrack your location with a GPS module and view geographic coordinates on your screen.
BeagleY-AI and Raspberry Pi 4 CommunicationDiscover how to make your BeagleY-AI and Raspberry Pi communicate over a serial link and exchange data.
AI-Driven Object Detection with TensorFlow LiteSet up and run an object detection model using TensorFlow Lite on the BeagleY-AI platform, with complete hardware and software details provided.
Build your own AI microcontroller applications from scratch
The MAX78000FTHR from Maxim Integrated is a small development board based on the MAX78000 MCU. The main usage of this board is in artificial intelligence applications (AI) which generally require large amounts of processing power and memory. It marries an Arm Cortex-M4 processor with a floating-point unit (FPU), convolutional neural network (CNN) accelerator, and RISC-V core into a single device. It is designed for ultra-low power consumption, making it ideal for many portable AI-based applications.
This book is project-based and aims to teach the basic features of the MAX78000FTHR. It demonstrates how it can be used in various classical and AI-based projects. Each project is described in detail and complete program listings are provided. Readers should be able to use the projects as they are, or modify them to suit their applications. This book covers the following features of the MAX78000FTHR microcontroller development board:
Onboard LEDs and buttons
External LEDs and buttons
Using analog-to-digital converters
I²C projects
SPI projects
UART projects
External interrupts and timer interrupts
Using the onboard microphone
Using the onboard camera
Convolutional Neural Network
STmicroelectronics’ wireless IoT & wearable sensor development kit
‘SensorTile.box’ is a portable multi-sensor circuit board housed in a plastic box and developed by STMicroelectronics. It is equipped with a high-performance 32-bit ARM Cortex-M4 processor with DSP and FPU, and various sensor modules, such as accelerometer, gyroscope, temperature sensor, humidity sensor, atmospheric pressure sensor, microphone, and so on. SensorTile.box is ready to use with wireless IoT and Bluetooth connectivity that can easily be used with an iOS or Android compatible smartphone, regardless of the level of expertise of the users. SensorTile.box is shipped with a long-life battery and all the user has to do is connect the battery to the circuit to start using the box.
The SensorTile.box can be operated in three modes: Basic mode, Expert mode, and Pro mode. Basic mode is the easiest way of using the box since it is pre-loaded with demo apps and all the user has to do is choose the required apps and display or plot the measured data on a smartphone using an app called STE BLE Sensor. In Expert mode users can develop simple apps using a graphical wizard provided with the STE BLE Sensor. Pro mode is the most complex mode allowing users to develop programs and upload them to the SensorTile.box.
This book is an introduction to the SensorTile.box and includes the following:
Brief specifications of the SensorTile.box; description of how to install the STE BLE Sensor app on an iOS or Android compatible smartphone required to communicate with the box.
Operation of the SensorTile.box in Basic mode is described in detail by going through all of the pre-loaded demo apps, explaining how to run these apps through a smartphone.
An introduction to the Expert mode with many example apps developed and explained in detail enabling users to develop their own apps in this mode. Again, the STE BLE Sensor app is used on the smartphone to communicate with the SensorTile.box and to run the developed apps.
The book then describes in detail how to upload the sensor data to the cloud. This is an important topic since it allows the sensor measurements to be accessed from anywhere with an Internet connection, at any time.
Finally, Pro mode is described in detail where more experienced people can use the SensorTile.box to develop, debug, and test their own apps using the STM32 open development environment (STM32 ODE). The Chapter explains how to upload the developed firmware to the SensorTile.box using several methods. Additionally, the installation and use of the Unicleo-GUI package is described with reference to the SensorTile.box. This PC software package enables all of the SensorTile.box sensor measurements to be displayed or plotted in real time on the PC.
Un support de cours réputé et adopté par de nombreux enseignants, avec 60 pages d'exercices corrigés
Reconnu et utilisé par les enseignants de nombreuses écoles et IUT, complété d'exercices accompagnés de leurs corrigés, cet ouvrage original et érudit est une référence sur tous les fondamentaux de la programmation: choix d'une structure de données, paramétrage, modularité, orientation objet en héritage, conception d'interface, multithreading et gestion d'événements, protocoles de communication et gestion réseau, bases de données jusqu'à la désormais indispensable norme Unicode (le format UTF-8). On verra notamment la réalisation avec Python 3 d'une application web interactive et autonome, intégrant une base de données SQLite. Cette nouvelle édition traite de la possibilité de produire des documents imprimables (PDF) de grande qualité en exploitant les ressources combinées de Python 2 et Python 3.
À qui s'adresse ce livre?
Aux étudiants en BTS et IUT Informatique et à leurs enseignants
À tous les autodidactes férus de programmation qui veulent découvrir le langage Python
Entièrement mise à jour pour le Raspberry Pi 5
Raspberry Pi 5 est un petit ordinateur intelligent, de construction britannique qui regorge de potentiel. Fabriqué à l'aide d'un processeur économe en énergie, le Raspberry Pi est conçu pour vous aider à apprendre le codage, découvrir comment fonctionne un ordinateur et construire vos propres projets uniques et incroyables. Ce guide est conçu pour vous montrer à quel point il est facile de démarrer.
Apprendre à :
Configurez votre Raspberry Pi, installez son système d'exploitation, et commencez à utiliser cet ordinateur entièrement fonctionnel.
Commencez à coder des projets, avec des guides étape par étape utilisant les langages de programmation Scratch 3, Python et MicroPython.
Expérimentez en connectant des composants électroniques, et amusez-vous à créer des projets incroyables.
Nouveauté de la 5ème édition :
Mise à jour pour les derniers ordinateurs Raspberry Pi : Raspberry Pi 5 et Raspberry Pi Zèro 2 W.
Couvre le dernier système d'exploitation Raspberry Pi.
Comprend un nouveau chapitre sur le Raspberry Pi Pico !
Téléchargements
GitHub
Learn the basics of designing and making things with Inventables' software (Easel) and 3D carving machines (X-Carve and Carvey)
This book was written for people who have never carved before. It teaches the basics of designing and making things with Inventables' software (Easel) and 3D carving machines (X-Carve and Carvey). It showcases five step-by-step projects you can build yourself as a beginner, including an inspiration tile, kitchen cutting board, custom block stamp, fidget spinner, and balsa wood glider. The book also features a gallery of aspirational projects, like an electric guitar and a box joint toolbox, to show what else is possible through 3D carving. The design files and instructions for these more complex projects can be found on the Inventables website.
Projects Included
Participate in the world's largest mosaic tile wall
Build a glider to your own specifications
Create your own inlay cutting boards
Carve a fidget spinner toy
Craft wooden 3D stamps you can use to create your own greeting cards
Add the power of HDR photography, Full HD video, and AI image recognition to your Raspberry Pi projects with Camera Modules. Give intelligence and depth to your creations, making your projects smarter and more responsive.
Plus, the new AI Kit supercharges your Raspberry Pi Camera Module with image recognition, enabling it to act and react to the world around it.
This book is your step-by-step guide to adding a Camera Module to your Raspberry Pi board. You’ll master still images, capture video clips as digital files, and control the camera with shell commands and Python code. Discover the numerous modes and effects available, and use the camera in a variety of exciting projects across 18 packed chapters:
Capturing photos and videos.
Control the camera with precision.
Add artificial intelligence with the AI Kit.
Time-lapse photography
Build a bird box camera.
…and much more!
Exploitez tout le potentiel de votre nano-ordinateur
L'objectif de ce livre est de fournir au lecteur débutant des bases solides pour explorer les ressources offertes par le Raspberry Pi tant du point de vue du système d'exploitation que du développement en Python. Les modèles Raspberry Pi 4 et Raspberry Pi 400 sont traités dans cet ouvrage. Aucun prérequis en Linux ou en électronique n'est nécessaire. Les programmes développés étant largement commentés, une première approche du langage Python est souhaitable, mais pas indispensable.
Après une présentation physique des deux modèles de Raspberry Pi, vous serez guidé pour installer rapidement le système d'exploitation de votre choix sur une carte micro SD et rendre votre Raspberry Pi opérationnel. L'utilisation de Raspberry Pi Imager est expliquée en détail. La présentation du nouveau bureau graphique de Raspberry Pi OS est suivie de l'utilisation de Linux en ligne de commande. Les principales commandes nécessaires à l'exploitation d'un Raspberry Pi sous GNU/Linux sont abordées. La description du GPIO précède une présentation technique des composants utilisés dans le livre (carte Breadboard, résistance, bouton poussoir, LED, LED RGB, LED adressable, servomoteur, codeur rotatif, carte d'acquisition analogique). Chaque composant est ensuite mis en ?uvre à l'aide de scripts Python et de la bibliothèque gpiozero.
Des projets concrets à réaliser permettent au lecteur d'utiliser ce matériel en suivant un cahier des charges. La construction d'une station météo est l'occasion d'utiliser un anémomètre, une girouette, un pluviomètre ainsi que différents capteurs (température, humidité, pression). La transmission des données via Sigfox ou LoRa sera évoquée ainsi que le partage de ces données dans un réseau météorologique. Les mesures relevées par la station météo sont, dans un premier temps, affichées en mode texte puis envoyées à une base de données InfluxDB avant d'être affichées sous forme de courbes dans le programme Chronograf.
Télechargements
Des fichiers complémentaires
Webographie
Projects Using Arduino IDE and the LVGL Graphics Library
The ESP32 is probably one of the most popular microcontrollers used by many people, including students, hobbyists, and professional engineers. Its low cost, coupled with rich features makes it a popular device to use in many projects. Recently, a board called the ESP32 Cheap Yellow Display (CYD for short) is available from its manufacturers. The board includes a standard ESP32 microcontroller together with a 320x240 pixel TFT display. Additionally, the board provides several connectors for interfaces such as GPIO, serial port (TX/RX), power and Ground. The inclusion of a TFT display is a real advantage as it enables users to design complex graphics-based projects without resorting to an external LCD or graphics displays.
The book describes the basic hardware of the ESP32 CYD board and provides details of its on-board connectors. Many basic, simple, and intermediate-level projects are given in the book based on the ESP32 CYD, using the highly popular Arduino IDE 2.0 integrated development environment. The use of both the basic graphics functions and the use of the popular LVGL graphics library are discussed in the book and projects are given that use both types of approaches.
All the projects given in the book have been tested and are working. The block diagram, circuit diagram, and the complete program listings and program descriptions of all the projects are given with explanations. Readers can use the LVGL graphics library to design highly popular eye-catching full-color graphics projects using widgets such as buttons, labels, calendars, keypads, keyboards, message boxes, spinboxes, sliders, charts, tables, menus, bars, switches, drop-down lists, animations, and many more widgets.