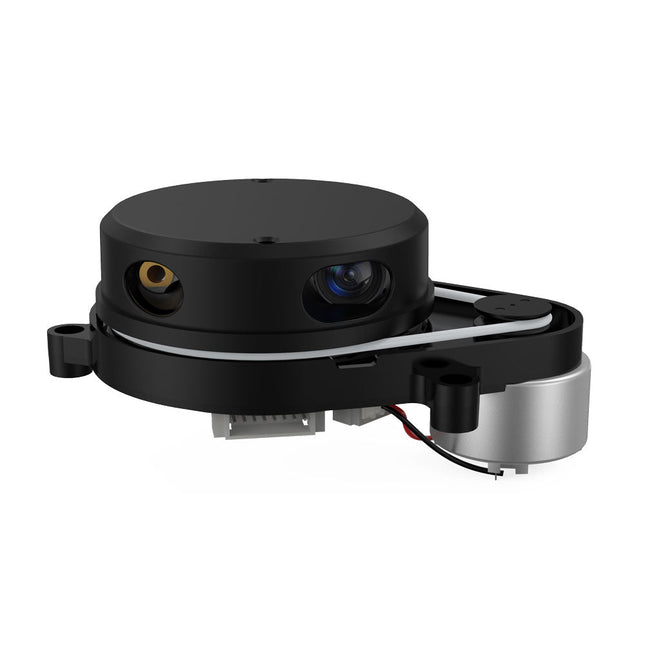
YDLIDAR TG30 is a 360 degrees 2D LiDAR. Based on the principle of ToF, it is equipped with related optics, electricity, and algorithm design to achieve high-frequency and high-precision distance measurement. The mechanical structure rotates 360 degrees to continuously obtain the angle information and output the point cloud data of the scanning environment while ranging.Features
IP65 protection level
360 degrees omnidirectional scanning and 5-12 Hz frequency
Ranging frequency up to 20 kHz
High accuracy, stable performance
Strong resistance to ambient light interference
Class I eye safety
Specifications
Range Frequency
20000 Hz
Scan Frequency
5-12 Hz
Range Distance
0.05-30 m
Scan Angle
360°
Angle resolution
0.09°-0.22°
Size ?
75.8 x 34.7 mm
Applications
Robot navigation and obstacle avoidance
Industrial automation
Regional security
Smart transportation
Environmental scanning and 3D reconstruction
Digital multimedia interaction
Robot ROS teaching and research
Downloads
Datasheet
User manual
Development manual
YDLIDAR T-mini Pro is een 360-graden 2D LiDAR die werkt volgens het Time of Flight (ToF) principe. De optiek, elektronica en firmware zijn geoptimaliseerd om nauwkeurig laserafstandmetingen te doen. Tijdens het meten draait de laserstraal rond om zodoende rondom informatie te verzamelen wat het mogelijk maakt een 360 graden beeld van de omgeving te vormen in de vorm van een puntenwolk.
Features
Gebruikt het beproefde ToF meetprincipe en kan door de compacte afmetingen probleemloos geïntegreerd worden in een systeem en geeft daarmee een robot een nauwkeurig en stabiel 360° tweedimensionaal beeld van de omgeving.
6-12 Hz adaptieve scanfrequentie, de snelheid kan onafhankelijk aangepast worden aan de eisen. De mechanische constructie draait 360°, en levert continu informatie over hoeken en afstanden in alle richtingen. De uitvoer is een 2D puntenwolk.
Een compacte behuizing en laag energieverbruik maken het mogelijk compacte toepassingen te bouwen die in breed toepasbaar zijn.
De borstelloze gelijkstroommotor werkt efficiënt en kent een verwachte levensduur van meer dan 10,000 uur.
Specificaties
Meetbereid: 0.02-12 m
Meetfrequentie: 4000 Hz
Hoeknauwkeurigheid: 0.54 graden
Scan frequentie: 6-12 Hz
Scan hoek: 360 graden
Interface: UART (serieel)
Toepassingen
Robot navigatie en het vermijden van obstakels
ROS Robot onderwijs en onderzoek
Bewaking
Omgevingsdetectie en 3D reconstructie
Navigatie vermijden van obstakels van service robots en robot stofzuigers
Downloads
Datasheet
User Manual
Development Manual
SDK
Tool
ROS
De YDLIDAR X4PRO is een 360 graden tweedimensionale afstandsmeter. Inspelend op het principe van triangulatie is hij uitgerust met de benodigde optica, elektronica en algoritmes om hoogfrequente en zeer nauwkeurige afstandsmetingen te doen. Het mechanische deel roteert 360 graden om zo continu de variërende hoekinformatie en de puntenwolkgegevens van de gescande omgeving te kunnen genereren.Kenmerken
360 graden omnidirectioneel scannen met afstandsmeting
Kleine meetfout in de afstand, stabiele prestaties en hoge nauwkeurigheid
Groot bereik qua afstand
Hoge ongevoeligheid voor interferentie door omgevingslicht
Laag stroomverbruik, klein formaat en lange levensduur
Laservermogen voldoet aan klasse I laser veiligheidsnormen
Instelbare motorsnelheid, scanfrequentie is 6 ~ 12 Hz
High-speed afstandmeting, frequentie tot 5 kHz
Toepassingen
Robotnavigatie en het vermijden van obstakels
Robot ROS-onderwijs en onderzoek
Regionale beveiliging
Scannen van de omgeving en 3D-reconstructie
Navigatie en obstakelvermijding bij een robotstofzuiger/ROS-Learning robot
Specificaties
Range frequentie
5000 Hz
Scan frequentie
6 ~ 12 Hz
Range afstand
0,12 ~ 10 m
Scanhoek
360°
Hoekresolutie
0,43 ~ 0,85°
Afmetingen
110,6 x 71,1 x 52,3 mm
Downloads
Datasheet
Gebruikershandleiding
Development Manual
SDK
Tool
ROS
De Ynvisible Segment E-Paper Displays zijn dun & flexibel, zonlicht leesbaar, zeer eenvoudig te bedienen, en dat ze de meest energie-efficiënte display technologie op de markt voor de meeste toepassingen. Ga vandaag nog aan de slag! Evalueer de ultra-low-power, dunne en flexibele Segment E-Paper Displays. De kit bevat display-ontwerpen en bevat zowel een handmatige display-driver als een display-driver met I²C-interface. Display parameters White Reflectance 40% Contrastverhouding (Yb/Yd) 1:3 Afhankelijkheid van de hoek Nee, lambertiaan Dikte 300 µm Grafische opmaak Segmenten Afmetingen segmenten 1-100 mm Responstijd 100-1000 ms Power parameters Aandrijfspanning 1,5 V Aandrijfmethode Directe aandrijving Energieverbruik 1 mJ/cm^2 Pulsenergie 0,25 mJ/cm^2 Beeldbehoud zonder stroom 1-5 minuten Bedrijfsomstandigheden -20°C - +60°C Activeringen/cycli 1.000.000 Inbegrepen
Onzichtbare Segment Displays (Gesegmenteerde e-paper displays met verschillende lay-outs, vormen en symbolen, geschikt voor testen en evaluatie.) 3 eencijferig display 1 dubbelcijferig display 5 displays met één segment/icoon 4 voortgangsbalken (7-segment en 3-segment)
Handmatige display-klikker (handmatige display-controller voor aan/uit-bediening)
Display-driver en softwarebibliotheek (Speciale display-driver met I²C-communicatie-interface. Compatibel met Arduino en andere gebruiksvriendelijke ontwikkelborden)
Flexibele display-adapter (Voor gemakkelijke aansluiting van flexibele displays op een plastic ondergrond op harde elektronica (zoals ontwikkelborden), met behulp van een FFC/FPC-connector.) Downloads Datasheet Gids & instructies
Deze draagbare passieve HF/VHF loop antenne is ontworpen voor ontvangers met een laag ruisgetal. Hij werkt ook met de RTL-SDR in directe samplingmodus indien u RTL AGC inschakelt. Signalen kunnen worden versterkt door gebruik te maken van een externe goedkope HF-versterker, of eventueel onze breedband LNA.
Specificaties
HF draagbare & flexibele loop antenne
Dekt de HF-frequenties (10 kHz tot 30 MHz)
Bruikbaar op FM/VHF tot 300 MHz als gevouwen dipool
Maximaal vermogen 250 mW
Passief ontwerp
Geen tuning nodig
Low-loss breedband balun met 0,28 dB verlies typical
Aansluiting: SMA male aan het einde van de voedingslijn
Inbegrepen
1x YouLoop T-vormige low-loss breedband balun
1x Coax omvormer connector
2x semi-rigide RG402 coax met SMA male connectoren – aftakkingen (1 m)
1x semi-rigide RG402 coax met SMA male connectoren – transmissie (2 m)
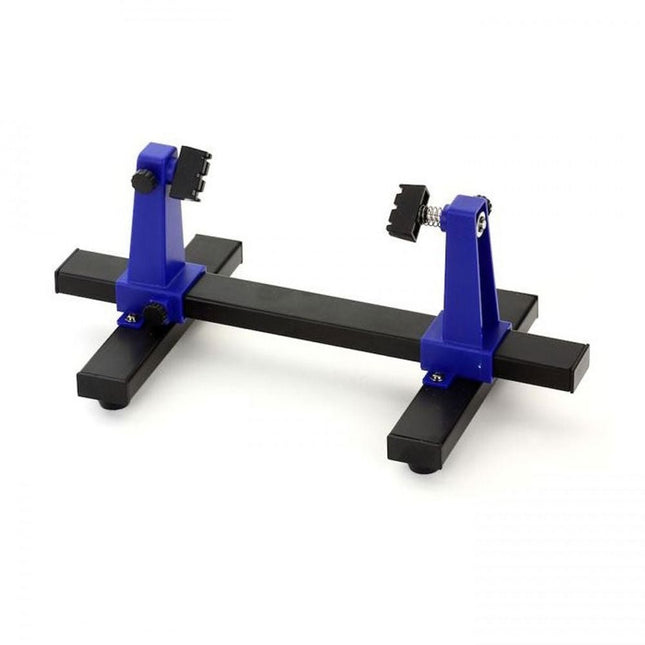
This adjustable circuit board holder is ideal for clamping PCB for soldering, desoldering or rework.
Kenmerken
2 adjustable grips on a retractable stand to accommodate various board sizes.
The adjustable clamps allow the PCB to rotate 360 degrees and stay set in any position.
The base of this rigid metal stand features four rubber feet to ensure stability.
Specificaties
Product size
30 x 16.5 x 12.5 cm
Max. holding size
20 x 14 cm
Weight
450 g
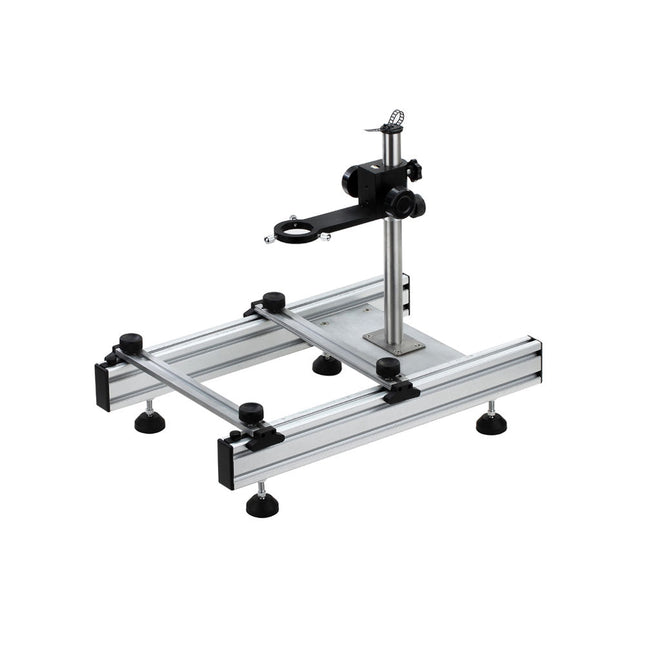
Dit multifunctionele gereedschap biedt een uitstekende allroundoplossing, ideaal voor het vasthouden van grote printplaten, desoldeerwerkzaamheden, etc.
Kenmerken
De armen van het reparatiestation kunnen gemakkelijk omhoog en omlaag bewegen, wat de bediening vergemakkelijkt.
De verstelbare onderdelen zijn gemaakt van hetzelfde materiaal als de microscoop, met hoge kwaliteit, perfecte stabiliteit en precisie.
De rubberen voetjes kunnen in alle richtingen bewegen, waardoor het werkplatform altijd op een vlakke ondergrond staat.
Geschikt voor het desolderen van BGA-IC's.
Specificaties
Grof verstelbereik in hoogte
0∼230 mm
Nauwkeurig verstelbereik in hoogte
0∼60 mm
Max. opnamegrootte van de printplaat
250 mm (lengte of breedte)
Min. opnamegrootte van de printplaat
20 mm (lengte of breedte)
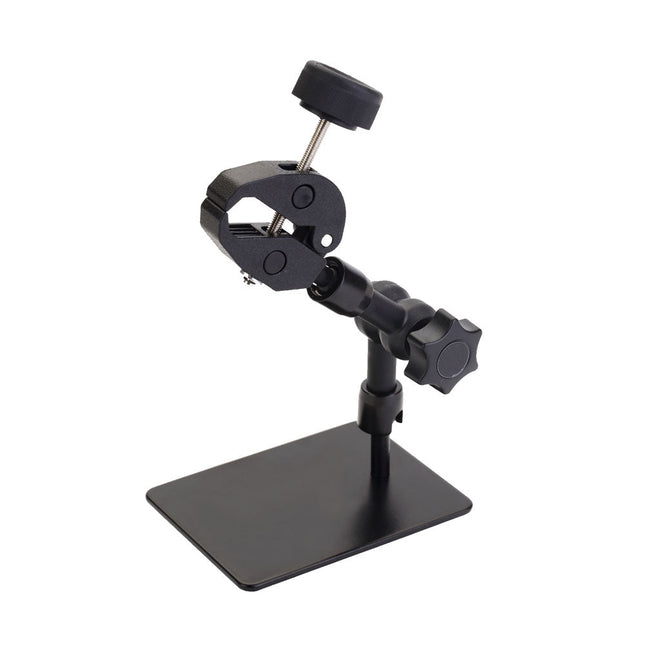
Deze print houder is ideaal voor elke toepassing waar een derde of vierde hand en een loeplamp nodig zijn. Kenmerken De helpende handen met 4 verstelbare zwanenhals armen. LED-loeplamp met USB-C interface. Metalen voet met rubberen antislip strips. Wordt geleverd met een cleaning ball, een spons, een soldeerboutstandaard en hars. Specificaties Lengte zwanenhals armen: 270 mm LED-loeplamp met 5-dioptrie lens Voeding via USB Afmetingen (standaard): 185 x 175 x 20 mm Gewicht: 620 g
Deze bureaulamp is ideaal voor op uw werkplek. Met de 5-inch 5D-lens kunnen de subtielste klusjes worden gedaan. De lamp heeft 80 geïntegreerde leds. Kenmerken Lens grootte: 5 inch Lens materiaal: glas Dioptrie: 5D Lichtbron: T5 22 W fluorescentielamp (80 stuks leds) Standaard montage: tafelvoet Spanning: 220-240 V Vermogen: 22 W
De dampen die vrijkomen tijdens het solderen zijn mogelijk schadelijk voor de gezondheid. Deze soldeerdampafzuiger wordt stevig met een beugel aan de werktafel bevestigd. Dankzij de 3 assen kan de soldeerdampafzuiger perfect op de juiste plek worden gepositioneerd, d.w.z. direct boven de opstijgende soldeerdampen. De schadelijke soldeerdampen worden afgezogen door een krachtige maar stille ventilator, en gefilterd door een actief koolstoffilter.
Kenmerken
Zuigt soldeerdampen weg
Absorbeert giftige gassen en dampen van soldeerwerkzaamheden
Vermindert de kans op hoofdpijn, oogirritatie en misselijkheid
Instelbare absorptiehoek voor nauwkeurige plaatsing
Eenvoudig vervangbaar actief koolstoffilter
Krachtige ventilator
Laag geluidsniveau en lange levensduur
Specificaties
Absorptiecapaciteit: 1 m³/min (max.)
Stroomverbruik: 23 W
Voeding: 220-240 VAC
Hoeveelheid actief koolstoffilter: 7 g
Maximaal absorptiegewicht: 2 g
Afmetingen: 220 x 270 x 168 mm (B x H x D)
Gewicht: 1,4 kg
Deze siliconen soldeermat kan worden gebruikt als basis voor allerlei soldeerwerkzaamheden zoals assemblage of reparatie. Specificaties Bestand tegen 200-230°C constant en 480-500°C voor korte perioden. Ideaal voor het solderen van elektronicacomponenten of het repareren van printplaten, elektronicakits, enz. Kleur: groen Dimensies: 209 x 295 mm
Het ZD-5L lijmpistool is een veelzijdig en gebruiksvriendelijk gereedschap voor huishoudelijk, doe-het-zelf en professioneel gebruik. Het heeft een compact en lichtgewicht ontwerp voor comfortabel gebruik en de ingebouwde standaard zorgt voor een veilige en stabiele werking.
Of u nu een doe-het-zelver of een professional bent, dit lijmpistool is een perfecte aanvulling op uw gereedschapskist, een efficiënte en praktische oplossing voor lijmen, repareren en creëren. Het is ideaal voor verschillende materialen zoals glas, karton, metaal, plastic, leer, stof en meer.
De ZD-5L gebruikt lijmsticks van 7,2 mm. Hij wordt gevoed door een 18650-batterij en opgeladen via USB-C.
Specificaties
Laadspanning
5 V DC
Laadstroom
Adaptief, 2 A (max)
Oplaadinterface
USB-C
Batterij
18650 lithium
Lijmstift
7,2 mm buitendiameter
Opwarmtijd
ca. 2 min.
Gebruikstijd
ca. 60 min.
Slaaptijd
5 minuten. zonder actie
Inbegrepen
1x ZD-5L lijmpistool
1x 18650 lithiumbatterij (2200 mAh)
2x Lijmsticks (10 cm)
1x USB-kabel
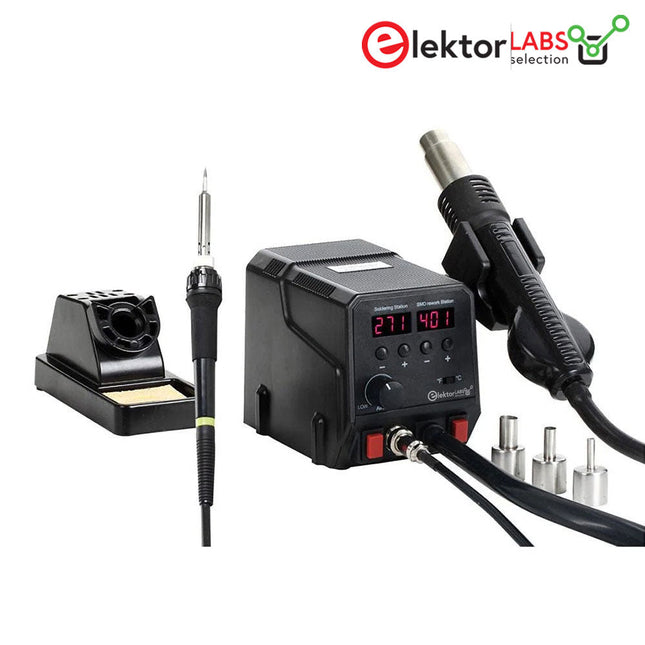
Dit 2-in-1 hot air rework station biedt een kosteneffectieve oplossing voor het solderen en desolderen van alle soorten SMD-componenten.
Kenmerken
Inclusief soldeerbout en heteluchtpomp. Het apparaat is geschikt voor het solderen en desolderen van alle soorten surface mounted ICs, PCB of andere componenten.
De regelunit heeft 2 LED's die de temperatuur weergeven en in °C en °F. De temperatuur kan eenvoudig worden ingesteld met eenvoudige omhoog/omlaag knoppen.
De heteluchttemperatuur kan continu geregeld worden van 3 L/min tot 24 L/min.
De temperatuur wordt door een microprocessor geregeld en kan worden ingesteld.
Temperatuurbereik: 50-480°C voor soldeerbout, 100-500°C voor heteluchtpomp.
Specificaties
Vermogen
Soldeerbout: 24 V, 60 WHeteluchtpomp: 300 W
Voeding
220-240 V AC/50 Hz
Temperatuur bereik
Soldeerbout: 50-480°CHeteluchtpomp: 100-500°C
Afmetingen
113 x 125 x 175 mm
Gewicht
2 kg
Inbegrepen
1x ZD-8922 Hot Air Rework Station
1x Soldeerbout
1x Heteluchtpistool
3x Heteluchtmondstukken
1x Soldeerbout met naaldpunt
1x Netsnoer
1x Soldeerboutstandaard met spons
De ZD-8951 is een 3-in-1 temperatuurgeregeld digitaal soldeerstation met ingebouwde rookafzuiging en LED-verlichting. De rapid-heating functie bereikt een temperatuur van 400°C in minder dan 1 minuut. Specificaties (Soldeerbout) Vermogen: 60 W (max. 130 W) Temperatuurbereik: 160 °C tot 480 °C (320 °F tot 896 °F) PTC rapid-heating element Met °C/°F conversiefunctie Temperatuur kan eenvoudig worden aangepast met de knop. LCD-scherm met wisselende achtergrondverlichting. Met de rapid-heating functie duurt het minder dan 1 minuut om van kamertemperatuur naar een temperatuur van 400 °C (752 °F) te stijgen. Specificaties (Rookafzuiger) Vermogen: 23 W Luchtafzuiging: 1 m³/min (max) Specificaties (LED-verlichting) Vermogen: 5 W Verlichting: 12 LED's Helderheid: 242 lm
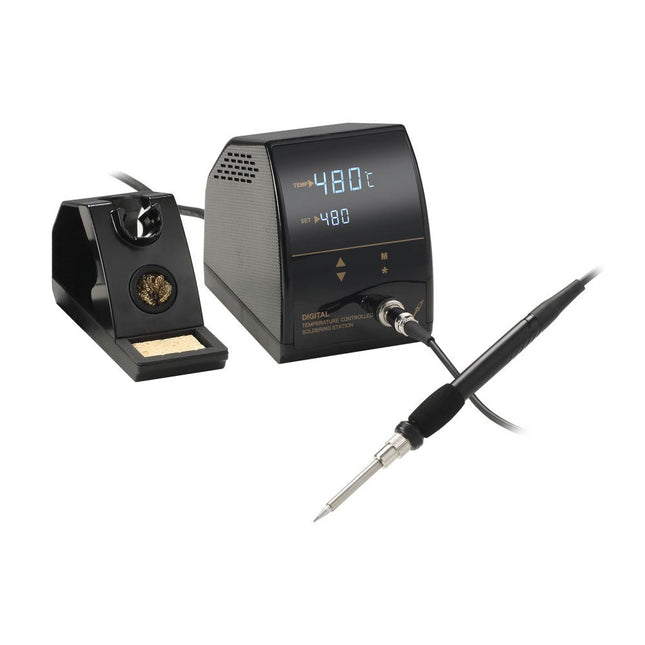
Dit temperatuurgeregelde digitale soldeerstation, met een instelbaar temperatuurbereik van 160°C tot 480°C, is een betaalbaar en betrouwbaar hulpmiddel voor allerlei soldeerwerkzaamheden in uw (thuis)laboratorium. Dankzij het hoogwaardige gecoate verwarmingselement wordt de gewenste soldeertemperatuur (Celsius of Fahrenheit) snel bereikt en weergegeven op het LED display.
Kenmerken
Een temperatuurgeregeld soldeerstation met instelbaar temperatuurbereik van 160°C tot 480°C.
Een tweeregelig LED-scherm geeft tegelijkertijd de temperatuurinstelling en de werkelijke temperatuur weer.
Mooi afgewerkt, een lust voor het oog.
Compacte en lichtgewicht soldeerbout met siliconen aansluiting.
Een gebruiksvriendelijke soldeerboutgreep met een schuimplastic handvat.
Eenvoudige manier om te schakelen tussen °C en °F met de ster-knop.
Specificaties
Vermogen
25 W (max. 50 W)
Display
LED
Temperatuur
160°C tot 480°C
Temperatuurafwijking
±5%
Aarding
Ja
Verwarmingssnelheid
Smelt soldeer binnen 20s
Bestand tegen spanning
1500/1MA
Ingangsspanning
AC 220-240 V (50 Hz)
Uitgangsspanning
24 V
Inbegrepen
ZD-8961-A Soldeerstation
Soldeerbout standaard
Soldeerbout met soldeertip N8-1
Reinigingsspons
Reinigingsbal
Netsnoer (EU)
De ZD-8965 is een digitaal temperatuurgecontroleerd desoldeerstation uitgerust met aardingsbeveiliging en een LCD-display voor temperatuurweergave. Ondanks het compacte en robuuste ontwerp is dit krachtige desoldeerstation eenvoudig met één hand te bedienen.
De ZD-8965 is voorzien van een soldeerpistool met een geïntegreerd filter dat al het geëxtraheerde materiaal opvangt, waardoor continu gebruik mogelijk is door simpelweg de filters te vervangen. Bovendien is er een temperatuursensor in de punt ingebed, waardoor een snelle reactie op temperatuurschommelingen mogelijk is, voor consistente prestaties.
Kenmerken
Pas de temperatuur moeiteloos aan tussen 160°C en 480°C met de handige omhoog/omlaag-knoppen op het voorpaneel.
LED-display om de temperatuur in °C/°F aan te geven
Beschikt over een ergonomische pistoolgreep met een trekker voor snelle en efficiënte verwijdering van soldeerafval.
Het verbeterde soldeerpistool is voorzien van een trigger aan de achterkant, waardoor het uitzonderlijk handig is om componenten te vervangen en te reinigen.
Wordt geleverd met een hoogwaardig soldeerpistool en een stevige houder.
Uitgerust met een krachtige verwarming die keer op keer zorgt voor optimale desoldeerprestaties.
Specificaties
Station
Spanningsvoorziening
220-240 V
Stroomverbrui
140 W
Vakumdruk
600 mm HG
Desoldeerpistool
Stroomverbruik
140 W (18 V DC)Opwarmvermogen: 140 W
Temperatuur
160-480°C
Verwarmingselement
Keramische verwarming
Inbegrepen
1x ZD-8965 Desoldeerstation
2x Reserve soldeerpunten
3x Reinigingsnaalden voor desoldeertips
3x Reservefilter voor desoldeerpistool
1x Reservefilter voor desoldeerstation
1x Manual
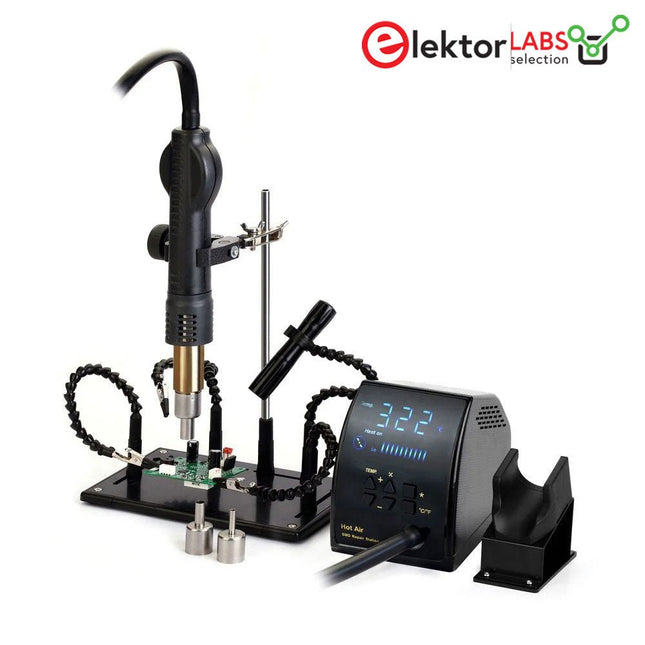
Deze Rework-Station-Bundel, bestaande uit het ZD-8968 Hot Air Rework Station en de ZD-11P PCB-houder, biedt nauwkeurige temperatuurregeling, instelbare luchtstroom en een stabiele houder voor uw printplaat.
Het ZD-8968 Hot Air Rework Station is een krachtig apparaat dat is ontworpen voor nauwkeurige desoldeer- en herbewerkingstaken met SMD-componenten. Het beschikt over een breed temperatuurbereik van 100-500°C, met instelbare lucht- en temperatuurregeling, een helder LED-display en een automatische slaapmodus voor meer veiligheid en efficiëntie.
De ZD-11P PCB-houder is uitgerust met 5 verstelbare 360° draaibare zwanenhalzen (4 met krokodillenklemmen, 1 met zaklamphouder + zaklamp), die extra flexibiliteit en stabiliteit bieden. Hij houdt de printplaat stevig op zijn plaats, waardoor het hanteren van SMD-componenten eenvoudiger en nauwkeuriger wordt.
Kenmerken
300 W verwarmingsvermogen zorgt voor een snelle opwarming
Breed temperatuurbereik van 100-500°C maakt nauwkeurige controle mogelijk
Gesloten lussensor en MCU-nuldoorgangsontwerp zorgen voor nauwkeurige en stabiele temperatuurregeling.
De handgreep van de heteluchtpomp bevat een ingebouwde sensor die overschakelt naar de werkmodus wanneer deze wordt opgepakt en naar de stand-bymodus wanneer deze weer in de houder wordt geplaatst.
De automatische stand-bymodus wordt geactiveerd na 10 minuten inactiviteit.
Het automatische koelsysteem en de functie voor uitgestelde uitschakeling beschermen het verwarmingselement.
Borstelloze motorventilator zorgt voor een stille werking, een soepele luchtstroom en een langere levensduur.
Hoogwaardig verwarmingselement verdubbelt de werkefficiëntie en bespaart energie.
Digitaal LED-display voor duidelijke controle van de temperatuurinstellingen.
Eenvoudige knoppen voor het aanpassen van het luchtvolume en de temperatuur.
Schakelen tussen °C en °F
Hittebestendig statief met heteluchtpistoolhouder, 5 flexibele verstelbare armen met krokodillenklemmen en een zaklamp (AA batterij niet inbegrepen)
Specificaties
ZD-8968 Hot Air Rework Station
Vermogen
300 W
Temperatuurbereik
100-500°C
Voeding
220-240 V AC/50 Hz
Gewicht
1,2 kg
ZD-11P PCB-houder
Basis (afmetingen)
210 x 134 mm
Metalen staaf (hoogte)
250 mm
Inbegrepen
Basis, metalen staaf, 4 zwanenhalsarmen met krokodillenklemmen, 1 zwanenhalsarm met zaklamphouder
Inbegrepen
1x ZD-8968 Hot Air Rework Station
1x ZD-11P PCB-houder (standaard met soldeerbouthouder met 5 verstelbare armen, 4 met krokodillenklemmen en 1 met zaklamphouder)
1x Zaklamp (AA-batterij niet inbegrepen)
3x Heteluchtmondstukken (79-7911, 79-7912, 79-7913)
1x Netsnoer (EU)
1x Netsnoer (VK)
1x Manual
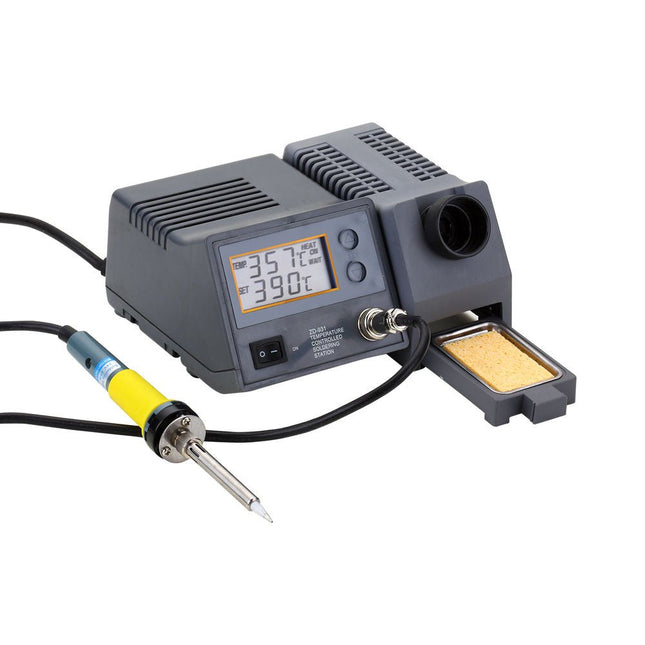
Het krachtige soldeerstation met lcd-scherm is ontworpen voor een breed temperatuurbereik (van 150-450°C) en is ideaal voor zowel algemeen soldeerwerk als gespecialiseerde loodvrije soldeertoepassingen. De soldeerbout wordt automatisch aangestuurd door de microprocessor.
Dankzij de hoogwaardige sensor garandeert het warmtewisselingssysteem een nauwkeurige temperatuurregeling bij de soldeerpunt. Dit digitale soldeerstation met temperatuurregeling wordt geleverd met een houder en een reinigingsspons.
Specificaties
Bedrijfsspanning
220-240 V, 50 Hz
Stroomverbruik
80 W
Vermogen soldeerbout
48 W
Bedrijfsspanning soldeerbout
24 V
Temperatuur (instelbaar)
150-450°C
Afmetingen
195 x 87 x 165 mm
Deze gereedschapset bevat essentieel gereedschap voor allerlei soorten elektronica klussen. Inbegrepen Soldeerbout Desoldeerpomp Precisie schroevendraaier 2,5x75 mm Schroevendraaier 3x75 mm Schroevendraaier 5x75 mm Schroevendraaier 6x125 mm Tang met lange bek (5') Zijsnijtang (4,5') IC trekker Draadstripper en -snijder Multimeter Inbussleutel Soldeerdraad Onderdelen opbergdoos Pincet (lange bek) Afmeting tasje: 340 x 210 x 50 mm
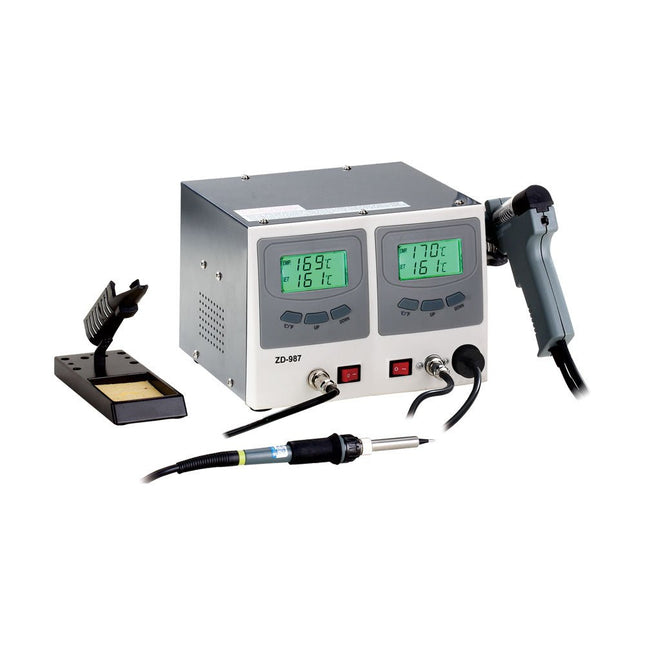
Het ZD-987 soldeer- en desoldeerstation is een krachtig, multifunctioneel gereedschap, ontworpen voor onderzoek, productie en revisie van elektronische producten. Het is ideaal voor gebruik in laboratoria, onderwijs- en productieomgevingen – met name voor het repareren en revisie van elektronische apparaten en communicatieapparatuur.
De soldeerbout en desoldeerbout worden elk automatisch aangestuurd door speciale microprocessoren. Dankzij digitale regelelektronica, een uiterst nauwkeurige sensor en een efficiënt warmtewisselingssysteem zorgt het station voor een nauwkeurige temperatuurregeling bij de soldeerpunt.
Maximale temperatuurnauwkeurigheid en optimale thermische respons onder belasting worden bereikt door snelle, nauwkeurige metingen binnen een gesloten regelcircuit. Dit ontwerp is specifiek geoptimaliseerd voor loodvrije soldeerprocessen.
Soldeerbout
De 60 W soldeerbout, compatibel met een breed scala aan soldeerpunten uit de N4-serie, is geschikt voor vrijwel elke taak in de elektronica. Het hoge vermogen en het slanke ontwerp maken hem ideaal voor nauwkeurig soldeerwerk met een fijne spoed.
De bout is uitgerust met een PTC-verwarmingselement en een sensor direct op de soldeerpunt. Dit zorgt voor een snelle en nauwkeurige temperatuurregeling voor consistente soldeerresultaten.
Desoldeerpistool
Het 80 W desoldeerpistool, compatibel met een breed scala aan N5-serie punten, is geschikt voor vrijwel elke desoldeerklus in de elektronica. Het hoge vermogen en het ergonomische pistoolontwerp maken hem perfect voor nauwkeurig en gedetailleerd desoldeerwerk.
Met een PTC-verwarmingselement en een sensor direct op de desoldeerpunt zorgt hij voor een snelle en nauwkeurige temperatuurregeling voor consistente prestaties.
Kenmerken
Ideaal voor productie- en servicegebruik
De soldeerbout en het desoldeerpistool kunnen onafhankelijk van elkaar of gelijktijdig worden bediend
Dubbel LCD-scherm met twee regels geeft gelijktijdig de temperatuur van de punt en de ingestelde waarde weer in °C of °F
Instelbaar temperatuurbereik van 160°C tot 480°C
Temperatuurinstelling met drukknop
Specificaties
Spanning
220-240 V, 50 Hz
Vermogen
160 W
Inbegrepen
1x ZD-987 Soldeer- en desoldeerstation
1x Soldeerbout
1x Desoldeerpistool
1x Soldeerboutstandaard met spons
1x Desoldeerboutstandaard
4x Filters
2x Mondstukken
3x Opruimgereedschapset
1x Zwart luchtmondstuk met afdichtring
1x Kabel
1x Manual
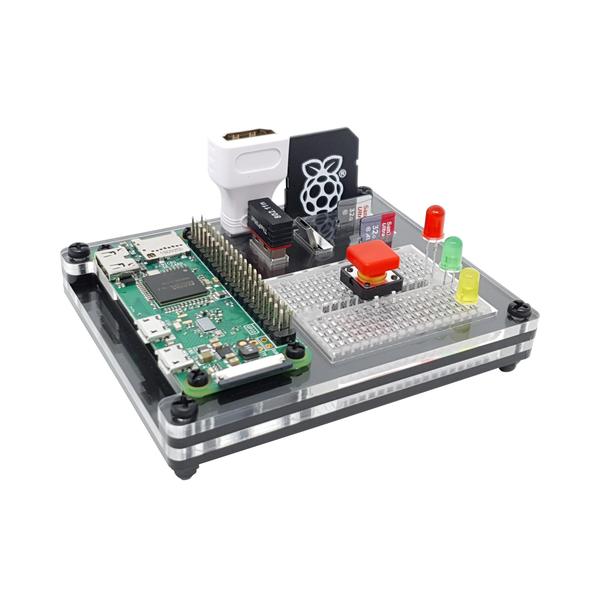
De standaardconfiguratie bevat een mini-breadboard (meegeleverd), een SD-kaartadapter, 2 micro-SD-kaarten, 2 USB-apparaten, een micro-USB-shim en natuurlijk de Raspberry Pi Zero zelf.
Gebruikers kunnen ervoor kiezen om de micro-USB-shim-sleuf te gebruiken voor een micro-HDMI-adapter, of misschien een Portsplus of vergelijkbare GPIO-referentiekaart in de SD-adaptersleuf te plaatsen. Je kunt ervoor kiezen om je USB-micro-SD-kaartlezer of zelfs andere grotere USB-apparaten zoals de USBDoctor te plaatsen. Gebruik hem zoals jij dat het beste vindt.
Alle poorten van de Raspberry Pi Zero zijn toegankelijk vanaf de ZeroDock, inclusief de camerapoort en de reset-/composietpinheader. De pHAT-poorten zijn ook vrij, dus je kunt gerust prototypen met je favoriete uitbreidingsborden.
De behuizing is een stijlvolle mix van heldere en zwarte acryllagen, zwarte bevestigingen en een helder breadboard, en past goed naast de meeste desktop-pc's/monitoren.
De montagehandleiding is hier beschikbaar.
Inbegrepen
4-laags lasergesneden acryl behuizing
Behuizing en Raspberry Pi-bevestigingen
Mini-breadboard Feedback
De ZK-DP3D CNC USB-C DC/DC-converter is een veelzijdige, uiterst nauwkeurige spannings- en stroomregelaar, ontworpen voor een breed scala aan toepassingen. Met een digitale besturingsinterface met instelbare spanning (1-30 V) en stroom (0-2 A), biedt het een nauwkeurig LCD-scherm voor het controleren van de ingangs-/uitgangsspanning, stroom, vermogen en meer.
Uitgerust met intelligente ondersteuning voor snellaadprotocollen (QC2.0/3.0, FCP, SCP, AFC) en meerdere veiligheidsvoorzieningen, is hij ideaal voor het voeden van apparaten zoals USB-ventilatoren, routers en batterijen. Het compacte ontwerp omvat push-type terminals voor eenvoudige connectiviteit en een hoog uitgangsvermogen van maximaal 15 W, wat betrouwbaarheid en gemak garandeert voor zowel hobbyisten als professionals.
Specificaties
Ingangsspanning
4-13 V (3 ingangsinterfaces: USB, MicroUSB en USB-C)
Uitgangsspanning
1-30 V
Uitgangsstroom
0-2 A
Uitgangsvermogen
Minder dan 15 W
Spanningsweergave
Resolutie 0,01 V, nauwkeurigheid ±(0,5% + 3 cijfers)
Huidige weergave
Resolutie 0,001 A, bereik 0-2 A, nauwkeurigheid ±(0,5% + 3 cijfers)
Vermogensweergave
0,00-15,00 W
Bedrijfsstroom
ca. 30 mA
Afmetingen
92 x 40 x 16 mm
Gewicht
41 g