Producten
-
Generic DIY Mini Digitale Oscilloscoop Kit
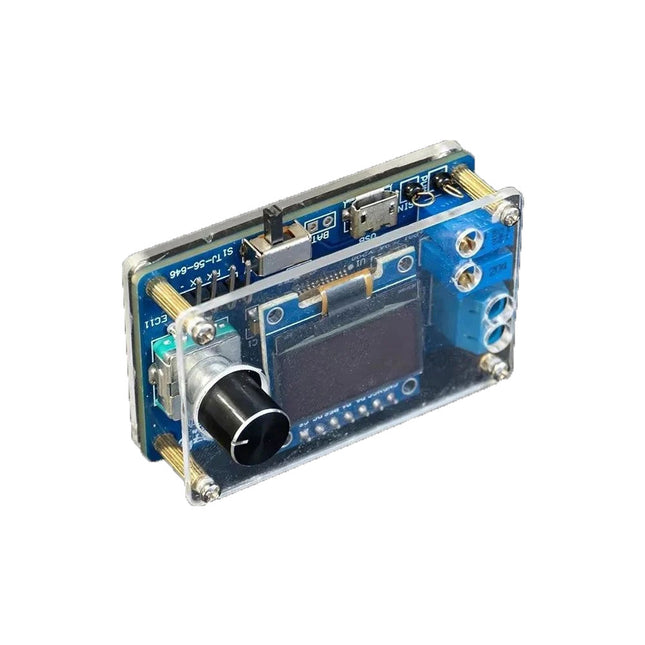
De DIY Mini Digitale Oscilloscoop Kit (met behuizing) is een eenvoudig te bouwen bouwpakket voor een kleine digitale oscilloscoop. Naast de aan/uit-schakelaar heeft het slechts één andere regelaar, een roterende encoder met een ingebouwde drukknop. De microcontroller van de kit is voorgeprogrammeerd. Het OLED-scherm van 0,96" heeft een resolutie van 128 x 64 pixels. De oscilloscoop heeft één kanaal dat signalen tot 100 kHz kan meten. De maximale ingangsspanning is 30 V, de minimale spanning is 0 V. De kit bestaat uit through-hole componenten (THT) en surface-mount devices (SMD). Daarom betekent het in elkaar zetten van de kit het solderen van SMD-onderdelen, waarvoor enige soldeerervaring nodig is. Specificaties Verticaal bereik: 0 tot 30 V Horizontaal bereik: 100 µs tot 500 ms Triggertype: Automatisch, Normaal en Single Triggerflank: Stijgen en dalen Triggerniveau: 0 tot 30 V Run/Stop-modus Automatische frequentiemeting Voeding: 5 V micro-USB 10 Hz, 5 V sinusgolfuitgang 9 kHz, 0 tot 4,8 V blokgolfuitgang Weergave: 0,96-inch OLED-scherm Afmetingen: 57 x 38 x 26 mm Downloads Documentation
-

Elektor Digital EAGLE V6 Getting Started Guide (E-book)
Whether you are an electronics enthusiast or engineering professional, this book provides the reader with an introduction to the use of the CadSoft’s EAGLE PCB design software package. EAGLE is a user-friendly, powerful and affordable software package for the efficient design of printed circuit boards. It offers the same power and functionality to all users, at a smaller cost than its competitors. A free version of EAGLE is available to enthusiasts for their own use. EAGLE can be used on the main computing platforms including: Microsoft Windows (XP, Vista or Windows 7); Linux (based on kernel 2.6 or above) and Apple Mac OS X (Version 10.6 or higher). Any hardware that supports these software platforms will run the EAGLE application. The book is intended for anyone who wants an introduction to the capabilities of EAGLE. The reader may be a novice at PCB design or a professional wanting to learn about EAGLE, with the intention of migrating from another CAD package. This book will quickly allow you to: obtain an overview of the main modules of EAGLE: the schematic editor; layout editor and autorouter in one single interface; learn to use some of the basic commands in the schematic and layout editor modules of EAGLE; apply your knowledge of EAGLE commands to a small project; learn more about some of the advanced concepts of EAGLE and its capabilities; understand how EAGLE relates to the stages of PCB manufacture; create a complete project, from design through to PCB fabrication. The project discussed in the book is a popular, proven design from the engineering team at Elektor. After reading this book while practicing some of the examples, and completing the projects, the reader should feel confident about taking on more challenging endeavors.
€ 29,95
Leden: € 26,96
-

Elektor Publishing Edge AI Made Practical
AI Projects for the Raspberry Pi with the AI HAT+ Edge AI is transforming everyday devices by putting intelligence where it matters most: directly inside the hardware. With on-device inference, a camera can recognize a visitor instantly, a phone can translate speech without streaming audio to the cloud, and a wearable can detect anomalies in real time—fast, private, and reliable even when the network disappears. This book is your practical guide to building exactly those kinds of systems with the Raspberry Pi AI HAT+ and the Hailo-8L accelerator. You’ll start with clear foundations: core AI and machine-learning concepts, how neural networks work, and what truly distinguishes Edge AI from cloud AI—plus an honest look at ethical considerations and future impacts. Then it’s straight to hands-on physical computing. Step by step, you’ll set up Raspberry Pi OS, power and cooling, and develop in Python using the Thonny IDE. You’ll learn GPIO basics with lights and servos, mount the AI HAT+ hardware, install and verify the Hailo software stack, and connect the right camera—official modules or USB webcams, even multiple cameras. From your first pipeline to real projects, you’ll run person detection, pose estimation, segmentation, and depth estimation, then level up with YOLO object detection: smart alerts, guest counters, and custom extensions. You’ll even connect vision to motion by combining gesture recognition with servo-driven mechanisms, including a robotic arm. With troubleshooting tips, hardware essentials, and a practical Python refresher, this book turns Edge AI from buzzword into buildable reality.
€ 34,95€ 29,95
Beste prijs
-

Elektor Digital Edge AI Made Practical (E-book)
AI Projects for the Raspberry Pi with the AI HAT+ Edge AI is transforming everyday devices by putting intelligence where it matters most: directly inside the hardware. With on-device inference, a camera can recognize a visitor instantly, a phone can translate speech without streaming audio to the cloud, and a wearable can detect anomalies in real time—fast, private, and reliable even when the network disappears. This book is your practical guide to building exactly those kinds of systems with the Raspberry Pi AI HAT+ and the Hailo-8L accelerator. You’ll start with clear foundations: core AI and machine-learning concepts, how neural networks work, and what truly distinguishes Edge AI from cloud AI—plus an honest look at ethical considerations and future impacts. Then it’s straight to hands-on physical computing. Step by step, you’ll set up Raspberry Pi OS, power and cooling, and develop in Python using the Thonny IDE. You’ll learn GPIO basics with lights and servos, mount the AI HAT+ hardware, install and verify the Hailo software stack, and connect the right camera—official modules or USB webcams, even multiple cameras. From your first pipeline to real projects, you’ll run person detection, pose estimation, segmentation, and depth estimation, then level up with YOLO object detection: smart alerts, guest counters, and custom extensions. You’ll even connect vision to motion by combining gesture recognition with servo-driven mechanisms, including a robotic arm. With troubleshooting tips, hardware essentials, and a practical Python refresher, this book turns Edge AI from buzzword into buildable reality.
€ 29,95
Leden: € 26,96
-

Édition spéciale : Installations solaires et photovoltaïques
Comme la demande pour la pose de panneaux solaires a fortement augmenté, surtout pour les installations plus vastes que les centrales de balcon, les carnets de commandes des entreprises dans le domaine du solaire sont pleins. Si vous demandez aujourd’hui un devis, vous risquez d’attendre un moment, si votre demande n’est pas tout simplement renvoyée à une date indéterminée. Une autre conséquence de cette explosion du solaire est que certaines entreprises pratiquent des prix très élevés pour réaliser des installations. Il y a pourtant une solution évidente et radicale contre les prix excessifs : Do it yourself comme le disent les Anglais. Le prix du matériel est actuellement abordable, c’est la période idéale pour ceux qui font le travail eux-mêmes. Ils ne pourraient pas réaliser davantage d’économies. À cela s’ajoutent la satisfaction de faire quelque chose d’utile, tant sur le plan économique qu’écologique, et le plaisir de construire soi-même. Dans ce numéro spécial, vous trouverez une large sélection de montages d’Elektor, du régulateur pour panneaux solaires à celui pour chauffe-eau solaire, en passant par le système d’orientation pour panneaux solaires. Ce numéro contient également des informations pratiques sur l’installation des panneaux solaires ainsi que la technologie qu’ils renferment. Enfin plusieurs articles abordent le sujet des centrales de balcon, par exemple comment les installer, comment les connecter à l’internet… Sommaire LES BASES Calculs et principes de mise en oeuvre de panneaux photovoltaïques Analyse sensorielle de la lumière Des LED pour la mesure de la lumière diurne Hélio-courant, un jeu d’enfant Charger en solaire avec/sans régulateur Sections de câbles et pertes dans les câbles pour les installations solaires Panneaux solaires Tout ce que vous avez toujours voulu savoir sur les panneaux solaires... Contrôleur de diode idéale Circuits à diodes à faible dissipation de puissance TRUCS ET ASTUCES Chargeur solaire à haut η Détecteur d’humidité solaire Régulateur shunt pour panneau solaire Système d’orientation simple Chargeur et régulateur à cellules solaires zBot : alimentation piles/solaire Témoin de tension pour panneau solaire Veilleuse solaire Chargeur solaire vert PROJETS Enregistreur de données énergétiquesMesurer et enregistrer la consommation d’énergie Petite alimentation solaireLumière du soleil en entrée, 3,3 V en sortie Unité de transfert de données (DTU) de fabrication maisonLecture des données de petits onduleurs avec une carte à microcontrôleur Chargeur solaire portableÀ accumulateur lithium-ion Régulation solaire thermiqueÀ la recherche du point de puissance maximale Chargeur 2 A avec régulateur MPPPresse le soleil jusqu’au dernier rayon Héliostat piloté par PCÀ la poursuite des étoiles Lampe solaireMême l’éclairage de jardin se met au sans fil Convertisseur de tension de panneau solairePour éclairage intérieur et IdO Chargeur en voyageÉnergie gratuite sur les cimes Chargeur solaire/moniteur Chargeur de batteries à panneaux solaires Convertisseurs de tension pour panneaux photovoltaïques Régulateur de charge solairePour panneaux solaires de ≤53 W Cure de soleil pour batterieChargeur de batterie solaire Bus CAN + Arduino pour la surveillance des cellules solairesDétecter et localiser les panneaux défectueux dans les grands réseaux photovoltaïques
€ 15,50
Leden: € 13,95
-

Édition spéciale : Les capteurs météorologiques et environnementaux
Construisez votre station météo idéale ou explorez les données environnementales avec le monde entier. Avec de nombreux projets pratiques pour Arduino, Raspberry Pi, NodeMCU, ESP32 et autres cartes de développement. Les stations météo jouissent d’une grande popularité depuis des décennies. Tous les magazines d’électronique, qu’ils soient récents ou non, ont publié et publient régulièrement des articles sur la construction d’une station météo. Au fil des années, elles sont devenues de plus en plus sophistiquées et peuvent aujourd’hui être entièrement intégrées dans la maison intelligente. Ceci implique toutefois souvent une fidélité à un fabricant de produits de marque (coûteux) pour tous les composants. Cependant, avec votre propre station météo, vous pouvez facilement suivre le rythme et même capturer des relevés que les appareils commerciaux ne peuvent pas réaliser. Le plaisir ne manque pas : vous développerez de manière ludique vos connaissances en électronique, en cartes de développement de microcontrôleurs modernes et en langages de programmation. Pour moins de dix euros, vous pouvez collecter des données environnementales initiales et étendre votre système au fur et à mesure que votre intérêt grandit. Dans ce numéro Sur la route du vent et de la météo Écran météo OpenWeatherMap à affichage fluorescent Les composés organiques volatils dans l‘air que nous respirons Travailler avec les capteurs MQ : mesurer le monoxyde de carbone Détecteur de CO2 avec connexion IdO vers ThingSpeak Un arrosage automatique pour vos plantes Un climat intérieur sain : la température et l‘humidité de l‘air sont importants Thermomètre avec tubes Nixie Une maison météo rétro pour toute la famille Mesurez la pression atmosphérique et la température avec précision Un détecteur de coups de soleil Capteur maison pour la durée d‘ensoleillement Le smartphone l‘indique : brouillard ou bonne visibilité ? Détecter les tremblements de terre Les niveaux des cours d‘eau et des réservoirs Évaluer la valeur du pH de l’eau Détecter les rayonnements radioactifs Avec le GPS, vous savez où se trouve votre capteur Enregistrer les fichiers journaux avec horodatage sur des cartes SD LoRaWAN, The Things Network et ThingSpeak Exploiter la passerelle LoRaWAN pour le TTN Affichage géant à led avec prévisions météo
€ 15,50
Leden: € 13,95
-

Elektor Digital Édition spéciale : Les capteurs météorologiques et environnementaux (PDF)
Construisez votre station météo idéale ou explorez les données environnementales avec le monde entier. Avec de nombreux projets pratiques pour Arduino, Raspberry Pi, NodeMCU, ESP32 et autres cartes de développement. Les stations météo jouissent d’une grande popularité depuis des décennies. Tous les magazines d’électronique, qu’ils soient récents ou non, ont publié et publient régulièrement des articles sur la construction d’une station météo. Au fil des années, elles sont devenues de plus en plus sophistiquées et peuvent aujourd’hui être entièrement intégrées dans la maison intelligente. Ceci implique toutefois souvent une fidélité à un fabricant de produits de marque (coûteux) pour tous les composants. Cependant, avec votre propre station météo, vous pouvez facilement suivre le rythme et même capturer des relevés que les appareils commerciaux ne peuvent pas réaliser. Le plaisir ne manque pas : vous développerez de manière ludique vos connaissances en électronique, en cartes de développement de microcontrôleurs modernes et en langages de programmation. Pour moins de dix euros, vous pouvez collecter des données environnementales initiales et étendre votre système au fur et à mesure que votre intérêt grandit. Dans ce numéro Sur la route du vent et de la météo Écran météo OpenWeatherMap à affichage fluorescent Les composés organiques volatils dans l‘air que nous respirons Travailler avec les capteurs MQ : mesurer le monoxyde de carbone Détecteur de CO2 avec connexion IdO vers ThingSpeak Un arrosage automatique pour vos plantes Un climat intérieur sain : la température et l‘humidité de l‘air sont importants Thermomètre avec tubes Nixie Une maison météo rétro pour toute la famille Mesurez la pression atmosphérique et la température avec précision Un détecteur de coups de soleil Capteur maison pour la durée d‘ensoleillement Le smartphone l‘indique : brouillard ou bonne visibilité ? Détecter les tremblements de terre Les niveaux des cours d‘eau et des réservoirs Évaluer la valeur du pH de l’eau Détecter les rayonnements radioactifs Avec le GPS, vous savez où se trouve votre capteur Enregistrer les fichiers journaux avec horodatage sur des cartes SD LoRaWAN, The Things Network et ThingSpeak Exploiter la passerelle LoRaWAN pour le TTN Affichage géant à led avec prévisions météo
€ 10,95
Leden: € 9,86
-
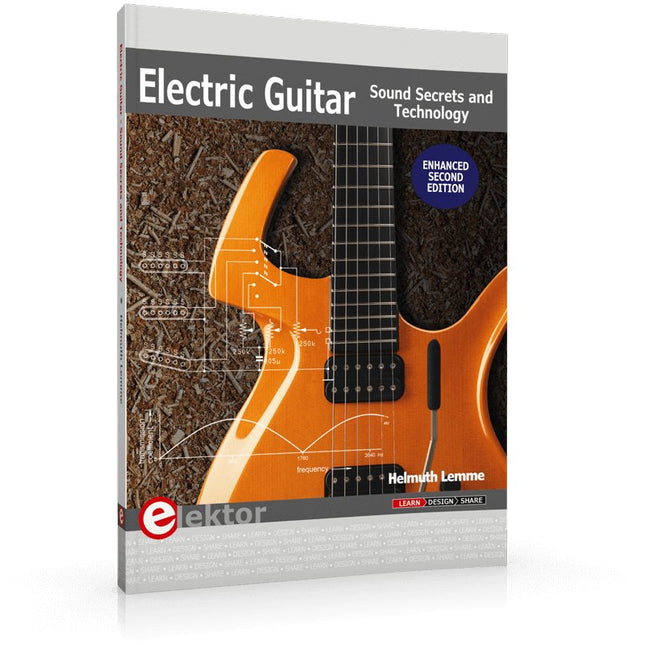
Elektor Publishing Electric Guitar (2nd Edition)
Sound Secrets and Technology What would today’s rock and pop music be without electric lead and bass guitars? These instruments have been setting the tone for more than sixty years. Their underlying sound is determined largely by their electrical components. But, how do they actually work? Almost no one is able to explain this to the true musician with no technical background. This book answers many questions simply, in an easily-understandable manner. For the interested musician (and others), this book unveils, in a simple and well-grounded way, what have, until now, been regarded as manufacturer secrets. The examination explores deep within the guitar, including pickups and electrical environment, so that guitar electronics are no longer considered highly secret. With a few deft interventions, many instruments can be rendered more versatile and made to sound a lot better – in the most cost-effective manner. The author is an experienced electronics professional and active musician. He has thoroughly tested everything described here, in practice.
€ 39,95
Leden: € 35,96
-

Elektor Digital Electric Guitar (2nd Edition) (E-book)
Sound Secrets and Technology What would today’s rock and pop music be without electric lead and bass guitars? These instruments have been setting the tone for more than sixty years. Their underlying sound is determined largely by their electrical components. But, how do they actually work? Almost no one is able to explain this to the true musician with no technical background. This book answers many questions simply, in an easily-understandable manner. For the interested musician (and others), this book unveils, in a simple and well-grounded way, what have, until now, been regarded as manufacturer secrets. The examination explores deep within the guitar, including pickups and electrical environment, so that guitar electronics are no longer considered highly secret. With a few deft interventions, many instruments can be rendered more versatile and made to sound a lot better – in the most cost-effective manner. The author is an experienced electronics professional and active musician. He has thoroughly tested everything described here, in practice.
€ 32,95
Leden: € 29,66
-

Electron Plus Electron Plus SPA100 Source Picoammeter
Deze zeer gevoelige picoammeter is ontworpen voor het meten en loggen van zeer kleine stromen tot in het pA-bereik – waardoor het een ideaal instrument is voor wetenschappelijke en onderzoekstoepassingen, waaronder natuurkunde, materiaalkunde en elektronenmicroscopie. De SPA100, met alle functies voor een betaalbare prijs, combineert gevoeligheid, nauwkeurigheid en stabiliteit om gebruikers in staat te stellen lage stromen met hoge precisie te meten en gemakkelijk biaspanningen voor experimenten te genereren. De SPA100 is ook te gebruiken als ultrahoge weerstandsmeter, die tot in het teraohm-bereik nauwkeurig meet. De SPA100 wordt via USB aangesloten op een PC en maakt gebruik van de gratis software SPA, waarmee gebruikers eenvoudig metingen kunnen meten, grafieken kunnen maken en meetwaarden met tijdstempels en informatie over meetstabiliteit kunnen vastleggen. Specificaties Ingang: ±2 mA tot ±200 pA in 8 bereiken Nauwkeurigheid en resolutie (2 Hz): ±2 mA bereik: ±0,1%, resolutie <20 nA ±200 uA bereik: ±0,1%, resolutie <2 nA ±20 uA bereik: ±0,2%, resolutie <200 pA ±2 uA bereik: ±0,2%, resolutie <20 pA ±200 nA bereik: ±0,5%, resolutie <2 pA ±20 nA bereik: ±0,5%, resolutie <200 fA ±2 nA bereik: ±1,0%, resolutie <20 fA ±200 pA bereik: ±1,5%, resolutie <2 fA Bemonsteringssnelheid: 2 Hz (18 bit) of 10 Hz (16 bit) Verstelbaar filter: 1 Sample tot 64 Samples Uitgangsspanning: -40 V tot +40 V (in stappen van 1 V), uitgangsweerstand 2,7 Kohm Weerstandsmeting: ~1 Kohm tot 40 Tohm (bijv. 40 V bron, 1 pA meting) Nauwkeurigheid: >±0,5% 1 Mohm tot 1 Tohm Gevoed via USB 2.0 (instrument verbruikt tot 0,3 A tijdens gebruik) Inbegrepen 1x SPA100 Source Picoammeter 1x USB-kabel Downloads Manual Software
€ 264,99
-

Elektor Digital Electronic Circuits For All (E-book)
This book contains more than 400 simple electronic circuits which are developed and tested in practice by the authors. The technical solutions presented in the book are intended to stimulate the creative imagination of readers and broaden their area of thought. This should allow readers to look beyond the horizons of possibilities and use ordinary electronic items in a new way. This book includes new and original radio electronic multipurpose circuits. The chapters of the book are devoted to power electronics and measuring equipment and contain numerous original circuits of generators, amplifiers, filters, electronic switches based on thyristors and CMOS switch elements. Wired and wireless systems as well as security and safety systems are presented. Due to the high relevance and increased interest of readers in little-known or not readily available information, the different chapters of this book describe the use of electronic devices in industrial electronics and for research, as well as new instruments and equipment for medical use, gas-discharge and Kirlian photography. A number of technical devices presented in this book are related to research of the mysteries of the earth, nature and human beings by using radio electronic devices. This book will be useful for both radio amateurs and professionals.
€ 32,95
Leden: € 29,66
-

Elektor Digital Electronic Security and Espionage (E-book)
A Handbook on DIY Nowadays, security problems are rarely properly solved or correctly addressed. Electronic security is only part of the chain in making a system secure. Electronic security is usually addressed as network or software security, neglecting other aspects, but the chain is only as strong as its weakest link. This book is about electronic hardware security, with an emphasis on problems that you can solve on a shoestring DIY budget. It deals mostly with secure communications, cryptosystems, and espionage. You will quickly appreciate that you can’t simply buy a trustworthy and reliable cryptosystem off the shelf. You will then realise that this applies equally to individuals, corporations, and governments. If you want to increase your electronic security awareness in a world already overcrowded with networks of microphones and cameras, this is a book for you. Furthermore, if you want to do something DIY by designing and expanding upon simple electronic systems, please continue reading. Some of the devices described are already published as projects in the Elektor magazine. Some are still ideas yet to be worked out. Complexity is the main enemy of security, so we'll try to keep to simple systems. Every chapter will analyse real-life espionage events or at least several hypothetical scenarios that will hopefully spark your imagination. The final goal is to build a security-conscious mindset (or “to get into a head of a spy”) which is necessary to recognise possible threats beforehand, to design a truly secure system. Don’t bother reading if: you think you and your secrets are 100% safe and secure you think somebody else can effectively handle your security you think conspiracy theories only exist in theory – Telefunken’s masterpiece the “FS-5000 Harpoon” was built on one!
€ 32,95
Leden: € 29,66
-
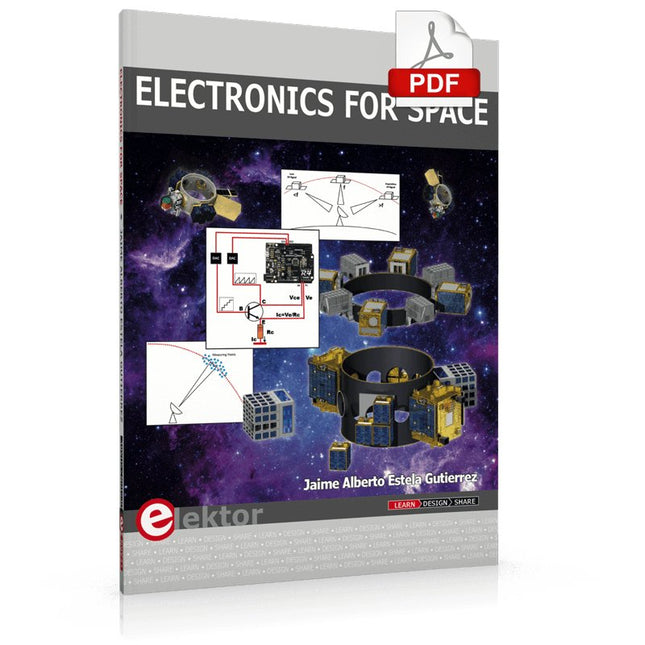
Elektor Digital Electronics for Space (E-book)
Space, the final frontier, will become more and more popular. The space industry is continually growing and new products and services will be required. Innovation is needed for the development of this industry. Today it is no longer possible to follow all the events in field of space. The space market is growing and activities are increasing, especially the market for small-satellites. This book wants to help close the gap and encourage electronic engineers to enter into the fascinating field of space electronics. One of the main difficulties is finding people with knowledge of space electronics design. Nowadays companies have to invest a lot of time and resources to instruct electronic engineers with no experience of space. Only a brief and basic introduction of this topic is typically achieved at university in space engineering lectures. Professionals with practical experience and the necessary theoretical knowledge are scarce. Companies from the space sector are searching for staff with knowledge of space electronics. This book will bring space closer aspiring to the space electronic hobbyists.
€ 24,95
Leden: € 22,46
-

Elektor Labs Elektor 'Woordrijke' LED-kerstboom
Meertalige DIY-kit (incl. 27 RGB-LED's + Raspberry Pi Pico) Geef uw kerstperiode een vleugje techniek met de "woordrijke" LED-kerstboom van Elektor. De prachtig ontworpen 3D-kerstboom combineert elf printplaten, een Raspberry Pi Pico en 27 adresseerbare RGB-LED's om feestelijke boodschappen in zeven talen te laten oplichten: Deens, Nederlands, Engels, Frans, Duits, Italiaans en Spaans. In tegenstelling tot gewone LED-bomen heeft elk woord in de boom zijn eigen lichtkamer, waardoor een verfijnd, zacht gloeiend display ontstaat zonder geluid of flikkering. De LED's zijn volledig WS2812-compatibel en worden aangestuurd via de populaire Adafruit NeoPixel-bibliotheek, waardoor je eenvoudig aangepaste animaties en kleureffecten kunt maken. Perfect voor makers, knutselaars en fans van feestelijke elektronica. Deze kit is zowel een leuke bouwervaring als een opvallende, gesprekswaardige decoratie. De Elektor LED-kerstboom is het ideale knutselproject voor de feestdagen! Kenmerken Meertalige begroetingen (7 talen) gefreesd in het frontpaneel 3D-constructie van 11 in elkaar grijpende printplaten Aangedreven door Raspberry Pi Pico 27 individueel adresseerbare RGB-leds (voorgemonteerd) Vloeiende fade-in en fade-out animaties Volledig programmeerbaar met Arduino IDE Voor maximale helderheid wordt een 5 V-voeding (met micro-USB-connector) met een capaciteit van ≥1 A aanbevolen (niet meegeleverd) Afmetingen (H x B x D): 130 x 115 x 75 mm Inbegrepen Alle benodigde printplaten met leds en andere SMD-onderdelen gemonteerd Raspberry Pi Pico (door de gebruiker te solderen en te programmeren) 3-polige pinheader (door de gebruiker te solderen) 3-polige pinsocket (door de gebruiker te solderen) 4x Zelfklevende rubberen buffers Projectpagina Elektor Labs
€ 59,95€ 49,95
Beste prijs
-

Elektor Digital Elektor AI Guest Edition 2024 (PDF) FR
Le téléchargement intégral de ce numéro est disponible pour nos membres GOLD et GREEN sur le site Elektor Magazine ! Pas encore membre ? Cliquez ici. le système de sécurité IA AlertAlfredBasé sur un Raspberry Pi 5 et le module Hailo 8L l'IA en développement électroniqueune mise à jour après seulement un an intro aux algorithmes de l'IAPrompt: Quels algorithmes implémentent chaque outil d'IA ? ordinateurs monocartes pour les projets d'IAAperçu et contexte des données de capteurs aux modèles d'apprentissage automatiqueDétection de gestes avec Edge Impulse et un accéléromètre créez un neurone d’intégrationet-tir avec fuiteIntelligence artificielle sans logiciel ChatGPT pour la conception électroniqueGPT-4o fait-il mieux ? intégrer l'IA périphérique avec l'ESP32-P4 fonctions vocales sur le Raspberry Pi ZeroWhen Overclocking Gives Freedom of Speech le rôle croissant de l'IA périphériqueUne tendance qui structure l'avenir exploiter la puissance de l'IA en périphérieUn entretien avec François de Rochebouët de STMicroelectronics horloge en VHDL réalisée avec ChatGPT l'impact réel de l'IASayash Kapoor à propos des "faux miracles de l'IA" et plus encore les dernières nouveautés de BeagleBoardBeagleY-AI, BeagleV-Fire, BeagleMod, BeaglePlay et BeagleConnect Freedom détection des moustiques : avec Arduino Nicla Vision et des données open source l'IA d’aujourd'hui et de demain : les idées d'Espressif, d'Arduino et de SparkFun chronologie de l'intelligence artificielle BeagleY-AIThe Latest SBC for AI Applications lumière sur l’IALes perspectives de la communauté Elektor vision artificielle avec OpenMVCréer un détecteur de canettes de soda conversation avec l'esprit numériqueChatGPT vs Gemini "Skilling Me Softley with This Bot?"L'essor de l'IA dans le secteur électronique freiné par une absence de précision sociale ?
€ 10,95
-

Elektor Digital Elektor AI Guest Edition 2024 (PDF)
Elektor GREEN en GOLD leden kunnen deze uitgave hier downloaden. Nog geen lid? Klik hier om een lidmaatschap af te sluiten. Het AlertAlfred AI-beveiligingssysteemmet Raspberry Pi 5 en Hailo 8L-module AI in elektronica-ontwikkelingeen update na slechts één jaar AI-algoritmen – een inleidingprompt: welke algoritmen implementeren AI-tools? Single-board computers voor AI-projectenachtergrond en overzicht Van sensordata naar machine learning-modelgebarendetectie met een versnellingsmeter en Edge Impulse Bouw uw eigen lekkend integreer-en-vuur neuronkunstmatige intelligentie zonder software Elektronica ontwerpen met ChatGPTdoet GPT-4o het beter? Breng AI naar de edgemet ESP32-P4 Spraakfuncties verkennen met een Raspberry Pi Zerooverklokken geeft recht van spreken De groeiende rol van Edge-AIeen trend die de toekomst vormgeeft De kracht van Edge-AI ontsluiteneen gesprek met François de Rochebouët van STMicroelectronics Een VHDL-klok gemaakt met ChatGPThoe AI de manier waarop we leren transformeert De werkelijke impact van AISayash Kapoor over ‘Haarlemmer AI-olie’ en meer Het laatste nieuws van BeagleBoardBeagleY-AI, BeagleV-Fire, BeagleMod, BeaglePlay en BeagleConnect Freedom Muggen detecterenmet open datasets en Arduino Nicla Vision AI nu en morgen:gedachten van Espressif, Arduino en SparkFun Tijdlijn kunstmatige intelligentie BeagleY-AIde nieuwste SBC voor AI-toepassingen AI in beeldgedachten uit de Elektor-community Machine vision met OpenMVmaak een frisdrankblik-detector Een gesprek met het digitale breinChatGPT versus Gemini “Skilling Me Softly with This Bot?”mislukt de AI-revolutie op elektronisch gebied door een gebrek aan sociale precisie?
€ 9,95
-

Elektor Labs Elektor AM-zender Kit
Bouw je eigen vintage radiozender De Elektor AM-zender kit maakt het mogelijk om audio te streamen naar vintage AM-radiotoestellen. Gebaseerd op een Raspberry Pi Pico microcontroller-module kan de AM-zender uitzenden op 32 frequenties in de AM-band, van 500 kHz tot 1,6 MHz in 32 stappen van ca. 35 kHz. De frequentie wordt gekozen met een potentiometer en weergegeven op een 0,96" OLED-display. Een drukknop maakt het mogelijk om de zendmodus te schakelen tussen Aan en Uit. Het bereik van de zender hangt af van de antenne. De ingebouwde antenne biedt een bereik van enkele centimeters, waardoor de AM-zender dicht bij of in de radio moet worden geplaatst. Een externe lusantenne (niet inbegrepen) kan worden aangesloten om het bereik te vergroten. De Elektor AM-zender kit wordt geleverd als een bouwpakket dat je zelf op de printplaat moet solderen. Kenmerken De printplaat is compatibel met een Hammond 1593N-behuizing (niet inbegrepen).Een 5 VDC-voeding met micro-USB-connector (bijv. een oude telefoonoplader) is nodig om de kit van stroom te voorzien (niet inbegrepen). Stroomverbruik: 100 mA. De Arduino-software (vereist het RP2040-boards-pakket van Earle Philhower) voor de Elektor AM-zenderkit plus meer informatie is beschikbaar op de Elektor Labs-pagina van dit project. Componentenlijst Weerstanden R1, R4 = 100 Ω R2, R3, R8 = 10 kΩ R5, R6, R9, R10, R11 = 1 kΩ R7 = optioneel (niet inbegrepen) P1 = potentiometer 100 kΩ, lineair Condensatoren C1 = 22 µF 16V C2, C4 = 10 nF C3 = 150 pF Diversen K1 = 4×1 pinheader K2, K3 = 3,5 mm-aansluiting Raspberry Pi Pico Drukknop, haaks gemonteerd 0,96" monochroom I²C OLED-display PCB 150292-1
€ 34,95€ 29,95
Beste prijs
-

Elektor Classics Elektor Archief 1961-2025 (USB-stick)
65 jaargangen op USB – Nu incl. jaargang 2025! NIEUW: Voor artikelen vanaf het jaar 2000 is er nu een aparte downloadoptie voor extra materiaal zoals PCB-layouts, Gerber-bestanden en software! Deze USB-stick (64 GB, USB 3.0) bevat de complete jaargangen 1961-2025 (alle nummers) van het elektronica-vakblad Elektor. Elektor wil mensen inspireren om zich elektronica en computertechniek eigen te maken door het presenteren van nabouwvriendelijke, professioneel ontworpen schakelingen op alle terreinen van de elektronica: Audio & Video Basiskennis Computer & apparatuur Hobby & modelbouw Hoogfrequent Huis & tuin Meten & testen Microcontrollers Stroomvoorziening Al dat andere dat niet zo gemakkelijk in een van deze categorieën kan worden ondergebracht. De meer dan 15.000 afzonderlijke artikelen zijn chronologisch op publicatiedatum (maand/jaar) geordend. Elektor GPT Elektor GPT is een AI-aangedreven tool waarmee gebruikers door het decennialange Elektor-archief kunnen navigeren. Met behulp van geavanceerde zoekalgoritmen en natuurlijke taalverwerking vindt Elektor GPT snel artikelen, projecten en andere bronnen uit het archief. Specificaties Geheugen 64 GB Connectoren 1x USB-A1x USB-C Systeemeisen Computer geschikt voor Adobe Reader vanaf versie 7 Webbrowser
€ 199,95€ 99,95
Beste prijs
-

Elektor Classics Elektor Archive 1978-2025 (USB Stick) FR
48 années sur clé USB – Année 2025 incluse ! NOUVEAU : Pour les articles à partir de l’année 2000, une option de téléchargement séparée est désormais disponible pour des ressources supplémentaires telles que les plans de PCB, les fichiers Gerber et les logiciels ! Cette clé USB (64 Go, USB 3.0) contient tous les numéros d’Elektor en français des années 1978 à 2025. Elektor propose à ses lecteurs des montages électroniques de conception professionnelle et aisément reproductibles, dans les domaines de l’électronique et de l’informatique appliquées. Il leur apporte également des informations sur l’évolution technologique et les nouveaux produits. Les principaux domaines d’application sont : Alimentation Audio, vidéo & HiFi Auto, moto & vélo Domestique Expérimentation Hautes-fréquences Informations générales Loisirs Mesure Microcontrôleurs & PC Photographie Plus de 10.000 articles d’Elektor sont réunis sur cette clé USB, présentés par ordre de parution (mois/année). Elektor GPT Elektor GPT est un outil basé sur l'IA qui aide les utilisateurs à naviguer dans les archives d'Elektor, vieilles de plusieurs décennies. Grâce à des algorithmes de recherche avancés et au traitement du langage naturel, Elektor GPT trouve rapidement des articles, des projets et d'autres ressources dans les archives. Spécifications Stockage 64 Go Connecteurs 1x USB-A1x USB-C Matériel et logiciel requis Ordinateur avec Adobe Reader version 7 ou sup. Navigateur Internet
€ 199,95€ 99,95
Beste prijs
-

Elektor Digital Speciale Elektor-editie: Gastredactie door Arduino 2022 (PDF)
Elektor GREEN en GOLD leden kunnen deze uitgave hier downloaden.Nog geen lid? Klik hier om een lidmaatschap af te sluiten. Arduino Portenta Machine Control en Arduino Portenta H7CAN/MQTT-gateway: een demoproject Uitgepakt: Elektor’s LCR Meter Kitmet David Cuartielles, mede-oprichter van Arduino! MicroPython betreedt de wereld van Arduino Connected, maar niet complexneem een duik in de Arduino Cloud Kennismaking met TinyMLgroot is niet altijd beter Arduino K-Way:bewust luchtig Arduino-sketches schrijven is nog beter geworden Maak kennis met Arduino Aan de slag met de Portenta X8software veilig beheren met containers Bouw, uitrol en onderhoud van schaalbare, veilige applicatiesop basis van Arduino Portenta X8 – met de i.MX 8M Mini Applications Processor en EdgeLock SE050 Secure Element van NXP Hoe ik mijn huis automatiseerdeFabio Violante (CEO Arduino) over zijn oplossingen Altair 8800-simulatorhardwaresimulatie van een vintage computer MS-DOS op de Portenta H7antieke software op moderne hardware Landbouw in zakformaatdigitaal gestuurde kweekbox voor binnenshuis Met Home Automation de wereld redden?MQTT op de Arduino Nano RP2040 Connect Arduino Pro voor professionals Slimme ovens – de ovens van de toekomst Tagvance maakt bouwlocaties veiliger met Arduino Santagostino krijgt genoeg luchtmet bewaking op afstand en gebruik van AI bij voorspellend onderhoud Beveiliging neemt een hoge vlucht met RIoT Secure’s MKR-gebaseerde oplossing Open-Source brengt de wereld een nieuwe generatie watermanagement Sensoontbossing detecteren met geluidsanalyse De Mozzi Arduino-library voor geluidssynthesegedachten van Tim Barrass De nieuwe Portenta X8 (met Linux!) en Max Carrier herdefiniëren het haalbare Hoe de Arduino studenten aan vaardigheden voor de toekomst helpt Must-haves voor je elektronica-werkplek Het belang van robotica in het onderwijs Betrouwbaar IoT op basis van LoRa Aan de slag met de Portenta Machine Control 8bit-gaming met Arduboy Spaar water op de paardenrenbaanmeet continu de bodemvochtigheid en temperatuurniveau via IoT Het panettone-projectzuurdesemstarter onder controle Met steun van deze Arduino-resellers Space Invaders met Arduino Kunst met Arduinoinspirerende inzichten van kunstenaars en ontwerpers Aan de slag met nieuwe Arduino-hardware! De toekomst van Arduino
€ 9,95
-
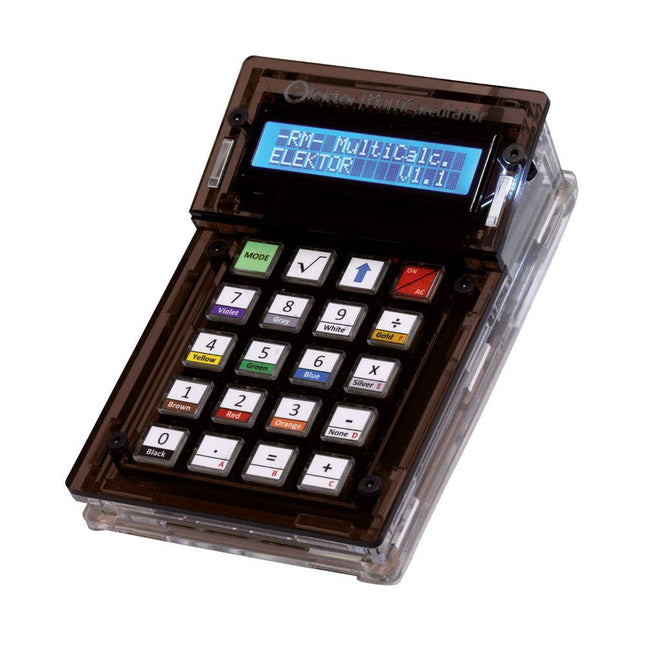
Elektor Labs Elektor Arduino MultiCalculator
De Elektor MultiCalculator Kit is een op Arduino-gebaseerde multifunctionele rekenmachine die verder gaat dan basisberekeningen. Hij biedt 22 functies, waaronder licht- en temperatuurmeting, differentiële temperatuuranalyse en NEC IR-afstandsbedieningsdecodering. De Elektor MultiCalculator is een handig hulpmiddel voor gebruik in je projecten of voor educatieve doeleinden. De kit heeft een Pro Mini module als rekeneenheid. De printplaat is eenvoudig te monteren met behulp van through-hole componenten. De behuizing bestaat uit 11 acrylpanelen en montagemateriaal voor eenvoudige montage. Bovendien is het apparaat uitgerust met een 16x2 alfanumeriek LCD-scherm, 20 knoppen en temperatuursensoren. De Elektor MultiCalculator is programmeerbaar met de Arduino IDE via een 6-weg PCB-header. De beschikbare software is tweetalig (Engels en Nederlands). De calculator kan worden geprogrammeerd met een programmeeradapter en wordt gevoed via USB-C. Bedrijfsmodi Rekenmachine 4-ringsweerstandscode 5-ringsweerstandscode Conversie van decimaal naar hexadecimaal en tekens (ASCII) Conversie van hexadecimaal naar decimaal en tekens (ASCII) Conversie van decimaal naar binair en tekens (ASCII) Conversie van binair naar decimaal en hexadecimaal Berekening van Hz, nF, capacitieve reactantie (XC) Berekening van Hz, µH, inductieve reactantie (XL) Weerstandberekening van twee parallel geschakelde weerstanden Weerstandberekening van twee in serie geschakelde weerstanden Berekening van onbekende parallelle weerstand Temperatuurmeting Verschiltemperatuurmeting T1&T2 en Delta (δ) Lichtmeting Stopwatch met rondetijdfunctie Artikelteller NEC IR-decodering van de afstandsbediening AWG-conversie (American Wire Gauge) Dobbelstenen gooien Personaliseer het opstartbericht Temperatuurkalibratie Specificaties Menutalen: Engels, Nederlands Afmetingen: 92 x 138 x 40 mm Bouwtijd: ongeveer 5 uur Inbegrepen PCB's en componenten met doorlopende gaten Voorgesneden acrylplaten met alle mechanische onderdelen Pro Mini-microcontrollermodule (ATmega328/5 V/16 MHz) Programmeeradapter Waterdichte temperatuursensoren USB-C kabel Downloads Software
€ 49,95€ 39,95
Beste prijs
-

Elektor Labs Elektor Arduino Nano MCCAB Training Board
Het Elektor Arduino Nano MCCAB Training Board bevat alle componenten (incl. Arduino Nano) die nodig zijn voor de oefeningen, zoals LED’s, schakelaars, drukknoppen, buzzer enz. Ook externe sensoren, motoren of modules kunnen worden gecheckt of bestuurd met dit microcontroller-trainingssysteem. Specificaties (Arduino Nano Training Board MCCAB) Voeding Via de USB-aansluiting van de aangesloten pc of een externe voeding (niet inbegrepen) Spanning +5 Vcc Ingangsspanning Alle ingangen 0 V tot +5 V VX1 en VX2 +8 V tot +12 V (alleen bij gebruik van een externe voeding) Hardware LCD 2x16 karakters Potentiometer P1 & P2 JP3: Selectie van de werkspanning van P1 & P2 Verdelers SV4: Verdeler voor de werkspanningenSV5, SV6: Verdelers voor de in-/uitgangen van de microcontroller Schakelaars en knoppen RESET knop op de Arduino Nano module; 6x drukknop schakelaars K1 ... K6; 6x Schuifschakelaars S1 ... S6; JP2: Jumper van de schakelaars met de ingangen van de microcontroller Buzzer Piezo buzzer ‘Buzzer1’ met jumper op JP6 Indicator LED’s 11 x LED: Status indicator voor de ingangen/uitgangen LED L op de Arduino Nano module, aangesloten op GPIO D13 JP6; Aansluiting van LED's LD10 ... LD20 met GPIO's D2 ... D12 Seriële interfacesSPI & I²C JP4: Selectie van het signaal op pin X van de SPI-connector SV12 SV9 naar SV12: SPI-interface (3,3 V/5 V) of I²C-interface Uitgangen voor externe apparaten SV1, SV7: Geschakelde uitgang (maximaal +24 V/160 mA, extern aangesloten) SV2: 2x13 pinnen voor aansluiting van externe modules 3x3 LED matrix(9 rode LED's) SV3: Kolommen van de 3x3 LED matrix (uitgangen D6 ... D8) JP1: Verbinding van de rijen met de GPIO's D3 ... D5 Software MCCABLib library Controle van hardware componenten (schakelaars, knoppen, LED's, 3x3 LED matrix, buzzer) op het MCCAB Training Board Werktemperatuur Tot +40 °C Afmetingen 100 x 100 x 20 mm Specificaties (Arduino Nano) Microcontroller ATmega328P Architectuur AVR Spanning 5 V Flash memory 32 KB, waarvan 2 KB gebruikt door de bootloader SRAM 2 KB Kloksnelheid 16 MHz Analoge IN Pinnen 8 EEPROM 1 KB DC stroom per I/O-pin 40 mA op één I/O-pin, totaal maximaal 200 mA op alle pinnen samen Ingangsspanning 7-12 V Digitale I/O-pinnen 22 (waarvan 6 PWM) PWM Uitgangen 6 Stroomverbruik 19 mA Afmetingen 18 x 45 mm Gewicht 7 g Inbegrepen 1x Elektor Arduino Nano Training Board MCCAB 1x Arduino Nano
€ 79,95
Leden: € 71,96
-
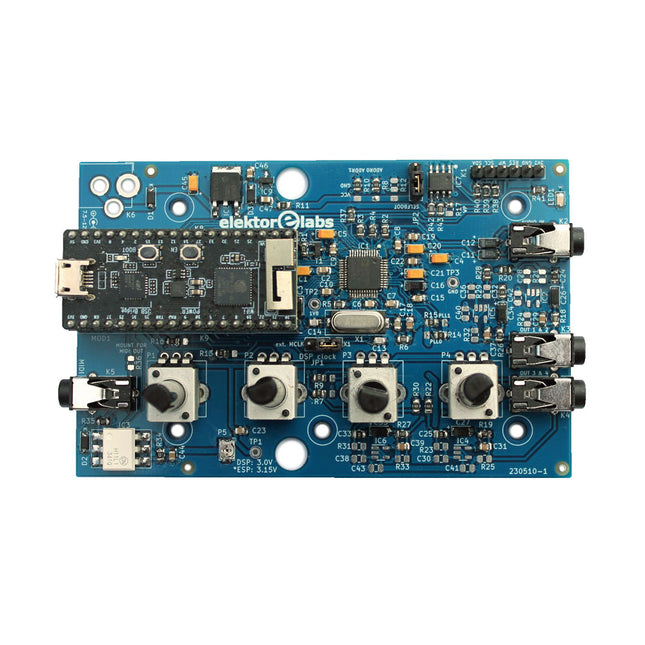
Elektor Labs Elektor Audio DSP FX Processor (Nieuwe Revisie)
De Elektor Audio DSP FX Processor combineert een ESP32-microcontroller en een ADAU1701 Audio DSP van Analog Devices. Naast een door de gebruiker programmeerbare DSP-kern heeft de ADAU1701 hoogwaardige analoog-naar-digitaal en digitaal-naar-analoog converters ingebouwd en is hij voorzien van een I²S-poort. Dit maakt hem geschikt als hoogwaardige audio-interface voor de ESP32. Programma's voor de ESP32 kunnen worden gemaakt met Arduino, Platform IO, CMake of door de Espressif IDF op een andere manier te gebruiken. Programma's voor de ADAU7101 audio DSP's worden gemaakt met de gratis visuele programmeertool SigmaStudio door voorgedefinieerde algoritmablokken op een canvas te slepen. Toepassingen Bluetooth/Wi-Fi audio sink (bijv. luidspreker) & bron Gitaareffectpedaal (stompbox) Muzieksynthesizer Geluids-/functiegenerator Programmeerbaar cross-overfilter voor luidsprekers Geavanceerde audio-effectprocessor (reverb, chorus, pitch shifting, enz.) Audioapparaat met internetverbinding DSP-experimentplatform Draadloze MIDI MIDI naar CV-converter en nog veel meer... Specificaties ADAU1701 28-/56-bit, 50-MIPS digitale audioprocessor die bemonsteringsfrequenties tot 192 kHz ondersteunt ESP32 32-bit dual-core microcontroller met Wi-Fi 802.11b/g/n en Bluetooth 4.2 BR/EDR en BLE 2x 24-bit audio-ingangen (2 V RMS, 20 kΩ) 4x 24-bit audio-uitgangen (0,9 V RMS, 600 Ω) 4x Regelpotentiometer MIDI in- en uitgang I²C-uitbreidingspoort Multi-mode werking Voeding: 5 V DC USB of 7,5-12 V DC (cilinderaansluiting, middelste pin is GND) Stroomverbruik (gemiddeld): 200 mA Inbegrepen 1x ESP32 Audio DSP FX Processor board (gemonteerd) 1x ESP32-PICO-KIT 2x Truien 2x 18-pins headers (female) 4x 10 KB potentiometers Downloads Documentation GitHub
€ 99,95€ 84,95
Beste prijs
-

Elektor Digital Elektor Circuit Special 2023 (PDF)
Elektor GREEN en GOLD leden kunnen deze uitgave hier downloaden.Nog geen lid? Klik hier om een lidmaatschap af te sluiten. Mini-zonnevoedingzon in, 3,3 V uit Solid-state stereo-audioschakelaarklikvrij en zonder bewegende onderdelen Grote RGB-digitmet through-hole WS2812 LED’s Microfoon-voorversterker met 48V-fantoomvoedingvoor podcasting en pro-audio Blokgolfgeneratoren met regelbare duty cycle en frequentiesimpele schakelingen met CMOS- en TTL-IC’s Eenvoudige dynamiekcompressorsofte aansturing, warm geluid Simpel elektronisch slot Actieve gelijkrichtervoor 2...40 V bij maximaal 3 A met tegenstroomonderdrukking Actieve boxen in- en uitschakelen Ongebalanceerd/gebalanceerd-convertermet RF-filter en DC-bescherming 2023: een AI-odysseewaar komt het vandaan en waar gaat het naar toe? Snelheidsregelaar voor ventilatormet handmatige en thermostaatmodus Laatste nieuwtjes van Arduino Project Hubnieuwe projecten uit de community Overbelastingsmonitorbewaakt netsnoeren Transistorloos knipperlicht in het donkeroscillator met alleen tweedraads onderdelen Morsecode-generatorvoor gebruik als baken of leermiddel! Programmeerbare video-DACvoor elk formaat tot RGB888 Kleintje klavierzonder bewegende onderdelen Dubbel-dobbel zonder microprocessordubbele dobbelsteen op een enkele print – plus enkele ontwerptrucs Elektronische vogelverschrikker Amusante, inspirerende en verbazingwekkende schakelingen LC/LP/HA-thermometernauwkeurige metingen en een binair display THD-generatorvervorming, maar dan opzettelijk Overtemperatuur-indicator met thyristorelektronische onderdelen ongebruikelijk gebruikt Een PTC-flipflop Sociale vogeleen tsjilpende Elektor Klassieker Neonlamp plus microcontroller Temperatuurgestabiliseerde IC-stroombronneutraliseer de temperatuurdrift van deze driebeners Regelbare tweede-orde hogetonen-boostergehoorsteuntje voor ouderen Edwin komt naar huisherinneringen na 53 jaar Eénarmige bandieteen eenvoudige, leuke, nostalgische en leerzame Elektor-klassieker! Eenvoudige digitaal gestuurde variabele weerstand Lekdetectorbeveiligt en alarmeert bij lekkages Eco-timer met automatische uitschakelingverbruikt niets in uitgeschakelde toestand! ChatGPT en Arduino Zenermetermeet de Z-spanning van Z-diodes ? 100 V Servotester ESP32 Windows-controller met gratis software Analoge en mixed-signal IC’s van Microchipzuinige signaalverwerking Interfacenormenfilter en overspanningsbeveiliging voor de I²C-bus Li-Ion accumonitorrestlading-indicator geeft visuele feedback PS/2-muis als draai-encoder (en meer...) Simpele schemerschakelaarvoor bestaande lampen of installaties Controller voor waterpompbereid je voor op hoogwater Kerstbal met FM-zonneradiomeer heb je voor de kerst niet nodig Trillingssensor met relaistik of schud om in te schakelen Doorgangstestergevoelig en niet storend In- en uitschakelen met een drukknop Regeling voor mini-boor (2023)een ontwerp uit 1980 herzien Digitale trillingssensorzet trillingen om in nauwkeurig getimede pulsen Ompoolbeveiliging met kleine spanningsval Goedkope frequentiestandaard Kleine DCF77-simulatornauwkeurige fake-tijdstandaard De Lilygo T-PicoC3combineert RP2040 en ESP32-C3 met een full-color TFT-display Hexadoku
€ 9,95


