Bestsellers
-

OWON OWON XDM1241 True RMS Multimeter
The OWON XDM1241 is a fast, high-precision digital True RMS benchtop multimeter with a high-resolution 3.5-inch LCD and 50,000 counts. Its DC voltage accuracy is up to 0.05% and it can measure up to 65 values per second. Kenmerken 3.5" high-resolution LCD (480x320 pixels) 55000 counts, DC voltage accuracy up to 0.05% Up to 65 readings per second Dual line display supported Trend analysis accessible in chart mode AC True RMS measurements (bandwidth: 20 Hz – 1 kHz) SCPI support: Remote control the multimeter through PC software via USB port Data record function, you can record the measured data into internal memory, and then read and process the recorded data with your computer. Specificaties Measurement Range Resolution Accuracy DC Voltage 50.000 mV 0.001 mV 0.1% +10 500.00 mV 0.01 mV 0.05% +5 5.0000 V 0.0001 V 0.05% +5 50.000 V 0.001 V 0.05% +5 500.00 V 0.01 V 0.1% +5 1000.0 V 0.1 V 0.1% +10 AC Voltage 500 mV~750 V 20 Hz~45 Hz 1% +30 45 Hz~65 Hz 0.5% +30 65 Hz~1 KHz 0.7% +30 DC Current 500 uA 0.01 uA 0.15% +20 5000 uA 0.1 uA 0.15% +10 50 mA 0.001 mA 0.15% +20 500 mA 0.01 mA 0.15% +10 5 A 0.0001 A 0.5% +10 10 A 0.001 A 0.5% +10 AC Current 500 uA~500 mA 20 Hz~1 KHz 0.5% +20 5 A-10 A 1.5% +20 Resistance 500 Ω 0.01 Ω 0.15% +10 5 KΩ 0.0001 KΩ 0.15% +5 50 KΩ 0.001 KΩ 0.15% +5 500 KΩ 0.01 KΩ 0.15% +5 5 MΩ 0.0001 MΩ 0.3% +5 50 MΩ 0.001 MΩ 1% +10 Frequency 10.000 Hz~60 MHz / ±(0.2% +10) Capacitance 50 nF~500 uF / 2.5% +10 5 mF50 mF 5% +10 Diode 3.0000 V 0.0001 V / Continuity 1000 Ω 0.1 Ω Adjustable threshold Temperature K type, PT100 Max Display 55,000 counts Data-logging Function Logging Duration 15ms~9999.999s Logging Length 1,000 points Display 3.5" TFT LCD (480x320 pixels) Power supply Lithium battery via USB-C or 5 V DC input Dimensions 235 x 88 x 65 mm Weight approx. 0.5 kg Inbegrepen 1x OWON XDM1241 Multimeter 2x Test leads 1x USB cable 1x USB to DC cord 1x Manual Downloads Programming Manual PC Software
€ 108,90
-

Elektor Digital C Programming for Embedded Microcontrollers (E-book)
Technology is constantly changing. New microcontrollers become available every year and old ones become redundant. The one thing that has stayed the same is the C programming language used to program these microcontrollers. If you would like to learn this standard language to program microcontrollers, then this book is for you! ARM microcontrollers are available from a large number of manufacturers. They are 32-bit microcontrollers and usually contain a decent amount of memory and a large number of on-chip peripherals. Although this book concentrates on ARM microcontrollers from Atmel, the C programming language applies equally to other manufacturer’s ARMs as well as other microcontrollers. Features of this book Use only free or open source software. Learn how to download, set up and use free C programming tools. Start learning the C language to write simple PC programs before tackling embedded programming - no need to buy an embedded system right away! Start learning to program from the very first chapter with simple programs and slowly build from there. No programming experience is necessary! Learn by doing - type and run the example programs and exercises. Sample programs and exercises can be downloaded from the Internet. A fun way to learn the C programming language. Ideal for electronic hobbyists, students and engineers wanting to learn the C programming language in an embedded environment on ARM microcontrollers.
€ 29,95
Leden: € 26,96
-

Elektor Digital ESP8266 and MicroPython (E-book)
Recently, the development of a tiny chip called the ESP8266 has made it possible to interface any type of microcontroller to a Wi-Fi AP. The ESP8266 is a low-cost tiny Wi-Fi chip having fully built-in TCP/IP stack and a 32-bit microcontroller unit. This chip, produced by Shanghai based Chinese manufacturer Espressif System, is IEEE 802.11 b/g/n Wi-Fi compatible with on-chip program and data memory, and general purpose input-output ports. Several manufacturers have incorporated the ESP8266 chip in their hardware products (e.g. ESP-xx, NodeMCU etc) and offer these products as a means of connecting a microcontroller system such as the Android, PIC microcontroller or others to a Wi-Fi. The ESP8266 is a low-power chip and costs only a few Dollars. ESP8266 and MicroPython – Coding Cool Stuff is an introduction to the ESP8266 chip and describes the features of this chip and shows how various firmware and programming languages such as the MicroPython can be uploaded to the chip. The main aim of the book is to teach the readers how to use the MicroPython programming language on ESP8266 based hardware, especially on the NodeMCU. Several interesting and useful projects are given in the e-book (pdf) to show how to use the MicroPython in NodeMCU type ESP8266 hardware: Project “What shall I wear today?”: You will be developing a weather information system using a NodeMCU development board together with a Text-to-Speech processor module. Project “The Temperature and Humidity on the Cloud”: You will be developing a system that will get the ambient temperature and humidity using a sensor and then store this data on the cloud so that it can be accessed from anywhere. Project “Remote Web Based Control”: You will be developing a system that will remotely control two LEDs connected to a NodeMCU development board using an HTTP Web Server application.
€ 29,95
Leden: € 26,96
-

Elektor Publishing SDR with HackRF One & HackRF Pro
Programming with GNU Radio HackRF is an open-source hardware platform developed by Great Scott Gadgets and serves as a versatile front end for software-defined radio (SDR). With HackRF One and its successor, HackRF Pro, users can develop their own SDR applications, build powerful receivers and transmitters, and tackle demanding RF measurement tasks. This book provides a practical introduction to the world of SDR. Step by step, the author shows how powerful SDR projects can be implemented with HackRF – from the fundamentals of RF technology to advanced applications using GNU Radio. In addition to working with SDR Sharp (SDR#), RadioConda, and GNU Radio, the book also covers the fundamentals of modern digital signal processing. Numerous experiments and easy-to-follow practical examples guide readers through topics such as AM, FM, and SSB reception, digital filters, shortwave radio, amateur radio, signal generators, and custom RF projects up to 6 GHz. Whether you are a maker, radio amateur, electronics enthusiast, or SDR beginner, this book provides solid knowledge, practical applications, and the motivation to creatively explore the possibilities of modern SDR technology.
€ 24,95
Leden: € 22,46
-

OWON OWON OW18E True RMS Multimeter
Kenmerken 4 1/2 bit resolutie (20000 counts) Datalogger Multimeter Thermometer True RMS test ondersteund BLE 4.0 draadloze transmissie, stabieler, minder stroomverbruik Ingebouwde offline opnamefunctie Grafiek en Diagram modus helpen om de datatrend te analyseren Met de zaklampfunctie om licht in de duisternis te brengen Ondersteuning van NCV (non-contact voltage sense), een draadloze spanningszoeker Brede ondersteuning op Android, iOS, Windowss Inbegrepen OWON OW18E Multimeter Korte handleiding Multimeter snoeren K-type Thermokoppel Schroefkop houder App Downloaden De Bluetooth functie van deze multimeter is compatibel met Android-app versie 1.5.8.0 of nieuwer. Gebruik de QR code in de doos of ga naar http://files.owon.com.cn/bluetooth.
€ 59,95
-

OWON OWON HDS242 2-ch Oscilloscope (40 MHz) + Multimeter
De HDS242 is een draagbare 2-in-1 multifunctionele tester, die kan worden gebruikt als een 2-kanaals oscilloscoop en multimeter. Hij beschikt over een contrastrijk 3,5-inch kleurendisplay dat geschikt is voor outdoor service, snelle metingen op locatie, voertuigonderhoud, spanningsdetectie, en meer.Kenmerken Oscilloscoop + multimeter 3,5-inch LCD-kleurenscherm met hoge resolutie en hoog contrast – geschikt voor gebruik buitenshuis 18650 lithium accu – kan tot 6 uur continu werken USB Type-C interface - ondersteuning voor powerbank en PC-aansluiting Zelfkalibratie functie SCPI ondersteund – faciliteer secundairy development Specificaties Oscilloscoop Bandbreedte 40 MHz Kanalen 2-kanaals oscilloscoop Sample frequentie 250 MSa/s Acquisition modi Normaal, Piekdetectie Record Lengte 8K Display 3,5-inch LCD Golfvorm refresh rate 10.000 wfrms/s Ingangssignaal DC, AC en Ground Ingangsimpedantie 1 M? ±2%, parallel aan 16pF ±10pF Probe dempingen 1X, 10X, 100X, 1000X, 10000X Max. Ingangsspanning 400 V (DC+AC, PK-PK, 1M? ingangsimpedantie) (10:1 probe demping) Bandbreedte (typical) 20 MHz Horizontale schaal 5ns/div - 1000s/div, in stappen van 1 - 2 - 52ns/div - 1000s/div, in stappen van 1 - 2 - 55ns/div - 1000s/div, in stappen van 1 - 2 - 52ns/div - 1000s/div, in stappen van 1 - 2 - 5 Verticale gevoeligheid 10mV/div - 10V/div Verticale resolutie 8 bits Trigger Type Edge Trigger Modi Auto, Normal, Single Automatische Meting Frequency, Period, Amplitude, Max, Min, Mean, PK-PK Cursor meting ? V, ? T, ?T & ?V tussen cursors Multimeter Max resolutie 20.000 counts Test modi Spanning, Stroom, Weerstand, Capaciteit, Diode en Continuïteitstest Ingangsimpedantie 10 M? Max ingangsspanning AC: 750 V | DC: 1000 V Max ingangsstroom DC: 10 A | AC: 10 A Diode 0-2 V Overig Connectiviteit USB Type-C Afmetingen 198 x 96 x 38 mm (7,68 x 3,74 x 1,5') Gewicht 600 g (zonder accu) Inbegrepen 1x OWON HDS242 Oscilloscoop 1x tasje 1x probe 1x netsnoer 1x probe adjust 1x USB-kabel 1x voedingsadapter 1x set multimeter probe kabels (rode en zwarte) 1x set oscilloscoop probe leads (BNC naar Krokodil) 1x gebruikershandleiding (Engels) Downloads User Manual for HDS200 Series SCPI Protocol for HDS200 Series Quick Guide for HDS200 Series PC Software for OWON HDS200 Series
€ 112,87
-

Elektor Digital GSM/GPRS Projects (E-book)
Based on PIC microcontrollers and Arduino Every mobile phone includes a GSM/GPRS modem which enables the phone to communicate with the external world. With the help of the GSM modems, users can establish audio conversations and send and receive SMS text messages. In addition, the GPRS modem enables users to connect to the internet and to send and receive large files such as pictures and video over the internet. This book is aimed for the people who may want to learn how to use the GSM/GPRS modems in microcontroller based projects. Two types of popular microcontroller families are considered in the e-book: PIC microcontrollers, and the Arduino. The highly popular mid-performance PIC18F87J50 microcontroller is used in PIC based projects together with a GSM Click board. In addition, the SIM900 GSM/GPRS shield is used with the Arduino Uno projects. Both GSM and GPRS based projects are included in the e-book. The book will enable you to control equipment remotely by sending SMS messages from your mobile phone to the microcontroller, send the ambient temperature readings from the microcontroller to a mobile phone as SMS messages, use the GPRS commands to access the internet from a microcontroller, send temperature readings to the cloud using UDP and TCP protocols and so on. It is assumed that the reader has some basic working knowledge of the C language and the use of microcontrollers in simple projects. Although not necessary, knowledge of at least one member of the PIC microcontroller family and the Arduino Uno will be an advantage. It will also be useful if the user has some knowledge of basic electronics.
€ 24,95
Leden: € 22,46
-

Elektor Digital Controller Area Network Projects with ARM and Arduino (E-book)
This book details the use of the ARM Cortex-M family of processors and the Arduino Uno in practical CAN bus based projects. Inside, it gives a detailed introduction to the architecture of the Cortex-M family whilst providing examples of popular hardware and software development kits. Using these kits helps to simplify the embedded design cycle considerably and makes it easier to develop, debug, and test a CAN bus based project. The architecture of the highly popular ARM Cortex-M processor STM32F407VGT6 is described at a high level by considering its various modules. In addition, the use of the mikroC Pro for ARM and Arduino Uno CAN bus library of functions are described in detail. This book is written for students, for practising engineers, for hobbyists, and for everyone else who may need to learn more about the CAN bus and its applications. The book assumes that the reader has some knowledge of basic electronics. Knowledge of the C programming language will be useful in later chapters of the book, and familiarity with at least one microcontroller will be an advantage, especially if the reader intends to develop microcontroller based projects using CAN bus. The book should be useful source of reference to anyone interested in finding an answer to one or more of the following questions: What bus systems are available for the automotive industry? What are the principles of the CAN bus? What types of frames (or data packets) are available in a CAN bus system? How can errors be detected in a CAN bus system and how reliable is a CAN bus system? What types of CAN bus controllers are there? What are the advantages of the ARM Cortex-M microcontrollers? How can one create a CAN bus project using an ARM microcontroller? How can one create a CAN bus project using an Arduino microcontroller? How can one monitor data on the CAN bus?
€ 32,95
Leden: € 29,66
-

Elektor Digital Controller Area Network Projects (E-book)
The Controller Area Network (CAN) was originally developed to be used as a vehicle data bus system in passenger cars. Today, CAN controllers are available from over 20 manufacturers, and CAN is finding applications in other fields, such as medical, aerospace, process control, automation, and so on. This book is written for students, for practising engineers, for hobbyists, and for everyone else who may be interested to learn more about the CAN bus and its applications. The aim of this book is to teach you the basic principles of CAN networks and in addition the development of microcontroller based projects using the CAN bus. In summary, this book enables the reader to: Learn the theory of the CAN bus used in automotive industry Learn the principles, operation, and programming of microcontrollers Design complete microcontroller based projects using the C language Develop complete real CAN bus projects using microcontrollers Learn the principles of OBD systems used to debug vehicle electronics You will learn how to design microcontroller based CAN bus nodes, build a CAN bus, develop high-level programs, and then exchange data in real-time over the bus. You will also learn how to build microcontroller hardware and interface it to LEDs, LCDs, and A/D converters. The book assumes that the reader has some knowledge on basic electronics. Knowledge of the C programming language will be useful in later chapters of the book, and familiarity with at least one member of the PIC series of microcontrollers will be an advantage, especially if the reader intends to develop microcontroller based projects using the CAN bus.
€ 29,95
Leden: € 26,96
-
Würth Trilogy of Connectors, 3rd Edition (E-book)
Contents Basic principles A connector is an electromechanical system that provides a separable connection between two subsystems of an electronic device without an unacceptable effect on the performance of the device. It will be shown that there are a lot of complex parameters to handle properly to make this statement true. Design / Selection / Assembly This chapter provides an overview of design and material requirements for contact finishes, contact springs and connector housings as well as the major degradation mechanisms for these connector components. To complete this chapter, material selection criteria for each will also be reviewed. Additionally the Level of Interconnection (LOI) was integrated into this chapter as it addresses, where the connector is used within an electronic system and therefore influences the requirements and durability of the connector depending on its use. Applications This chapter is heading to the practical work and shows how customers use connectors in their applications to offer some possibilities and to ease your daily work. Additionally it contains some special topics like tin-whisker or impedance of ZIF cable to offer you extended background knowledge.
€ 26,99
Leden: € 24,29
-

Elektor Digital MSP430 Microcontroller Essentials (E-book)
Architecture, Programming and Applications The MSP430 is a popular family of microcontrollers from Texas Instruments. In this book we will work with the smallest type, which is the powerful MSP430G2553. We will look at the capabilities of this microcontroller in detail, as it is well-suited for self-made projects because it is available in a P-DIP20 package. We will take a closer look at the microcontroller and then build, step by step, some interesting applications, including a 'Hello World' blinking LED and a nice clock application, which can calculate the day of the week based on the date. You also will learn how to create code for the MSP microcontroller in assembler. In addition to that, we will work with the MSP-Arduino IDE, which makes it quite easy to create fast applications without special in-depth knowledge of the microcontrollers. All the code used in the book is available for download from the Elektor website.
€ 32,95
Leden: € 29,66
-
Elektor Digital Compilation Arduino (FR) | (E-book)
Cette compilation comprend des articles intégrés de l'actuel Elektor entre juillet 2012 et novembre 2014. Les documents suivants sont inclus dans le numéro de document (PDF) avec la fonction de navigation disponible et les articles sont intéressants.
€ 9,95
Leden: € 8,96
-

SEQURE SEQURE T55 Smart Mini Soldeer Hot Plate (55x55 mm)
De SEQURE T55 Smart Mini Temperatuur Verstelbare Soldeerplaat is een compact en efficiënt apparaat, ontworpen voor nauwkeurig voorverwarmen en desolderen. Met zijn instelbare temperatuurbereik van 50°C tot 280°C is hij geschikt voor diverse toepassingen, zoals het repareren van mobiele telefoons, het monteren van printplaten, enz. Kenmerken Instelbaar verwarmingstemperatuurbereik: 50°C tot 280°C Uitgerust met een hittebestendige keramische temperatuursensor, voor een zeer nauwkeurige gegevensmeting bij continu hoge temperaturen. Stopt automatisch met verwarmen na het bereiken van de vooraf ingestelde werktijd. Ondersteunt PD, QC en DC (max. 25 V) Intelligent temperatuurregelalgoritme voor temperatuurcompensatie en vermogensaanpassing. OLED-display met een resolutie van 128 x 32 en een ingebouwde zoemer om de bedrijfsstatus aan te geven. °C/°F-conversie Specificaties Verwarmingsoppervlak 55 x 55 mm Werktemperatuur 50-280°C Max. spanning 25 V Max. vermogen 95 W Aanbevolen spanning 19-25 V PD-voeding PD 20 V ≥3 A Voedingsmodi PD, QC, DC Interface USB-C Display 128 x 32 OLED Menutalen Engels, Russisch en Chinees Afmetingen 55 x 60 x 37 mm Gewicht 92 g Inbegrepen 1x SEQURE T55 Smart Mini Soldeerplaat 1x PD 65 W Voeding (EU) 1x Snellaadkabel (100 W/5 A)
€ 49,95
Leden: € 44,96
-

Sensepeek Sensepeek 4012 PCBite Kit incl. 2x SP10 Probe for DMM
PCBite is the complete solution handling your circuit board during the development phase. Powerful magnets together with a stainless base plate makes the system flexible, mobile and user friendly. The holder can easily be repositioned to handle circuit boards of varying shape and sizes. The probes are steady but yet flexible made for instant measurements or total hands-free operations together with your multimeter or prefered tool. Included 4x PCBite holder 2x Banana to DuPont test wires red/black 2x SP10 probe with red/black probe head and pin tipped test needles 2x Extra crown tipped test needle 1x Set of yellow insulation washers 1x Large Baseplate (A4) 1x Microfiber cloth Downloads User Guide
€ 104,95
-

Elektor Digital The Connected Autonomous Vehicle and its Environment (E-book)
An Introduction to Real and Reduced-Scale Autonomous Vehicles Want to cut through the hype and get to the core of autonomous and connected vehicles? Then this book is your clear, accessible guide to a complex and fast-moving field. Starting with Intelligent Transport Systems (ITS), it walks you through the essential foundations, including Advanced Driver Assistance Systems (ADAS) – the stepping stones to full autonomy. Explore how self-driving cars mimic human behavior through a loop of perception, analysis, decision, and action. Discover the key functions that make it possible: localization, obstacle detection, driver monitoring, cooperative awareness – and the most challenging of all, trajectory planning, across strategic, tactical, and operational levels. Will vehicles be connected? The debate is on – but the standards are already here. Learn how connectivity, infrastructure, and vehicles can work in synergy through the innovative concept of floating car data (FCD). Dive into real-world implementation: with embedded electronics account-ing for over 30% of a modern vehicle‘s cost, we unpack the architecture, coordination, and tools required to manage the complexity – brought to life with a hands-on case study. To finish, we open the door to the future: building your own 1:10 scale autonomous vehicle. No plug-and-play solutions – just the foundations for a collaborative, creative, and geek-friendly challenge. Let’s drive the future together.
€ 29,95
Leden: € 26,96
-

Elektor Publishing H0W2: Get Started with the MAX78000FTHR Development Board
Build your own AI microcontroller applications from scratch The MAX78000FTHR from Maxim Integrated is a small development board based on the MAX78000 MCU. The main usage of this board is in artificial intelligence applications (AI) which generally require large amounts of processing power and memory. It marries an Arm Cortex-M4 processor with a floating-point unit (FPU), convolutional neural network (CNN) accelerator, and RISC-V core into a single device. It is designed for ultra-low power consumption, making it ideal for many portable AI-based applications. This book is project-based and aims to teach the basic features of the MAX78000FTHR. It demonstrates how it can be used in various classical and AI-based projects. Each project is described in detail and complete program listings are provided. Readers should be able to use the projects as they are, or modify them to suit their applications. This book covers the following features of the MAX78000FTHR microcontroller development board: Onboard LEDs and buttons External LEDs and buttons Using analog-to-digital converters I²C projects SPI projects UART projects External interrupts and timer interrupts Using the onboard microphone Using the onboard camera Convolutional Neural Network
€ 39,95
Leden: € 35,96
-

Elektor Labs Elektor Arduino Nano MCCAB Training Board
Het Elektor Arduino Nano MCCAB Training Board bevat alle componenten (incl. Arduino Nano) die nodig zijn voor de oefeningen, zoals LED’s, schakelaars, drukknoppen, buzzer enz. Ook externe sensoren, motoren of modules kunnen worden gecheckt of bestuurd met dit microcontroller-trainingssysteem. Specificaties (Arduino Nano Training Board MCCAB) Voeding Via de USB-aansluiting van de aangesloten pc of een externe voeding (niet inbegrepen) Spanning +5 Vcc Ingangsspanning Alle ingangen 0 V tot +5 V VX1 en VX2 +8 V tot +12 V (alleen bij gebruik van een externe voeding) Hardware LCD 2x16 karakters Potentiometer P1 & P2 JP3: Selectie van de werkspanning van P1 & P2 Verdelers SV4: Verdeler voor de werkspanningenSV5, SV6: Verdelers voor de in-/uitgangen van de microcontroller Schakelaars en knoppen RESET knop op de Arduino Nano module; 6x drukknop schakelaars K1 ... K6; 6x Schuifschakelaars S1 ... S6; JP2: Jumper van de schakelaars met de ingangen van de microcontroller Buzzer Piezo buzzer ‘Buzzer1’ met jumper op JP6 Indicator LED’s 11 x LED: Status indicator voor de ingangen/uitgangen LED L op de Arduino Nano module, aangesloten op GPIO D13 JP6; Aansluiting van LED's LD10 ... LD20 met GPIO's D2 ... D12 Seriële interfacesSPI & I²C JP4: Selectie van het signaal op pin X van de SPI-connector SV12 SV9 naar SV12: SPI-interface (3,3 V/5 V) of I²C-interface Uitgangen voor externe apparaten SV1, SV7: Geschakelde uitgang (maximaal +24 V/160 mA, extern aangesloten) SV2: 2x13 pinnen voor aansluiting van externe modules 3x3 LED matrix(9 rode LED's) SV3: Kolommen van de 3x3 LED matrix (uitgangen D6 ... D8) JP1: Verbinding van de rijen met de GPIO's D3 ... D5 Software MCCABLib library Controle van hardware componenten (schakelaars, knoppen, LED's, 3x3 LED matrix, buzzer) op het MCCAB Training Board Werktemperatuur Tot +40 °C Afmetingen 100 x 100 x 20 mm Specificaties (Arduino Nano) Microcontroller ATmega328P Architectuur AVR Spanning 5 V Flash memory 32 KB, waarvan 2 KB gebruikt door de bootloader SRAM 2 KB Kloksnelheid 16 MHz Analoge IN Pinnen 8 EEPROM 1 KB DC stroom per I/O-pin 40 mA op één I/O-pin, totaal maximaal 200 mA op alle pinnen samen Ingangsspanning 7-12 V Digitale I/O-pinnen 22 (waarvan 6 PWM) PWM Uitgangen 6 Stroomverbruik 19 mA Afmetingen 18 x 45 mm Gewicht 7 g Inbegrepen 1x Elektor Arduino Nano Training Board MCCAB 1x Arduino Nano
€ 79,95
Leden: € 71,96
-

Elektor Digital Embedded in Embedded (E-book)
ARM Cortex-M Embedded Design from 0 to 1 Hobbyists can mash together amazing functional systems using platforms like Arduino or Raspberry Pi, but it is imperative that engineers and product designers understand the foundational knowledge of embedded design. There are very few resources available that describe the thinking, strategies, and processes to take an idea through hardware design and low-level driver development, and successfully build a complete embedded system. Many engineers end up learning the hard way, or never really learn at all. ARM processors are essentially ubiquitous in embedded systems. Design engineers building novel devices must understand the fundamentals of these systems and be able to break down large, complicated ideas into manageable pieces. Successful product development means traversing a huge amount of documentation to understand how to accomplish what you need, then put everything together to create a robust system that will reliably operate and be maintainable for years to come. This book is a case study in embedded design including discussion of the hardware, processor initialization, low‑level driver development, and application interface design for a product. Though we describe this through a specific application of a Cortex-M3 development board, our mission is to help the reader build foundational skills critical to being an excellent product developer. The completed development board is available to maximize the impact of this book, and the working platform that you create can then be used as a base for further development and learning. The Embedded in Embedded program is about teaching fundamental skill sets to help engineers build a solid foundation of knowledge that can be applied in any design environment. With nearly 20 years of experience in the industry, the author communicates the critical skill development that is demanded by companies and essential to successful design. This book is as much about building a great design process, critical thinking, and even social considerations important to developers as it is about technical hardware and firmware design. Downloads EiE Software Archive (200 MB) IAR ARM 8.10.1 (Recommended IDE version to use) (1.2 GB) IAR ARM 7.20.1 (Optional IDE version to use) (600 MB)
€ 44,95
Leden: € 40,46
-

Elektor Digital Zonne-energie (E-book)
Dit praktijkboek richt zich tot iedereen die geïnteresseerd is in de techniek, de planning, de opbouw en het mogelijke rendement van zonnestroominstallaties. Het boek bevat veel nuttige informatie, van de principes van het genereren van stroom uit zonlicht via de dimensionering van leidingen, de werking van omvormers, laadregelaars en accu's tot en met de beschrijving van complete autonome of netgekoppelde fotovoltaïsche generatoren. Zowel de leek als de (meer of minder ervaren) elektrotechnicus kan dit boek ook als leidraad gebruiken bij de aansluiting van een generator op het elektriciteitsnet conform de voorschriften van de netbeheerder. Het boek bevat bovendien wetenswaardigheden over veiligheidsbepalingen en over de belasting door een deugdelijke constructie van fotovoltaïsche generatoren. Ontwerp, planning en montage worden aan de hand van een groot aantal illustraties gedetailleerd en op een ook voor leken begrijpelijke wijze behandeld. Bovendien geeft het boek waardevolle informatie over de kosten en eventuele opbrengst van zonnestroomgeneratoren. Tenslotte bevat dit boek een overzicht van belangrijke internet-sites waar u gratis software kunt downloaden voor het ontwerp en de dimensionering van netgekoppelde en autonome fotovoltaïsche installaties. U hoeft dus geen kostbare PC-programmatuur aan te schaffen!
€ 19,95
Leden: € 17,96
-
Elektor Digital Mastering Microcontrollers Helped by Arduino (3rd Edition) | E-book
Third, extended and revised edition with AVR Playground and Elektor Uno R4 Arduino boards have become hugely successful. They are simple to use and inexpensive. This book will not only familiarize you with the world of Arduino but it will also teach you how to program microcontrollers in general. In this book theory is put into practice on an Arduino board using the Arduino programming environment. Some hardware is developed too: a multi-purpose shield to build some of the experiments from the first 10 chapters on; the AVR Playground, a real Arduino-based microcontroller development board for comfortable application development, and the Elektor Uno R4, an Arduino Uno R3 on steroids. The author, an Elektor Expert, provides the reader with the basic theoretical knowledge necessary to program any microcontroller: inputs and outputs (analog and digital), interrupts, communication busses (RS-232, SPI, I²C, 1-wire, SMBus, etc.), timers, and much more. The programs and sketches presented in the book show how to use various common electronic components: matrix keyboards, displays (LED, alphanumeric and graphic color LCD), motors, sensors (temperature, pressure, humidity, sound, light, and infrared), rotary encoders, piezo buzzers, pushbuttons, relays, etc. This book will be your first book about microcontrollers with a happy ending! This book is for you if you are a beginner in microcontrollers, an Arduino user (hobbyist, tinkerer, artist, etc.) wishing to deepen your knowledge,an Electronics Graduate under Undergraduate student or a teacher looking for ideas. Thanks to Arduino the implementation of the presented concepts is simple and fun. Some of the proposed projects are very original: Money Game Misophone (a musical fork) Car GPS Scrambler Weather Station DCF77 Decoder Illegal Time Transmitter Infrared Remote Manipulator Annoying Sound Generator Italian Horn Alarm Overheating Detector PID Controller Data Logger SVG File Oscilloscope 6-Channel Voltmeter All projects and code examples in this book have been tried and tested on an Arduino Uno board. They should also work with the Arduino Mega and every other compatible board that exposes the Arduino shield extension connectors. Please note For this book, the author has designed a versatile printed circuit board that can be stacked on an Arduino board. The assembly can be used not only to try out many of the projects presented in this book but also allows for new exercises that in turn provide the opportunity to discover new techniques. Also available is a kit of parts including the PCB and all components. With this kit you can build most of the circuits described in the book and more. Datasheets Active Components Used (.PDF file): ATmega328 (Arduino Uno) ATmega2560 (Arduino Mega 2560) BC547 (bipolar transistor, chapters 7, 8, 9) BD139 (bipolar power transistor, chapter 10) BS170 (N-MOS transistor, chapter 8) DCF77 (receiver module, chapter 9) DS18B20 (temperature sensor, chapter 10) DS18S20 (temperature sensor, chapter 10) HP03S (pressure sensor, chapter 8) IRF630 (N-MOS power transistor, chapter 7) IRF9630 (P-MOS power transistor, chapter 7) LMC6464 (quad op-amp, chapter 7) MLX90614 (infrared sensor, chapter 10) SHT11 (humidity sensor, chapter 8) TS922 (dual op-amp, chapter 9) TSOP34836 (infrared receiver, chapter 9) TSOP1736 (infrared receiver, chapter 9) MPX4115 (analogue pressure sensor, chapter 11) MCCOG21605B6W-SPTLYI (I²C LCD, chapter 12) SST25VF016B (SPI EEPROM, chapter 13) About the author Clemens Valens, born in the Netherlands, lives in France since 1997. Manager at Elektor Labs and Webmaster of ElektorLabs, in love with electronics, he develops microcontroller systems for fun, and sometimes for his employer too. Polyglot—he is fluent in C, C++, PASCAL, BASIC and several assembler dialects—Clemens spends most of his time on his computer while his wife, their two children and two cats try to attract his attention (only the cats succeed). Visit the author’s website: www.polyvalens.com.Authentic testimony of Hervé M., one of the first readers of the book:'I almost cried with joy when this book made me understand things in only three sentences that seemed previously completely impenetrable.'
€ 34,95
Leden: € 31,46
-
Elektor Digital Elektor Select: Arduino Compilatie (PDF)
Dit 216 pagina's tellende e-book staat boordevol Arduino-ideeën, uitleg, tips, diagrammen, programma's, PCB layouts en meer. Genoeg voor dagen vol informatief, inspirerend en stimulerend leesplezier! Opgemaakt als PDF bevat dit digitale document een inhoudsopgave inclusief links naar elk project, zo dat u gemakkelijk komt waar u wilt zijn. Dit biedt u de mogelijkheid om tussen projecten te wisselen en degene die u het meeste boeien snel en gemakkelijk te vinden.
€ 9,95
Leden: € 8,96
-
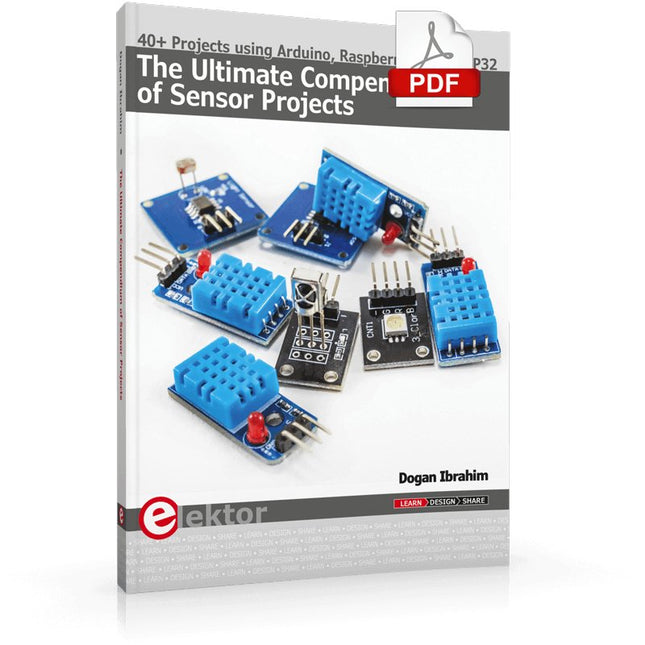
Elektor Digital The Ultimate Compendium of Sensor Projects (E-book)
40+ Projects using Arduino, Raspberry Pi and ESP32 This book is about developing projects using the sensor-modules with Arduino Uno, Raspberry Pi and ESP32 microcontroller development systems. More than 40 different sensors types are used in various projects in the book. The book explains in simple terms and with tested and fully working example projects, how to use the sensors in your project. The projects provided in the book include the following: Changing LED brightness RGB LEDs Creating rainbow colours Magic wand Silent door alarm Dark sensor with relay Secret key Magic light cup Decoding commercial IR handsets Controlling TV channels with IT sensors Target shooting detector Shock time duration measurement Ultrasonic reverse parking Toggle lights by clapping hands Playing melody Measuring magnetic field strength Joystick musical instrument Line tracking Displaying temperature Temperature ON/OFF control Mobile phone-based Wi-Fi projects Mobile phone-based Bluetooth projects Sending data to the Cloud The projects have been organized with increasing levels of difficulty. Readers are encouraged to tackle the projects in the order given. A specially prepared sensor kit is available from Elektor. With the help of this hardware, it should be easy and fun to build the projects in this book.
€ 34,95
Leden: € 31,46
-

Elektor Digital Percer les mystères de l’électronique (E-book)
Le monde de l'électronique est à la fois vaste et… tout petit ! Voici un livre qui confirme ces deux constatations contradictoires. En effet, en électronique, tout touche à tout, d'une manière ou d'une autre. Le plus petit détail peut avoir les plus grandes conséquences, et pas toujours celles que l'on attendrait. L'objectif de l'auteur de cette série d'articles autonomes intitulée hors-circuits, réunis ici en un livre, n'est pas de vous tenir par la main. Robert Lacoste, électronicien professionnel de haut-niveau, vous donne des pistes pour comprendre ce qui paraît mystérieux. Il vous guide juste assez pour vous permettre ensuite de progresser tout seul. Avec lui, non seulement vous repousserez vos propres limites, mais saurez aussi détecter celles du matériel et du logiciel que vous utilisez. En vous invitant à repasser par les notions de physique de base, il vous permettra de séparer les véritables progrès techniques des laïus commerciaux. Les bases, ça peut mener loin D'où vient la sensibilité d'un récepteur d'ondes radio ? Pourquoi le téléchargement d'une vidéo sur votre portable est-il beaucoup plus lent à la campagne qu'en centre-ville ? Si pour vous la réponse technique à des questions comme celles-ci (et bien d'autres que vous n'osez peut-être même pas vous poser) n'est pas évidente, ce livre vous aidera à y voir plus clair. Oui, on peut être à l'aise avec les microcontrôleurs, mais dérouté par le comportement d'un simple transistor. Vous sentez-vous concerné par de telles interrogations ? Ce livre est donc pour vous. Sans aucune formule mathématique qui ne soit pas à la portée d'un lycéen, il balaye tout le champ de l'électronique, depuis l'analogique jusqu'au traitement numérique du signal en passant par le domaine si redouté des hautes-fréquences. La théorie ne s'y éloigne jamais beaucoup de la loi d'Ohm ! Avec des mots simples, l'auteur explique comment ça marche, pourquoi parfois ça ne marche pas comme on veut, et comment mieux utiliser différentes techniques dans vos propres projets pour que ça marche. Liste des sujets abordés : adaptation d'impédance : qu'est-ce-que c'est ? petite introduction aux microrubans jouons avec la réflectométrie temporelle circuits imprimés : éviter les bourdes en HF et avec les fréquences élevées le marquage CE pour les béotiens le quartz magie de la PLL VCO & PLL : pour obtenir des fréquences à la fois précises, stables et variables synthèse numérique directe : une introduction comprendre l'amplificateur à transistor : sexagénaire vaillant ampli de classe A, B, C, D, E, F, G, H : quesako ? le filtrage numérique sans stress : les filtres FIR le filtrage numérique sans stress : les filtres CIC le filtrage numérique sans stress : les filtres IIR l'ABC des CA/N DNL, INL, SNR, SINAD, ENOB, SFDR et consorts l'ABC des CA/N sigma-delta, quésaco ? bruit et sensibilité des récepteurs échange débit contre portée
€ 32,95
Leden: € 29,66
-

Elektor Digital Elektor Mai/Juin 2024 (PDF)
Le téléchargement intégral de ce numéro est disponible pour nos membres GOLD et GREEN sur le site Elektor Magazine ! Pas encore membre ? Cliquez ici. STM32 Wireless Innovation Design Contest Winners : les gagnants LC mètre en circuitétude de prototype AmpVolt : module de mesure de puissance (1)mesure de la puissance CC et de la consommation énergétique jusqu'à 50 V et 5 A Embedded world 2024 réparation d'équipements électroniquesoutils, techniques et conseils démarrer en électronique...plus de théorie sur les ampli-op un générateur de signaux simplePure synthèse numérique directe Sparkplug en un coup d'œilune spécification pour les données MQTT contrôleur de tube cathodique éclairage à commande radarcomment éclairer automatiquement un escalier en détectant une présence humaine niveau à bulle électronique et disque stroboscopique actif pour platines vinylerégler votre platine vinyle avec cet outil tout-en-un explorer les défis et la valeur commerciale de l’électronique open source le connecteur circulaire codé Aune solution de choix pour les applications industrielles The Arduino-Inside Measurement Labun instrument de test et de mesure 8 en 1 pour le labo d’électronique analyseur de gain-phase avec une carte sonpour les fréquences de 100 Hz à 90 kHz mesure du pH avec l'Arduino UNO R4vérifier la qualité de l'eau sur le vifdouble détente oscilloscope numérique FNIRSI 1014Dde bonnes performances pour des budgets serrés 2024 : l'odyssée de l'IAdétection d'objets générateur de référence 10 MHztrès précis, avec distributeur et isolation galvanique mise à jour #2 : compteur d'énergie basé sur l'ESP32quelques améliorations projet 2.0corrections, Mises à jour, et Courrier des lecteurs entretien avec Eben Upton, PDG de Raspberry PiRaspberry Pi 5 et au delà
€ 10,95


