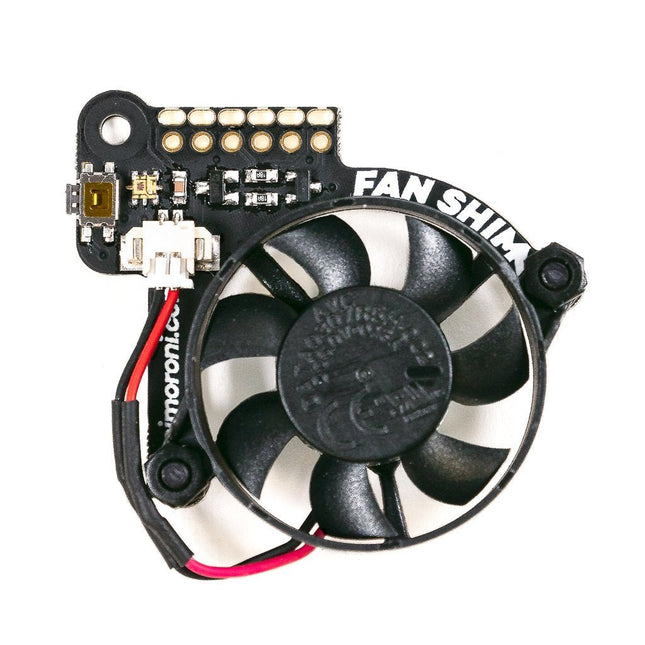
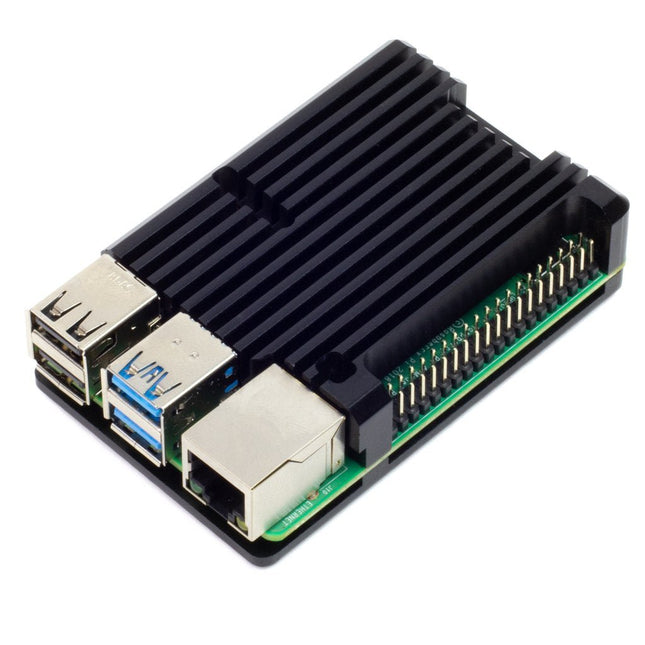
When Raspberry Pi 4's system on chip (SoC) achieves a certain temperature, it lowers its operating speed to protect itself from harm. As a result, you don't get maximum performance from the single board computer. Fan SHIM is an affordable accessory that effectively eliminates thermal throttling and boosts the performance of RPi 4. It's quite easy to attach the fan SHIM to Raspberry pi: fan SHIM uses a friction-fit header, so it just slips onto your Pi's pins and it's ready to go, no soldering required! The fan can be controlled in software, so you can adjust it to your needs, for example, toggle it on when the CPU reaches a certain temperature etc. You can also program the LED as a visual indicator of the fan status. The tactile switch can also be programmed, so you can use it to toggle the fan on or off, or to switch between temperature-triggered or manual mode. Features 30 mm 5 V DC fan 4,200 RPM 0.05 m³/min air flow 18.6 dB acoustic noise (whisper-quiet) Friction-fit header No soldering required RGB LED (APA102) Tactile switch Basic assembly required Compatible with Raspberry Pi 4 (and 3B+, 3A+)
Python library and daemon Pinout Scope of delivery Fan SHIM PCB 30 mm 5 V DC fan with JST connector M2.5 nuts and bolts Assembly The assembly is really simple and almost takes no time With the component side of the PCB facing upwards, push the two M2.5 bolts through the holes from below, then screw on the first pair of nuts to secure them and act as spacers. Push the fan's mounting holes down onto the bolts, with the cable side of the fan downwards (as pictured) and the text on the fan upwards. Attach with another two nuts. Push the fan's JST connector into the socket on Fan SHIM. Software With the help of Python library you can control the fan (on/off), RGB LED, and switch. You'll also find a number of examples that demonstrate each feature, as well as a script to install a daemon (a computer program that runs as a background process) that runs the fan in automatic mode, triggering it on or off when the CPU reaches a threshold temperature, with a manual override via the tactile switch.
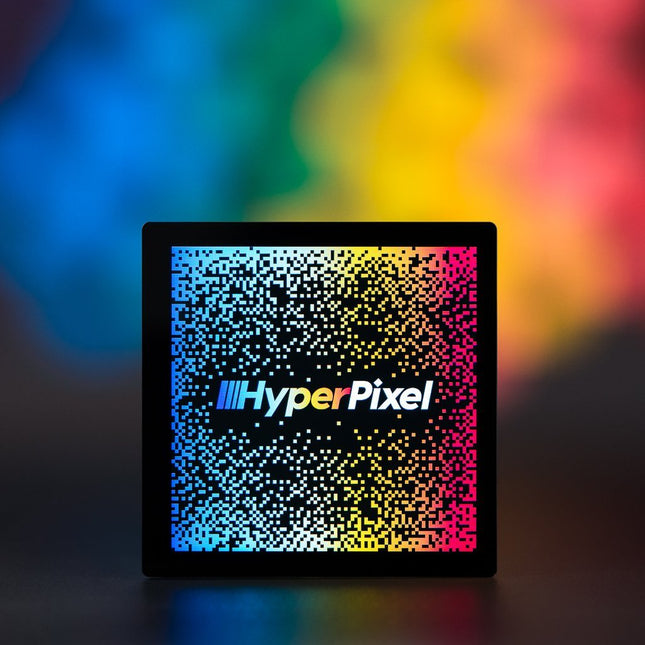
HyperPixel 2.1 Round has all the great features of other HyperPixels – crisp, brilliant IPS display touchscreen, and high-speed DPI interface – it's just rounder! You can use it with any Raspberry Pi with a 40-pin header but it works particularly nicely with the RPi Zero footprint – it's designed so you can mount a Zero neatly behind it, so you can't see the RPi when you look at it from the front.
This version of HyperPixel would be great for custom interfaces and control panels – mounted on a wall it would make a really neat, minimalist smart home controller or a stylish 'what's playing' display for your sound system. Everything is pre-soldered and ready to go, just pop it onto your RPi, install the software, and away you go!
HyperPixel 2.1 Round uses a high-speed DPI interface, allowing it to shift 5x more pixel data than the usual SPI interface that these small Pi displays normally use. It has a 60 FPS frame rate and a resolution of approximately 229 pixels per inch (480x480px) on its 2.1' display. The display can show 18-bits of colour (262,144 colors).
Kenmerken
High-speed DPI interface
2.1" IPS (wide viewing angle, 175°) display
480x480 pixels, minus the corners (~229 PPI)
18-bit colour (262,144 colors)
60 FPS frame rate
Active area: 53.28 x 53.28 mm
Capacitive touchscreen (with Python library)
Compatible with all 40-pin header Raspberry Pi models
Dimensions: 71.80 x 71.80 x 10.8 mm (WxHxD, depth includes header and display). With a RPi Zero attached with short standoffs, the total depth is 17 mm.
Downloads
Display library for Raspberry Pi OS
Python touchscreen library
Dimensional drawing
Pinout
HyperPixel 4.0 Square has all the great features of our standard HyperPixel 4.0 – a crisp, brilliant IPS display with touchscreen, and high-speed DPI interface – it's just more square!
This square version of HyperPixel 4.0 is great for custom interfaces and control panels, and works really well for Pico-8 games. Everything is pre-soldered and ready to go, just pop it onto your RPi, run our installer, and away you go!
Kenmerken
High-speed DPI interface
4.0' IPS (wide viewing angle, 160°) display (72x72 mm)
720x720 pixels (~254 PPI)
18-bit colour (262,144 colors)
60 FPS frame rate
Optional capacitive touchscreen
40-pin female header included to boost height for Raspberry Pi B+, 2, 3, 3B+ and 4
Standoffs included to securely attach to your RPi
Compatible with all 40-pin header Raspberry Pi models
One-line installer
HyperPixel 4.0 Square uses a high-speed DPI interface, allowing it to shift 5x more pixel data than the usual SPI interface that these small RPi displays normally use. It has a 60 FPS frame rate and a resolution of approximately 254 pixels per inch (720x720px) on its 4.0' display. The display can show 18-bits of colour (262,144 colors).
This Touch version has a capacitive touch display that's more sensitive and responsive to touch than a resistive touch display, and it's capable of multi-touch!
Please note: when installing HyperPixel 4.0 Square onto your RPi make sure not to press down on the screen surface! Hold the board by its edges and wiggle it to mate with the extended header (or GPIO header). Also take care not to pull on the edges of the glass display when removing your HyperPixel.
It'll work with any 40-pin version of the RPi, including RPi Zero and RPi Zero W. If you're using it with a larger RPi then use the extra 40-pin header that's included to boost it up to the required height. If you're using a Zero or Zero W then just pop it straight onto the GPIO.
The included standoff kit allows you to mount your HyperPixel 4.0 Square safely and securely to your RPi. Just screw them into the posts on the underside of the HyperPixel 4.0 Square PCB and then secure with screws through the mounting holes on your RPi.
Downloads
GitHub
De HyperPixel 4.0 is een perfecte manier om je RPi te gebruiken zonder een hoop kabels of een groot scherm. Ontwerp je eigen interface om je project te besturen, gegevens weer te geven, of verander je Pi in een klein model media center.
Deze versie van HyperPixel heeft een prachtig IPS-scherm, met brede kijkhoek, en op maat gemaakt beschermglas. Voor geavanceerde gebruikers is een alternatieve I²C-interface beschikbaar.
Kenmerken
High-speed DPI interface
4,0' IPS-scherm (brede kijkhoek, 160°) (86,4 x 51,8 mm)
800 x 480 pixels (~ 235 PPI)
18-bits kleur (262.144 kleuren)
Frame rate van 60 FPS
Contrast ratio: 500:1
Capacitive touch
Inclusief 40-pins female header om de hoogte aan te passen voor Raspberry Pi B+, 2, 3, 3B+ en 4
Inclusief afstandhouders om veilig uw RPi te bevestigen
Compatibel met alle 40-pins header Raspberry Pi modellen
One-line installer
Afmetingen: 58,5 x 97 x 12 mm (BxHxD, diepte inclusief header en display)
HyperPixel maakt gebruik van een snelle DPI interface, waardoor hij 5x meer pixelgegevens kan verwerken dan de gebruikelijke SPI-interface die deze kleine Pi-schermen gebruiken. Hij heeft een frame rate van 60 FPS en een resolutie van ongeveer 235 pixels per inch (800x480) op het 4,0 inch scherm. Het scherm kan 18-bits aan kleuren weergeven (262.144 kleuren).
Deze Touch-versie heeft een capacitive touch screen, dat gevoeliger is en sneller reageert op aanraking dan een resistive touch screen, en hij is geschikt voor multi-touch!
Alles wordt volledig gemonteerd geleverd en solderen is dus niet nodig! Het scherm zit stevig vast op de HyperPixel 4.0 PCB, en is aangesloten via een nette kleine FPC kabel. Zet de HyperPixel 4.0 simpelweg op je RPi en voer ons installatieprogramma uit om alles in te stellen!
Let op: als u uw HyperPixel 4.0 op de RPi installeert, zorg er dan voor dat u niet op het scherm drukt! Houd het bordje bij de randen vast en beweeg hem zodanig dat hij op de verlengde header (of GPIO header) kan worden geplugd. En zorg er ook voor dat u niet aan de randen van het glazen scherm trekt wanneer u uw HyperPixel weer verwijdert.
Hij werkt met elke 40-pins versie van de RPi, inclusief RPi Zero en RPi Zero W. Als u hem gebruikt met een grotere RPi, gebruik dan de extra 40-pins header die is meegeleverd om hem aan te passen aan de gewenste hoogte. Indien u een Zero of Zero W gebruikt plaatst u hem gewoon rechtstreeks op de GPIO.
Met de meegeleverde afstandhouders kunt u uw HyperPixel 4.0 veilig en stevig op uw RPi bevestigen. Schroef ze gewoon in de schroefgaten aan de onderkant van de HyperPixel 4.0 PCB om de RPi vervolgens te bevestigen met de schroeven door de montagegaten.
Downloads
GitHub
Features Compatible with Raspberry Pi 4 only
Cutout in lid for 40x30mm heatsink or Fan SHIM
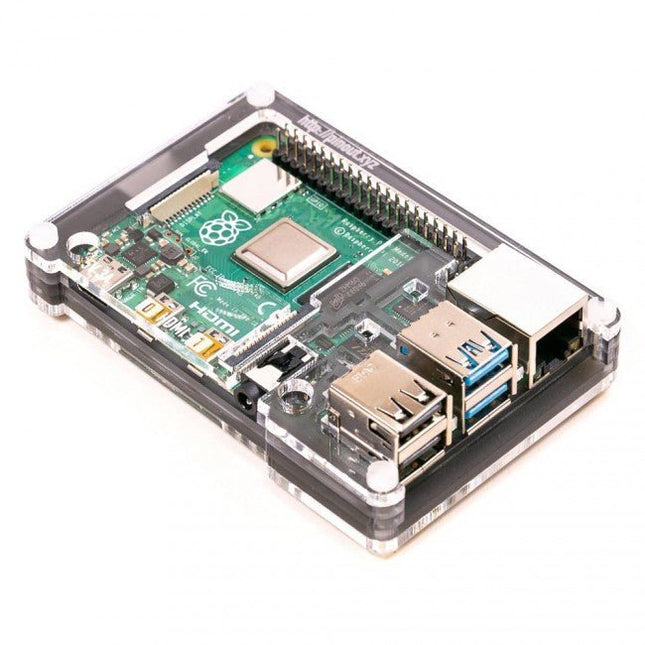
Super-slimline profile Fully HAT-compatible Protects your beloved Pi Clear top and base leave Raspberry Pi 4 visible GPIO cut-out Handy laser-etched port labels Leaves all ports accessible Made from lightweight, high-quality, cast acrylic Great for hacking and tinkering! Made in Sheffield, UK Weighing just over 50 grams, the case is lightweight and ideal for mounting to any surface. No tools are required for assembly or disassembly. The dimensions are: 99 × 66 × 15 mm. In the video below you can see a quick assembly guide.
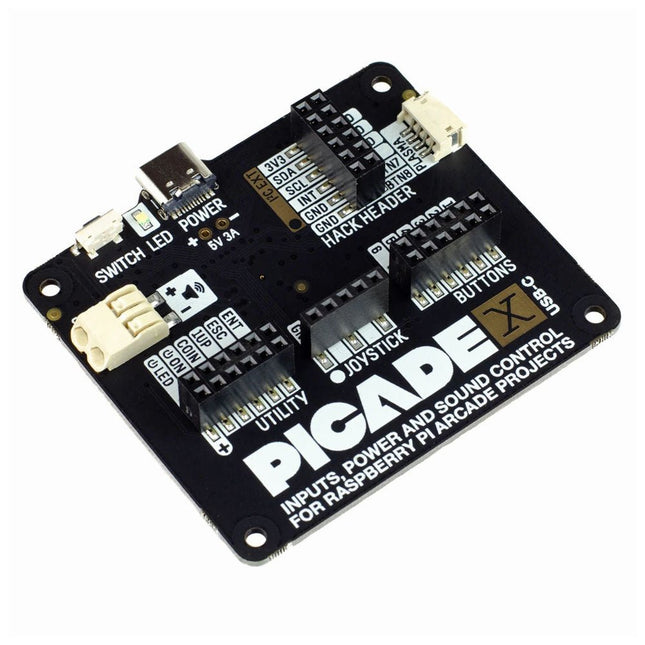
Turn your Raspberry Pi into a retro games console! Picade X HAT includes joystick and button inputs, a 3 W I²S DAC/amplifier, and soft power switch. This HAT has all the same great features as the original Picade HAT but now has no-fuss female Dupont connectors to hook up your joystick and buttons. Simply pop Picade X HAT onto your Pi, plug a USB-C power supply into the connector on the HAT (it back-powers your Pi through the GPIO, so no need for a separate power supply), wire up your controls, and install the driver! It's ideal for your own DIY arcade cabinet builds, or for interfaces that need big, colourful buttons and sound. Features I²S audio DAC with 3 W amplifier (mono) and push-fit terminals Safe power on/off system with tactile power button and LED USB-C connector for power (back-powers your Pi) 4-way digital joystick inputs 6x player button inputs 4x utility button inputs 1x soft power switch input 1x power LED output Plasma button connector Breakout pins for power, I²C, and 2 additional buttons Picade X HAT pinout Compatible with all 40-pin Raspberry Pi models The I²S DAC blends both channels of digital audio from the Raspberry Pi into a single mono output. This is then passed through a 3 W amplifier to power a connected speaker. The board also features a soft power switch that allows you turn your Pi on and off safely without risk of SD card corruption. Tap the connected button to start up, and press and hold it for 3 seconds to fully shutdown and disconnect power. Software/Installation Open a terminal and type curl https://get.pimoroni.com/picadehat | bash to run the installer. You'll need to reboot once the installation is complete, if it doesn't prompt you to do so. The software does not support Raspbian Wheezy Notes With USB-C power connected through Picade X HAT you'll need either to tap the connected power button or the button marked 'switch' on the HAT to power on your Pi.
De PicoVision is een krachtige digitale videostick met een dubbele RP2040 chip en een handige HDMI uitgangsconnector om hem aan te kunnen sluiten.
Met de PicoVision kunt u uw eigen huisgemaakte games maken en uitvoeren, digitale kunst creëren, of favoriete demo's, screensavers of WinAmp visualisaties namaken, diverse data visualiseren, reclameborden simuleren, CeeFax nabootsen of bewegwijzering maken.
GPU (RP2040)Doet al het zware werk om gelikte animaties met hoge resolutie weer te geven op uw tv of monitor via HDMI.
CPU (Pico W)Voert uw code uit en biedt een interface naar andere gadgets via USB, Wi-Fi en Bluetooth.
HDMI-connectorMaak gebruik van tv's, monitoren, grote projectoren of zelfs kleine displays om in te bouwen in een cosplay outfit.
Line out audioGenereer wat blieps en bloops! Deze digitale audio-interface kan diverse kwaliteitsgeluiden produceren.
MicroSD kaartKom nooit opslagruimte tekort voor uw mooie creaties door een flinke microSD kaart aan uw setup toe te voegen.
Qw/ST-connectorVoeg sensoren of andere soorten breakouts toe aan uw project, om interactie met de omgeving mogelijk te maken.
On-board reset- en gebruiksknoppenMaak een eenvoudige gebruikersinterface voor uw project zonder dat u extra's hoeft toe te voegen.
U kunt de PicoVision programmeren met C++ of MicroPython. C++ geeft de beste prestaties, maar indien u een beginner bent dan raden we MicroPython aan om zo gemakkelijk aan de slag te kunnen gaan.
Daarbij heeft u toegang tot de PicoGraphics libraries om daarmee gemakkelijk vormen, tekst en afbeeldingen te kunnen manipuleren, en beschikt u dan over een aantal boeiende nieuwe vectorafbeeldingen en fonts, met dank aan PicoVector, en de mogelijkheid om bliepjes, bloops en andere leuke elektronische geluiden te maken met PicoSynth.
Kenmerken
Raspberry Pi Pico W (CPU)
Dual Arm Cortex M0+ met 264 kB SRAM
2 MB QSPI-flash met ondersteuning voor XiP
2,4 GHz draadloos / Bluetooth 5.2
RP2040 (GPU)
Nóg een Dual Arm Cortex M0+ met 264 kB SRAM
Hogere resolutiemodi maken gebruik van het aanzienlijk overklokken van de GPU
Wordt op de CPU aangesloten als een I²C-randapparaat
2x 8MB PSRAM chips voor dubbele buffering van frames
Digitale video uitgang via HDMI-aansluiting
PCM5100A DAC voor line level audio via I²S, aangesloten op een 3,5 mm stereo jack
MicroSD kaartsleuf
3x Bedieningsknoppen (één bedraad naar CPU, twee naar GPU)
Resetknop
Status LED (GPU)
Qw/ST (Qwiic/STEMMA QT) connector
Volledig afgemonteerd (solderen is niet nodig)
Spare/extra pinnen uitgebroken als niet-gebruikte headers (deze moeten worden gesoldeerd)
C++/MicroPython libraries
Downloads
Pinout
Schema's
MicroPython voor PicoVision
MicroPython voorbeelden en documentatie
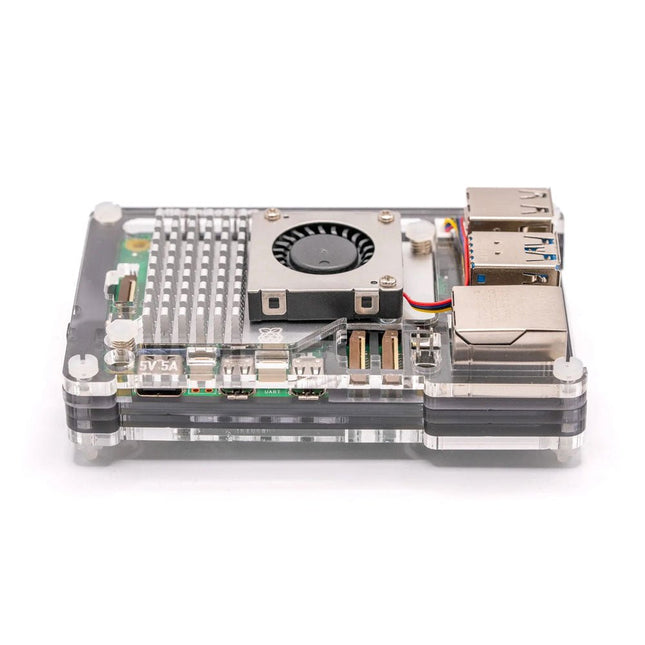
This anodised aluminium heatsink case will protect your Raspberry Pi 4 and give you very effective passive cooling. It's great in cases where you want completely silent cooling, for instance, if you're building a home media center. The scope of delivery includes a thermal pad to provide thermal contact between the CPU and top case, and a handy Allen key and set of hex bolts to attach the case together. The case gives you access to all of the ports, pins, and connectors. Features Anodised aluminium top and bottom case Heatsink fins Thermal pad Hex bolts and Allen key included Access to all ports, pins, and connectors Compatible with Raspberry Pi 4 Assembly Assembling your heatsink case is pretty easy and should only take a couple of minutes. The first, and most important thing is to make sure that your Pi is powered off and unplugged before you fit the case. Take one of the thermal pads and peel the protective films off both sides of it (there's a white film and an easy-to-miss clear film on the other side. Stick the thermal pad onto your Pi's CPU (the metal square nearest the middle of the PCB). Sticking the thermal pad to the CPU first is a much better way to position it correctly than trying to stick it to the case. Only use one thermal pad with the Raspberry Pi 4. Position the top case and then, holding it in place, flip the whole thing over and position the bottom case on the underside of your Pi. Use the four hex bolts and allen key to secure the case. Notes The case is metal and hence conductive, so be careful not to short any components on it, and ensure that your RPi is powered off and unplugged when fitting the case It may be obvious, but the case will get hot in use Dimensions: 87 × 56 × 25.5 mm
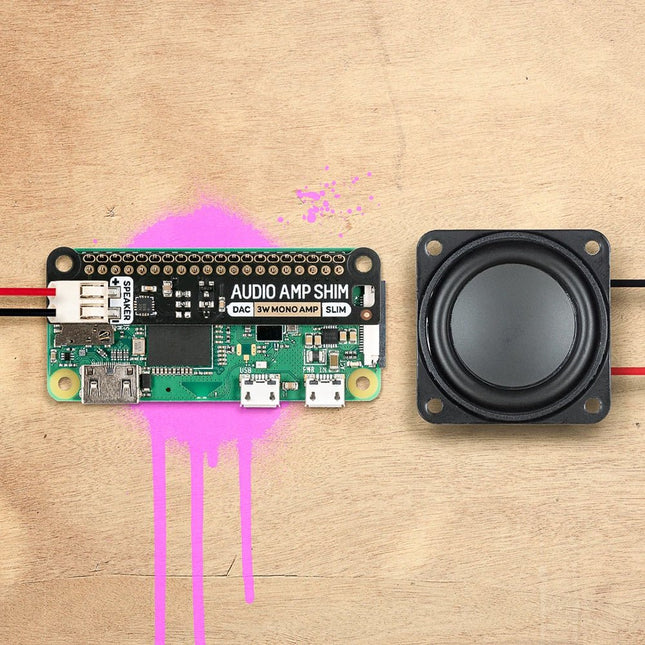
SHIM is een oude Yorkshire term die 'Shove Hardware In Middle' betekent - wij gebruiken het voor Raspberry Pi add-ons die zijn ontworpen om tussen uw Pi en een HAT of mini HAT te worden geklemd. Deze heeft een slimme friction fit header die gemakkelijk over je GPIO pinnen glijdt, niet gesoldeerd hoeft te worden*, en gemakkelijk te verwijderen is.De MAX98357A gecombineerde DAC/versterker-chip neemt digitale audio van hoge kwaliteit van uw Pi en versterkt deze, zodat deze kan worden gebruikt met een luidspreker zonder voeding. De push-fit connectors maken het eenvoudig om uw luidspreker aan te sluiten, of het nu een boekenplank of vloerstaande luidspreker is, de luidspreker in een oude radio, of een andere luidspreker die u misschien heeft liggen. Omdat Audio Amp SHIM geen extra ruimte toevoegt aan uw Pi, is het perfect om in te bouwen in een compacte behuizing - u kunt het gebruiken om een kleine MP3-speler te maken om lokale bestanden af te spelen of te streamen van diensten zoals Spotify, een vintage radio de mogelijkheid te geven om digitale radiostreams af te spelen of bliepgeluiden te integreren in uw eigen retro handheld. Het is ook een handige manier om audio-uitgang aan uw Pi Zero of Pi 400 toe te voegen!Let op: Raspberry Pi and speakers zijn niet inbegrepen bij dit board. Features
MAX98357A DAC / amplifier chip
Mono 3W audio out
Push-fit speaker terminals
SHIM-format board with friction-fit connectors
2x mounting holes (M2.5) for if you want to secure everything together with bolts
Fully-assembled
No soldering required (*unless you're using a Pi that comes without a header)
Compatible with all 40-pin header Raspberry Pi models
SoftwareDe eenvoudigste manier om alles in te stellen is gebruik te maken van Pimoroni's Pirate Audio software en installer die I2S audio configureert, alsook Mopidy installeert en onze aangepaste Pirate Audio plugins waarmee u Spotify kunt streamen en lokale bestanden kunt afspelen.Hier is hoe te beginnen:
Stel een SD-kaart in met de laatste versie van Raspberry Pi OS.
Maak verbinding met Wi-Fi of een bekabeld netwerk.
Open een terminal en type het volgende:git clone https://github.com/pimoroni/pirate-audiocd pirate-audio/mopidysudo ./install.sh
Reboot your Pi
Downloads
MAX98357A Datasheet
Pirate Audio software
Schematic
Een door een Pico W bestuurde alles-in-één industriële automatiseringscontroller met 2,46 GHz draadloze connectiviteit, diverse relais, en een overvloed aan in- en uitgangen. Hij is compatibel met systemen van 6 V tot 40 V.De Automation 2040 W is een door een Pico W / RP2040 bestuurde bewaking- en automatiseringsboard. Hij bevat alle uitstekende functies van de Automation HAT (relais, analoge kanalen, met spanning gevoede uitgangen, en gebufferde ingangen), maar nu op één compact bordje en met een breder spanningsbereik, zodat je hem met meer apparaten kunt gebruiken. Zeer geschikt voor het aansturen van ventilatoren, pompen, elektromagneten, grote motoren, elektronische sloten of statische LED-verlichting (tot 40 V).Alle kanalen (en de knoppen) hebben een bijbehorende indicatie-LED, zodat je in één oogopslag kunt zien wat er met je setup gebeurt, of waarmee je programma's kunt testen zonder dat er hardware is aangesloten.Kenmerken
De Raspberry Pi Pico W op het board
Dual Arm Cortex M0+ die op maximaal 133 MHz draait met 264 KB SRAM
2 MB QSPI flash die XiP ondersteunt
Gevoed en programmeerbaar via USB Micro-B
2,4 GHz draadloos
3x 12-bits ADC-ingangen tot 40 V
4x digitale ingangen tot 40 V
3x digitale sourcing uitgangen op V+ (voedingsspanning)
4 A maximale continue stroom
2 A max stroom bij 500 Hz PWM
3x relais (NC- en NO-klemmen)
2 A tot 24 V
1 A tot 40 V
3,5 mm schroefklemmen voor het aansluiten van ingangen, uitgangen en externe voeding
2x knopschakelaars met LED-indicatoren
Reset knop
2x Qw/ST connectoren voor het bevestigen van breakouts
M2,5 montage gaten
Volledig geassembleerd
Solderen is niet nodig.
C/C++ en MicroPython libraries
Schema
Lay-out
Voeding
Board is compatibel met 12 V, 24 V en 36 V systemen
Vereist een voeding van 6-40 V
Kan 5 V tot 0,5 A leveren voor toepassingen met een lagere spanning
Downloads
Pirate-brand MicroPython
Aan de slag met de Raspberry Pi Pico
MicroPython voorbeelden
MicroPython functie referentie
C++ voorbeelden
C++ functie referentie
Aan de slag met de Automation 2040 W
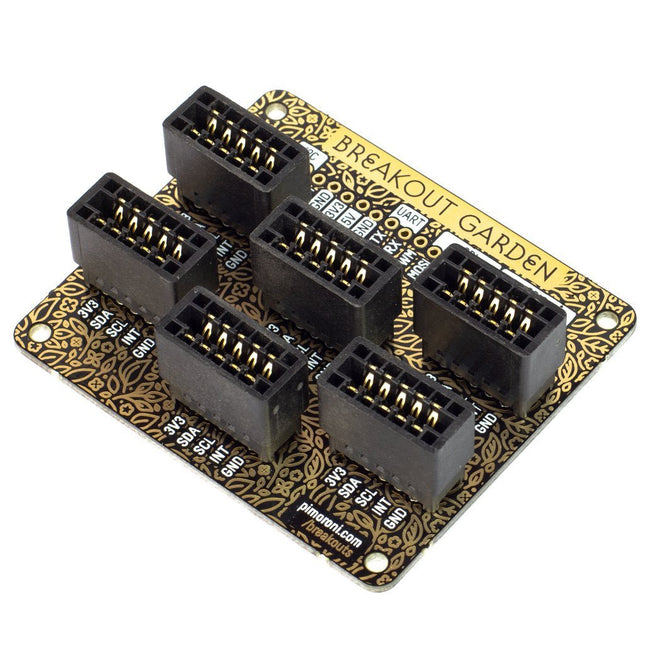
Thanks to its six sturdy slots, Breakout Garden enables the users to simply plug and play with various tiny breakout board.Just insert one or more boards into the slots in the Breakout Garden HAT and you’re ready to go. The mini breakouts feel secure enough in the edge-connector slots and are very unlikely to fall out.There are a number of useful pins along the top of Breakout Garden, which lets you connect other devices and integrate them into your project.You shouldn't be worried if you insert a board the wrong way thanks to provided reverse polarity protection. It doesn't matter which slot you use for each breakout either, because the I²C address of the breakout will be recognised by the software and it'll detect them correctly in case you move them around.Features
Six sturdy edge-connector slots for Pimoroni breakouts
0.1” pitch, 5 pin connectors
Broken-out pins (1 × 10 strip of male header included)
Standoffs (M2.5, 10 mm height) included to hold your Breakout Garden securely
Reverse polarity protection (built into breakouts)
HAT format board
Compatible with Raspberry Pi 3 B+, 3, 2, B+, A+, Zero, and Zero W
It's suggested using the included standoffs to attache Breakout Garden to your Raspberry Pi.SoftwareBreakout Garden doesn't require any software of its own, but each breakout you use will need a Python library. On the Breakout Garden GitHub page you'll find an automatic installer, which will install the appropriate software for a given breakout. There are also some examples that show you what else you can do with Breakout Garden.
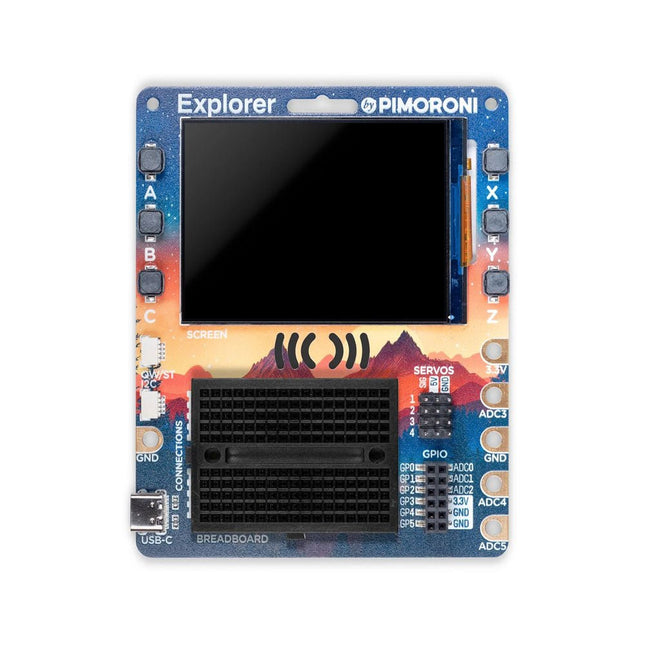
De Pimoroni Explorer Starter Kit is een elektronische avonturenspeeltuin voor fysiek computergebruik, gebaseerd op de RP2350-chip. Het bevat een 2,8-inch LCD-scherm, een luidspreker, een mini-breadboard en nog veel meer. Het is ideaal voor knutselen, experimenteren en het bouwen van kleine prototypes.
Kenmerken
Mini-breadboard voor het aansluiten van componenten
Servoheaders
Analoge ingangen
Ingebouwde luidspreker
Veel algemene invoer/uitvoer
Connectoren voor het bevestigen van krokodillensnoeren
Qw/ST-connectoren voor het bevestigen van I²C-breakouts
Specificaties
Aangedreven door RP2350B (Dual Arm Cortex-M33 met een snelheid tot 150 MHz met 520 KB SRAM)
16 MB QSPI-flash met ondersteuning voor XiP
2,8" IPS LCD-scherm (320 x 240 pixels)
Stuurprogramma-IC: ST7789V
Helderheid: 250 cd/m²
Actief gebied: 43,2 x 57,5 mm
USB-C-connector voor programmeren en voeding
Mini-broodplank
Piezo-luidspreker
6x door de gebruiker bestuurbare schakelaars
Reset- en opstartknoppen
Gemakkelijke toegang tot GPIO-headers (6x GPIO's en 3x ADC's, plus 3,3 V voeding en aarde)
6x krokodillenklemterminals (3x ADC's, plus 3,3 V stroom en aarding)
4x 3-pins servo-uitgangen
2x Qw/ST (Qwiic/STEMMA QT)-connector
2-pins JST-PH-connector voor het toevoegen van een batterij
Gleuf voor sleutelkoord!
Inclusief 2x bureaustandaardvoeten
Volledig gemonteerd (solderen niet nodig)
Programmeerbaar met C/C++ of MicroPython
Inbegrepen
1x Pimoroni Explorer
1x Multi-Sensor Stick – een fraaie nieuwe alles-in-één supersensorsuite voor omgevings-, licht- en bewegingsdetectie
Selectie van verschillende gekleurde LED's om mee te knipperen (inclusief rood, geel, groen, blauw, wit en RGB)
1x Potentiometer (voor analoog amusement)
3x 12 mm schakelaars met verschillende gekleurde kapjes
2x Servo's met continue rotatie
2x 60 mm wielen voor bevestiging aan uw servo's
1x AAA-batterijhouder (batterijen niet inbegrepen)
1x klittenband om de batterijhouder aan de achterkant van de Explorer te bevestigen
20x pin-naar-pin- en 20x pin-naar-socket-jumperdraden voor het maken van verbindingen op uw breadboard
1x Qw/ST-kabel om de Multi-Sensor Stick aan te sluiten
1x Siliconen USB-C kabel
Downloads
GitHub
Schematic
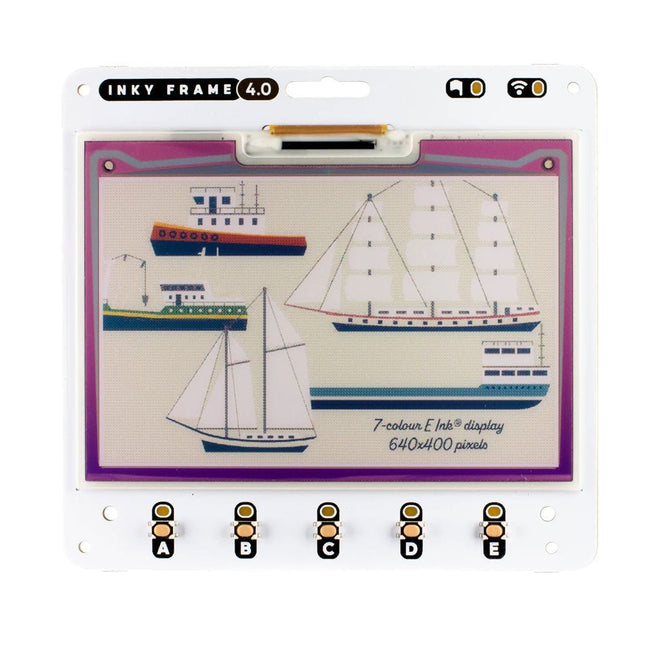
Inky Frame 4.0' features a vibrant E Ink display with 640 x 400 pixels of tightly packed seven colour goodness – that's almost as many pixels as on the 5.7' Inky Frame, but squished tidily into a smaller footprint. There's five buttons with LED indicators for interacting with the display, two Qw/ST connectors for plugging in breakouts and a micro SD card slot for storage of capybara photos or other vital files.Every Inky Frame comes with a pair of sleek little metal legs so you can stand it up on your desk. There's also a battery connector so you can power it without annoying trailing wires, and some neato power saving features that mean you can run it from batteries for ages.Inky Frame 4.0' is great for:
An ultra readable, low power consumption home automation dashboard
Displaying stylised photos, pop art images or favourite comic panels.
Showing cute graphs and readouts from local or wirelessly connected sensors
Displaying fascinating data from online APIs.
Features
Raspberry Pi Pico W Aboard
Dual Arm Cortex M0+ running at up to 133 Mhz with 264 kB of SRAM
2 MB of QSPI flash supporting XiP
Powered and programmable by USB micro-B
2.4 GHz wireless
4.01' EPD display (640 x 400 pixels)
E Ink Gallery Palette 4000 ePaper
ACeP (Advanced Color ePaper) 7-color with black, white, red, green, blue, yellow, orange.
Ultra wide viewing angles
Ultra low power consumption
Dot pitch – 0.135 x 0.135 mm
5x Tactile buttons with LED indicators
Two Qw/ST connectors for attaching breakouts
microSD card slot
Dedicated RTC chip (PCF85063A) for deep sleep/wake
Fully assembled (no soldering required)
C/C++ and MicroPython libraries
Schematic
Included
1x Inky Frame 4.0' (incl. Pico W)
2x Metal legs
DownloadsMicroPython
(Learn) Getting Started with Inky Frame
(Readme) Installing MicroPython
(Readme) MicroPython FAQs (and troubleshooting)
Download pirate-brand MicroPython (you'll want the Inky Frame.uf2)
MicroPython examples
PicoGraphics function reference
C/C++
C examples
Picographics function reference
Inventor 2040 W is a multi-talented board that does (almost) everything you might want a robot, prop or other mechanical thing to do. Drive a couple of fancy motors with encoders attached? Yep! Add up to six servos? Sure? Attach a little speaker so you can make noise? No problem! It's also got a battery connector so you can power your inventions from AA/AAA or LiPo batteries and carry your miniature automaton/animated top hat/treasure chest that growls at your enemies around with you untethered.You also get a ton of options for hooking up sensors and other gubbins – there's two Qw/ST connectors (and an unpopulated Breakout Garden slot) for attaching breakouts, three ADC pins for analog sensors, photoresistors and such, and three spare digital GPIO you could use for LEDs, buttons or digital sensors. Speaking of LEDs, the board features 12 addressable LEDs (AKA Neopixels) – one for each servo and GPIO/ADC channel.Features
Raspberry Pi Pico W Aboard
Dual Arm Cortex M0+ running at up to 133 Mhz with 264 kB of SRAM
2 MB of QSPI flash supporting XiP
Powered and programmable by USB micro-B
2.4 GHz wireless
2 JST-SH connectors (6 pin) for attaching motors
Dual H-Bridge motor driver (DRV8833)
Per motor current limiting (425 mA)
Per motor direction indicator LEDs
2 pin (Picoblade-compatible) connector for attaching speaker
JST-PH (2 pin) connector for attaching battery (input voltage 2.5-5.5 V)
6 sets of header pins for connecting 3 pin hobby servos
6 sets of header pins for GPIO (3 of which are ADC capable)
12x addressable RGB LEDs/Neopixels
User button
Reset button
2x Qw/ST connectors for attaching breakouts
Unpopulated headers for adding a Breakout Garden slot
Fully assembled
No soldering required (unless you want to add the Breakout Garden slot).
C/C++ and MicroPython libraries
Schematic
Downloads
Download pirate-brand MicroPython
Getting Started with Raspberry Pi Pico
Motor function reference
Servo function reference
MicroPython examples
C++ examples
Add colors to your projects with this collection of red, green, yellow, blue and white LEDs. They come with various current limiting resistors in order to protect the parts and control the brightness.Included
10 mm LEDs
1x red
1x green
1x yellow
1x blue
1x white
5 mm LEDs
5x red
5x green
5x yellow
5x blue
5x white
3 mm LEDs
5x red
5x green
5x yellow
5x blue
5x white
25x 330 Ω resistors
10x 1 kΩ resistors
10x 10 kΩ resistors
10x 100 kΩ resistors
10x 1 MΩ resistors
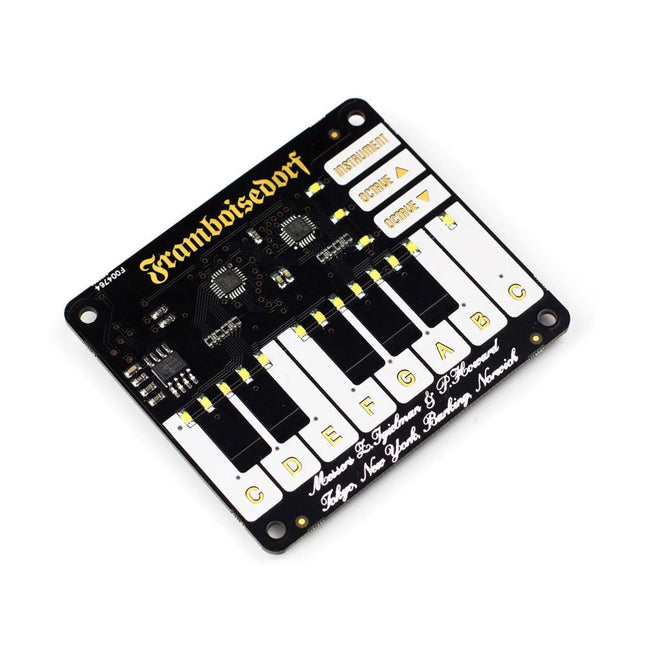
Laat uw innerlijke Mozart bovenkomen met de Piano HAT, een mini muzikale metgezel voor uw Raspberry Pi! De Piano HAT is geïnspireerd op de PiPiano van Zachary Igielman en gemaakt met zijn instemming. We hebben zijn fantastische idee om een kleine piano add-on te bouwen voor de Raspberry Pi overgenomen, deze aanraakgevoelig gemaakt, en netjes afgewerkt met veel van onze kenmerkende Pimoroni lak. Speel muziek af in Python, bedien softwaresynths op je Pi, en pak zelf de controle over hardwaresynthesizers! Kenmerken 16 capacitieve touchpads (elk te koppelen aan hun eigen Python functie!) 13 pianotoetsen (een volledig octaaf) Octaaf omhoog/omlaag knoppen Knop voor instrumentcyclus (ideaal voor gebruik met synthesizers) 16 helderwitte leds (laat ze automagisch oplichten of neem de controle over met Python) 2x Microchip CAP1188 capacitieve touch driver chips Gebruik hem om software- of hardwaresynths te besturen via MIDI Compatibel met alle 40-pins header Raspberry Pi modellen Wordt volledig gemonteerd geleverd Downloads Python library Pinout
The slim, hackable and attractive case for Raspberry Pi 5.
Pibow 5 lets you access all the ports and connectors on your Raspberry Pi and even has a clever little tab that will let you push the Pi 5's brand new power button whilst it's safely ensconced in its case. The case is designed to fit neatly around Raspberry Pi's Active Cooler.
Features
Compatible with Raspberry Pi 5 Official Active Cooler
Super-slimline profile
Fully HAT/pHAT compatible
Protects your Raspberry Pi 5
Clear top leaves Raspberry Pi 5 visible (so you can gaze upon its wonder).
GPIO cut-out
Leaves all ports and connectors accessible
External Power Button Nubbin via compliant mechanism magic
Mounting holes on the base that will accommodate M2.5 screws/bolts and the studs on popular Danish ABS construction blocks
Made from lightweight high-quality cast acrylic
Great for hacking and tinkering
Crafted out of five unique layers including a transparent top that leaves your Raspberry Pi visible inside. Each layer is laser-cut from colourful high-quality cast acrylic and once stacked they securely contain a Raspberry Pi 5 while leaving the primary ports and GPIO accessible.
This case is lightweight and ideal for mounting to any surface. No tools are required for assembly or disassembly!
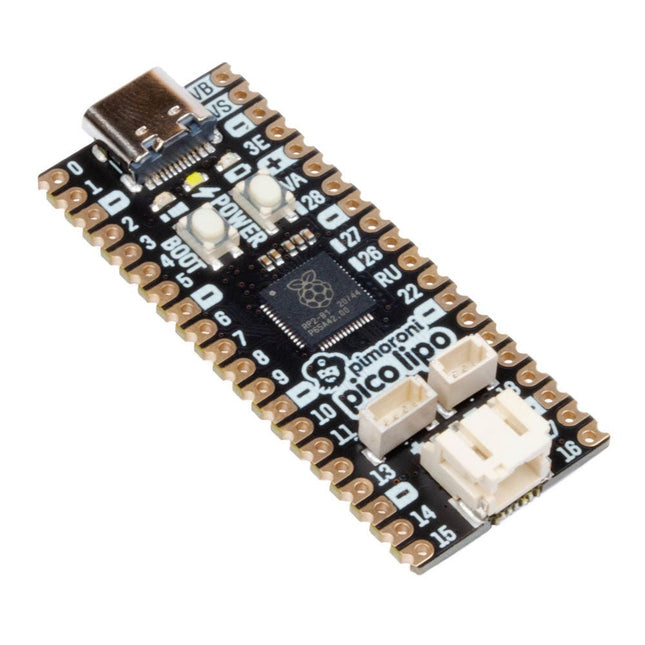
Pimoroni Pico LiPo is powered and programmable via USB-C and comes with 16 MB of QSPI (XiP) flash. With the Qwiic/STEMMA QT connector you can hook up a whole host of different sensors and breakouts, and a debug connector for if you want to do your programming using a SWD debugger. There is an on/off button and a BOOTSEL button, which can also be used as a user switch.Pimoroni Pico LiPo also has onboard LiPo/LiIon battery management – the inbuilt charging circuitry means charging your battery is as easy as plugging your Pimoroni Pico Lipo in via USB. Two indicator LEDs connected to the battery circuit keep you informed of on/off state and charging status and it's compatible with any of our LiPo, LiIon and high capacity LiPo batteries.Programmable with C++, MicroPython or CircuitPython, Pimoroni Pico LiPo is the perfect powerhouse for your portable projects.Features
Powered by RP2040
Dual ARM Cortex M0+ running at up to 133 Mhz
264 kB of SRAM
16 MB of QSPI flash supporting XiP
MCP73831 charger with 215 mA charging current (datasheet)
XB6096I2S battery protector (datasheet)
USB-C connector for power, programming, and data transfer
4 pin Qw-ST (Qwiic / STEMMA QT) connector
3 pin debug connector (JST-SH)
2-pole JST PH battery connector, with polarity marked on the board
Switch for basic input (doubles up as DFU select on boot)
Power button
Power, charging and user LED indicators
On-board 3V3 regulator (max regulator current output 600mA)
Input voltage range 3 - 5.5 V
Compatible with Raspberry Pi Pico add-ons
Measurements: approx 53 x 21 x 8 mm (L x W x H, including connectors)
Downloads
CircuitPython
Getting started with CircuitPython guide
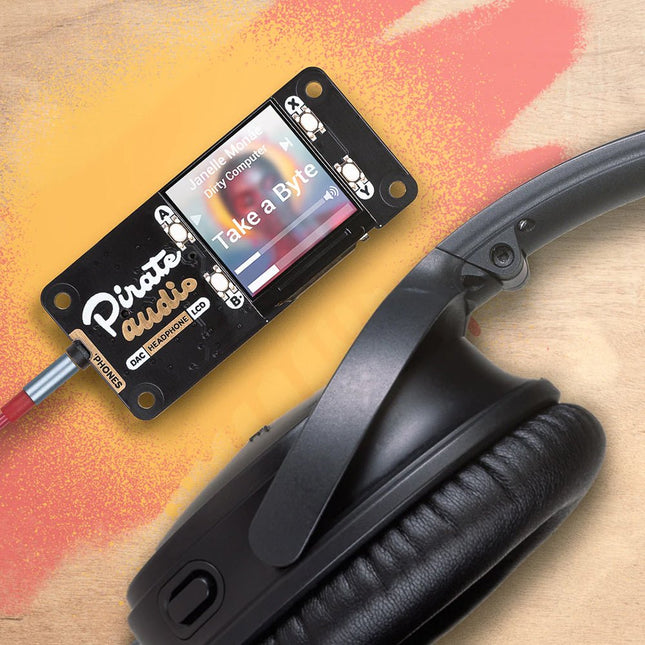
Je zou Pirate Audio Headphone Amp kunnen gebruiken om een nette, zakformaat speler te bouwen voor lokale audiobestanden (MP3, FLAC, etc) of voor het streamen van muziek van online diensten zoals Spotify. Om je op weg te helpen heeft Pimoroni plugins gebouwd voor Mopidy waarmee je prachtige album art kunt weergeven, je tracks kunt afspelen/pauzeren en het volume kunt regelen. De DAC en hoofdtelefoonversterker geven je heldere digitaal versterkte audio via je hoofdtelefoon met kabel. Pirate Audio is een reeks van alles-in-een audio boards voor Raspberry Pi, met hoge kwaliteit digitale audio, prachtig heldere IPS displays voor album art, tactiele knoppen voor playback controle, en een aangepaste Pirate Audio software en installer om het opzetten van dit allemaal een fluitje van een cent te maken.Functies
Versterkte digitale audio (24-bit / 192KHz) over I2S
PAM8908 hoofdtelefoonversterker chip
Low-gain / high-gain schakelaar (high-gain verhoogt met 12dB)
PCM5100A DAC-chip
3.5mm stereo aansluiting
1,3' IPS-kleurenscherm (240x240px) (ST7789 driver)
Vier tactiele knoppen
Mini HAT-formaat bord
Volledig gemonteerd
Compatibel met alle 40-pin header Raspberry Pi modellen
Afmetingen: 65x30.5x9.5mm
SoftwareDe Pirate Audio software en installer installeert de Python bibliotheek voor de LCD, configureert de I2S audio en SPI, en installeert vervolgens Mopidy en de aangepaste Pirate Audio plugins om album art en track info weer te geven, en om de knoppen te gebruiken voor playback control.Hier ziet u hoe u aan de slag kunt:
Stel een SD-kaart in met de laatste versie van Raspberry Pi OS.
Gebonden met Wi-Fi of een bekabeld netwerk.
Open een terminal en typ het volgende:git clone https://github.com/pimoroni/pirate-audiocd pirate-audio/mopidysudo ./install.sh
Reboot uw Pi
Downloads
PAM8908 Datasheet
PCM5100A-gegevensblad
Pirate Audio software
Pico Breakout Garden Base sits underneath your Pico and lets you connect up to six of our extensive selection of Pimoroni breakouts to it. Whether it's environmental sensors so you can keep track of the temperature and humidity in your office, a whole host of little screens for important notifications and readouts, and, of course, LEDs. Scroll down for a list of breakouts that are currently compatible with our C++/MicroPython libraries!As well as a labelled landing area for your Pico, there's also a full set of broken out Pico connections, in case you need to attach even more sensors, wires, and circuitry. We've thrown in some rubber feet to keep the base nice and stable and to stop it from scratching your desk, or there are M2.5 mounting holes at the corners so that you can bolt it onto a solid surface if you prefer.The six sturdy black slots are edge connectors that connect the breakouts to the pins on your Pico. There's two slots for SPI breakouts, and four slots for I²C breakouts. Because I²C is a bus, you can use multiple I²C devices at the same time, providing they don't have the same I²C address (we've made sure that all of our breakouts have different addresses, and we print them on the back of the breakouts so they're easy to find).As well as being a handy way to add functionality to your Pico, Breakout Garden is also very useful for prototyping projects without the need for complicated wiring, soldering, or breadboards, and you can grow or change up your setup at any time.Features
Six sturdy edge-connector slots for breakouts
4x I²C slots (5 pins)
2x SPI slot (7 pins)
Landing area with female headers for Raspberry Pi Pico
0.1” pitch, 5 or 7 pin connectors
Broken-out pins
Reverse polarity protection (built into breakouts)
99% assembled – just need to stick on the feet!
Compatible with Raspberry Pi Pico
Pico Display lets you turn a Pico into a compact user interface device for a bigger project, capable of giving instructions, displaying readouts and even incorporating elaborate nested menus. If you'd rather use your Pico as a standalone device you could make a little rotating slideshow of images, display beautiful graphs from sensor data or build your own Tamagotchi or matchbox sized text adventure game.Features
1.14” 240x135 pixel IPS LCD screen
4 x tactile buttons
RGB LED
Pre-soldered female headers for attaching to Pico
Compatible with Raspberry Pi Pico.
Fully assembled
No soldering required (as long as your Pico has header pins attached).
Dimensions: approx 53 x 25 x 9 mm (L x W x H)
Screen usable area: approx 25 x 15 mm (L x W)
C/C++ and MicroPython libraries
This board is an all-digital conversion of Raspberry Pi's VGA reference design, great for if you want to start hacking on video and/or audio output from a Raspberry Pi Pico and piping it straight into a modern monitor.Features
HDMI connector
PCM5100A DAC for line out audio over I²S (datasheet)
SD card slot
Reset button
Socket headers to install your Raspberry Pi Pico
Three user-controllable switches
Rubber feet
Compatible with Raspberry Pi Pico
No soldering required (as long as your Pico has header pins attached)
Programmable with C/C++
Note: Raspberry Pi Pico is not included. Your Pico will need to have pin headers soldered to it (with the pins pointing downwards) to attach to our add-on boards.Downloads
Schematic
GitHub
Struggling to choose which Pico add-on to go for? Pico Omnibus lets you plug in two Pico Packs or Bases at once, or you can use the extra set of male GPIO pins to easily attach other devices, jumper wires or circuitry – very useful for prototyping. We've added useful labels to all three sets of connectors, so you can be sure that all those lovely wires are going to the right places. We've also thrown in some little feet to keep everything solid.Features
One landing area with labelled female headers for attaching to your Pico.
Two landing areas with labelled (mirrored) male headers for attaching add-ons.
4x rubber feet
Compatible with Raspberry Pi Pico.
99% assembled – just need to stick on the feet!
Fully assembled.
No soldering required.
Dimensions: approx 94 x 52 x 12 mm (L x W x H, including headers)
With a 6x20 grid of 2.54 mm spaced holes for easy soldering and labelled Pico pins so you know what's what, Pico Proto is perfect for when you're happy with your breadboard project and want to give it a secure, smart and compact long-term home. Pico Proto doesn't come with any headers attached, so you will need to either solder it directly to your Pico's male header pins (for a permanent, but super slim sandwich) or solder it to some female header. Features 40 2.54 mm spaced holes for attaching to your Pico. 120 2.54 mm spaced holes (6x20 grid) for attaching other things Compatible with Raspberry Pi Pico. Dimensions: approx 51 x 25 x 1 mm (L x W x H)