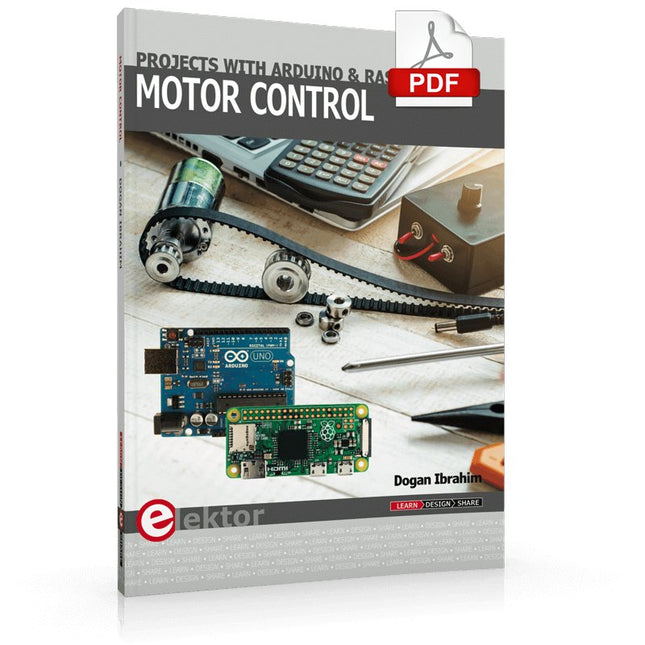
This book is about DC electric motors and their use in Arduino and Raspberry Pi Zero W based projects. The book includes many tested and working projects where each project has the following sub-headings:
Title of the project
Description of the project
Block diagram
Circuit diagram
Project assembly
Complete program listing of the project
Full description of the program
The projects in the book cover the standard DC motors, stepper motors, servo motors, and mobile robots. The book is aimed at students, hobbyists, and anyone else interested in developing microcontroller based projects using the Arduino Uno or the Raspberry Pi Zero W.
One of the nice features of this book is that it gives complete projects for remote control of a mobile robot from a mobile phone, using the Arduino Uno as well as the Raspberry Pi Zero W development boards. These projects are developed using Wi-Fi as well as the Bluetooth connectivity with the mobile phone. Readers should be able to move a robot forward, reverse, turn left, or turn right by sending simple commands from a mobile phone. Full program listings of all the projects as well as the detailed program descriptions are given in the book. Users should be able to use the projects as they are presented, or modify them to suit to their own needs.
This book is for people who want to understand how AC drives (also known as inverter drives) work and how they are used in industry by showing mainly the practical design and application of drives.
The key principles of power electronics are described and presented in a simple way, as are the basics of both DC and AC motors. The different parts of an AC drive are explained, together with the theoretical background and the practical design issues such as cooling and protection.
An important part of the book gives details of the features and functions often found in AC drives and gives practical advice on how and where to use these. Also described is future drive technology, including a matrix inverter.
The mathematics is kept to an essential minimum. Some basic understanding of mechanical and electrical theory is presumed, and a basic knowledge of single andthree phase AC systems would be useful.
Anyone who uses or installs drives, or is just interested in how these powerful electronic products operate and control modern industry, will find this book fascinating and informative.
The MotoPi is an extension-board to control and use up to 16 PWM-controlled 5 V servo motors. The board can be additional powered by a voltage between 4.8 V and 6 V so a perfect supply is always guaranteed and even larger projects can be powered. With the additional power supply and the integrated Analog-Digital-Converter, new possibilities can be reached. An additional power supply per motor is not required anymore because all connections (Voltage, Ground, Control) are directly connected to the board. The control and the programing can be directly done, as usual, on the Raspberry Pi. Special features 16 Channels, own clock generator, Inkl. Analog Digital Converter Input 1 Coaxial power connector 5.5 / 2.1 mm, 5 V / 6 A max Input 2 Screw terminal, 4.8-6 V / 6 A max Compatible with Raspberry Pi A+, B+, 2B, 3B Dimensions 65 x 56 x 24 mm Scope of supply Board, manual, fixing material
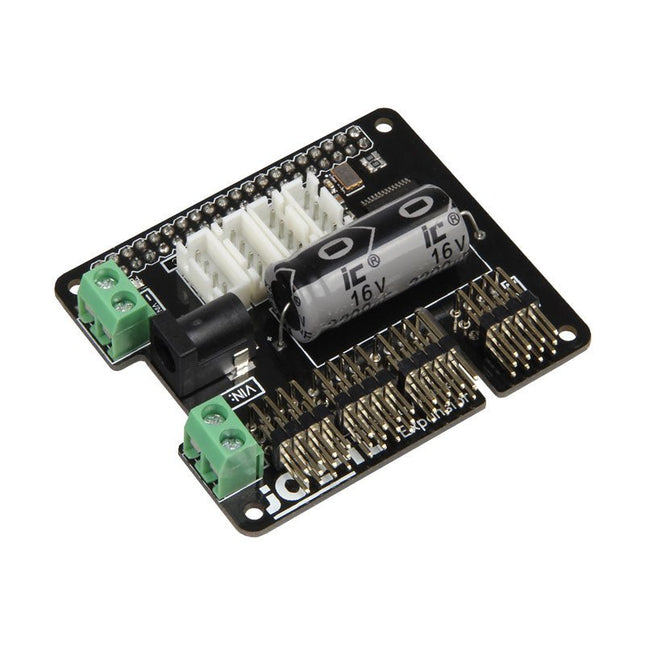
Met dit board kan de Raspberry Pi Pico (aangesloten via een pin header) twee motoren tegelijk aandrijven met volledige vooruit, achteruit en stop regeling, waardoor het ideaal is voor Pico gestuurde buggy projecten. Als alternatief kan het board ook gebruikt worden om een stappenmotor aan te drijven. De printplaat is voorzien van het DRV8833 motor driver IC, dat ingebouwde beveiliging tegen kortsluiting, overstroom en oververhitting heeft. De printplaat heeft ook 4 externe aansluitingen op de GPIO pinnen en een 3 V en GND voeding van de Pico. Dit maakt extra IO mogelijkheden mogelijk voor je buggy bouwsels die door de Pico uitgelezen of bestuurd kunnen worden. Bovendien is er een aan/uit schakelaar en een power status LED, zodat je in een oogopslag kunt zien of de printplaat aan staat en je batterijen kunt sparen als je project niet in gebruik is. Om de motor driver kaart te gebruiken moet de Pico een gesoldeerde pin header hebben en stevig in de connector gestoken worden. De kaart heeft een gereguleerde voeding die via de 40-weg connector wordt geleid om de Pico te voeden, zodat je de Pico niet rechtstreeks hoeft te voeden. De motordriver print wordt gevoed via schroefklemmen of via een servo style connector. Kitronik heeft een micro-python module en voorbeeld code ontwikkeld om het gebruik van het Motor Driver board met de Pico te ondersteunen. Deze code is beschikbaar in de GitHub repository. Features Een compact board met veel mogelijkheden, ontworpen als hart van je Raspberry Pi Pico robot buggy projecten. Het board kan 2 motoren tegelijk aansturen met volledige voorwaartse, achterwaartse, en stop regeling. Het bevat de DRV8833 motor driver IC, die ingebouwde beveiliging tegen kortsluiting, overstroom en oververhitting heeft. Bovendien heeft de printplaat een aan/uit schakelaar en een LED voor de voedingsstatus. De voeding van de kaart gaat via een connector in klemmenblokstijl. De 3V en GND pennen zijn ook uitgesplitst, zodat externe apparaten van stroom kunnen worden voorzien. Codeer het met MicroPython via een editor zoals de Thonny editor. Afmetingen: 63 mm (L) x 35 mm (B) x 11,6 mm (H) Download Datasheet
Clever Tricks with ATmega328 Pro Mini Boards
With a simple Pro Mini board and a few other components, projects that 20 or 30 years ago were unthinkable (or would have cost a small fortune) are realized easily and affordably in this book: From simple LED effects to a full battery charging and testing station that will put a rechargeable through its paces, there’s something for everyone.
All the projects are based on the ATmega328 microcontroller, which offers endless measuring, switching, and control options with its 20 input and output lines. For example, with a 7-segment display and a few resistors, you can build a voltmeter or an NTC-based thermometer. The Arduino platform offers the perfect development environment for programming this range of boards.
Besides these very practical projects, the book also provides the necessary knowledge for you to create projects based on your own ideas. How to measure, and what? Which transistor is suitable for switching a certain load? When is it better to use an IC? How do you switch mains voltage? Even LilyPad-based battery-operated projects are discussed in detail, as well as many different motors, from simple DC motors to stepper motors.
Sensors are another exciting topic: For example, a simple infrared receiver that can give disused remote controls a new lease on life controlling your home, and a tiny component that can actually measure the difference in air pressure between floor and table height!
Learn to interface and program hardware devices in a wide range of useful applications, using ARM7 microcontrollers and the C programming language. Examples covered in full detail include a simple LED to a multi-megabyte SD card running the FAT file system.
Features of this book
Build prototype circuits on breadboard or Veroboard and interface to ARM microcontrollers.
A 32-bit ARM7 microcontroller is used in interfacing and software examples.
Interfacing principles apply to other ARM microcontrollers and other non-ARM microcontrollers as well.
Example programs are written in the C programming language.
Use only free or open source software.
Download and install all programming tools from the Internet.
Template project files are provided for easy project creation.
Hardware
Interface to LEDs, transistors, optocouplers, relays, solenoids, switches, keypads, LCD displays, seven segment displays, DC motors, stepper motors, external analogue signals using the ADC, RS232, RS-485, TWI, USB, SPI and SD memory cards.
Software
Once hardware has been interfaced to a microcontroller, software must be written to control the hardware. You will learn how to write programs to operate externally interfaced hardware devices, use timers and interrupts. Also learn how to port FAT file system code for use with an SD memory card, program the PWM to produce an audio sine wave, program the PWM to speed control a DC motor and more.
A chapter on more advanced ARM microcontrollers is included with an overview of some of the newest ARM microcontrollers and their features.
STM32 Nucleo family of processors are manufactured by STMicroelectronics. These are low-cost ARM microcontroller development boards. This book is about developing projects using the popular Nucleo development board. In the early chapters of the book, the architecture of the Nucleo family is briefly described.
Software development tools that can be used with the Nucleo boards such as the Mbed, Keil MDK, TrueSTUDIO, and the System Workbench are described briefly in later Chapters.
The book covers many projects using most features of the STM32 Nucleo development boards where the full software listings for Mbed and System Workbench are given for every project. The projects range from simple flashing LEDs to more complex projects using modules and devices such as GPIO, ADC, DAC, I²C, LCD, analog inputs and others.
In addition, several projects are given using the Nucleo Expansion Boards, including popular expansion boards such as solid-state relay, MEMS and environmental sensors, DC motor driver, Wi-Fi, and stepper motor driver.
These Expansion Boards plug on top of the Nucleo development boards and simplify the task of project development considerably.
Features of this book
Learn the architecture of the STM32 microcontrollers
Learn how to use the Nucleo development board in projects using Mbed and System Workbench Toolchains
Learn how to use the Nucleo Expansion Boards with the Nucleo development boards
Update
The Mbed compiler has been replaced with two software packages: The Mbed Studio and Keil Studio Cloud. Both of these software packages are free of charge and are available on the Internet. If you need assistance using the Keil Studio Cloud, please download the Guide below.
Using the RFID Starter Kit
An Arduino board has now become ‘the’ basic component in the maker community. No longer is an introduction to the world of microcontrollers the preserve of the expert. When it comes to expanding the capabilities of the basic Arduino board however, the developer is still largely on his own. If you really want to build some innovative projects it’s often necessary to get down to component level. This can present many beginners with major problems. That is exactly where this book begins.
This book explains how a wide variety of practical projects can be built using items supplied in a single kit together with the Arduino board. This kit, called the 'RFID Starter Kit for Arduino' (SKU 17240) is not just limited to RFID applications but contains more than 30 components, devices and modules covering all areas of modern electronics.
In addition to more simple components such as LEDs and resistors there are also complex and sophisticated modules that employ the latest technology such as:
A humidity sensor
A multicolor LED
A large LED matrix with 64 points of light
A 4-character 7-segment LED display
An infra red remote-controller unit
A complete LC-display module
A servo
A stepper motor and controller module
A complete RFID reader module and security tag
On top of that you will get to build precise digital thermometers, hygrometers, exposure meters and various alarm systems. There are also practical devices and applications such as a fully automatic rain sensor, a sound-controlled remote control system, a multifunctional weather station and so much more.
All of the projects described can be built using the components supplied in the Elektor kit.
Projecten met Arduino, ESPHome, Home Assistant en Raspberry Pi & Co.
Dit e-book bevat verschillende voorbeeldprojecten, te beginnen met een inleiding tot elektronica. Het legt ook uit hoe je Home Assistant installeert op een Raspberry Pi, hoe je binnenklimaatsensoren gebruikt voor temperatuur en vochtigheid, hoe je het MQTT-protocol en andere interfaces implementeert, en hoe je ESPHome gebruikt om sensoren en actuatoren te integreren in Home Assistant. Talrijke video tutorials vullen het boek aan.
The book begins with an introduction to electrical engineering. You will learn the basics of voltage, current, resistors, diodes and transistors.
Arduino and microcontrollers
A complete section is dedicated to the Arduino Uno. You will get to know the structure, write your first programs and work on practical examples.
Home Assistant and automation
You will learn how to set up Home Assistant on a Raspberry Pi and how to use automations, scenes and devices. In addition, Zigbee, MQTT and ESP-NOW – important technologies for home automation – will be discussed.
ESP8266, ESP32 and ESP32-CAM
The popular ESP microcontrollers are covered in detail. A theoretical introduction is followed by practical projects that show you how to get the most out of these devices.
Sensors and actuators
The book explains the functionality and application of numerous sensors such as temperature and humidity sensors, motion detectors and RFID readers. For actuators, stepper motors, e-ink displays, servo motors and much more are covered. There are practical application examples for all devices.
ESPHome
This chapter shows you how to integrate sensors and actuators into Home Assistant without any programming effort. You will be guided step by step through the setup with ESPHome.
LEDs and lighting technology
In this chapter, you will learn about different types of LEDs and how they can be used. The basics of lighting technology are also explained.
Node-RED
A whole chapter is dedicated to Node-RED. You will learn the basics of this powerful tool and be guided step by step through its setup and use.
Integrated Circuits (ICs)
In electronics, there are numerous ICs that make our lives easier. You will get to know the most important ones and apply your knowledge in practical projects.
Professional programming
Advanced topics such as the correct use of buttons, the use of interrupts and the use of an NTP server for time synchronisation are covered in detail in this chapter.
Downloads
GitHub
Multitasking and multiprocessing have become a very important topic in microcontroller-based systems, namely in complex commercial, domestic, and industrial automation applications. As the complexity of projects grows, more functionalities are demanded from the projects. Such projects require the use of multiple inter-related tasks running on the same system and sharing the available resources, such as the CPU, memory, and input-output ports. As a result of this, the importance of multitasking operations in microcontroller-based applications has grown steadily over the last few years. Many complex automation projects now make use of some form of a multitasking kernel.
This book is project-based and its main aim is to teach the basic features of multitasking using the Python 3 programming language on Raspberry Pi. Many fully tested projects are provided in the book using the multitasking modules of Python. Each project is described fully and in detail. Complete program listings are given for each project. Readers should be able to use the projects as they are, or modify them to suit their own needs.
The following Python multitasking modules have been described and used in the projects:
Fork
Thread
Threading
Subprocess
Multiprocessing
The book includes simple multitasking projects such as independently controlling multiple LEDs, to more complex multitasking projects such as on/off temperature control, traffic lights control, 2-digit, and 4-digit 7-segment LED event counter, reaction timer, stepper motor control, keypad based projects, car park controller, and many more. The fundamental multitasking concepts such as process synchronization, process communication, and memory sharing techniques have been described in projects concerning event flags, queues, semaphores, values, and so on.
Make your project dreams come true: an odometer for the hamster wheel, a fully automatic control of your ant farm with web interface, or the Sandwich-O-Mat – a machine that toasts and grills sandwiches of your choice.
With the Arduino and the DIY or Maker movement, not only did entry into microcontroller programming become child's play, but a second development also took place: Resourceful developers brought small boards – so-called shields or modules – to the market, which greatly simplified the use of additional hardware. The small modules contain all the important electronic parts to be connected to the microcontroller with a few plug-in cables, eliminating the need for a fiddly and time-consuming assembly on the plug-in board. In addition, it is also possible to handle tiny components that do not have any connecting legs (so-called SMDs).
Projects Discussed
Arduino seeks connection
BMP and introduction to libraries, I²C
Learn I/O basics with the multi-purpose shield
I²C LCD adapter and DOT matrix displays
LCD keypad shield
Level converter
W5100: Internet connection
I/O expansion shield
Relays and solid-state relays
The multi-function shield: A universal control unit
Connecting an SD card reader via SPI
Keys and 7-segment displays
16-bit ADC
MCP4725 DAC
16-way PWM servo driver
MP3 player
GPS data logger using an SD card
Touch sensor
Joystick
SHT31: Temperature and humidity
VEML6070 UV-A sensor
VL53L0X time-of-flight
Ultrasonic distance meter
MAX7219-based LED DOT matrix display
DS3231 RTC
Port expander MCP23017
433 MHz radio
MPU-650 gyroscope
ADXL345 accelerometer
WS2812 RGB LEDs
Power supply
MQ-xx gas sensors
CO2 gas sensor
ACS712 current sensor
INA219 current sensor
L298 motor driver
MFRC522 RFID
28BYJ-48 stepper motor
TMC2209 silent step stick
X9C10x digital potentiometer
ST7735 in a color TFT display
e-Paper display
Bluetooth
Geiger counter
SIM800L GSM module
I²C multiplexer
Controller Area Network
Get Cracking with the Arduino Nano V3, Nano Every, and Nano 33 IoT
The seven chapters in this book serve as the first step for novices and microcontroller enthusiasts wishing to make a head start in Arduino programming. The first chapter introduces the Arduino platform, ecosystem, and existing varieties of Arduino Nano boards. It also teaches how to install various tools needed to get started with Arduino Programming. The second chapter kicks off with electronic circuit building and programming around your Arduino. The third chapter explores various buses and analog inputs. In the fourth chapter, you get acquainted with the concept of pulse width modulation (PWM) and working with unipolar stepper motors.
In the fifth chapter, you are sure to learn about creating beautiful graphics and basic but useful animation with the aid of an external display. The sixth chapter introduces the readers to the concept of I/O devices such as sensors and the piezo buzzer, exploring their methods of interfacing and programming with the Arduino Nano. The last chapter explores another member of Arduino Nano family, Arduino Nano 33 IoT with its highly interesting capabilities. This chapter employs and deepens many concepts learned from previous chapters to create interesting applications for the vast world of the Internet of Things.
The entire book follows a step-by-step approach to explain concepts and the operation of things. Each concept is invariably followed by a to-the-point circuit diagram and code examples. Next come detailed explanations of the syntax and the logic used. By closely following the concepts, you will become comfortable with circuit building, Arduino programming, the workings of the code examples, and the circuit diagrams presented. The book also has plenty of references to external resources wherever needed.
An archive file (.zip) comprising the software examples and Fritzing-style circuit diagrams discussed in the book may be downloaded free of charge below.