Principles, Systems, and Electronics
This handbook provides a detailed study of the sensors and actuators at the heart of modern vehicle electronics. It begins with basic electrical and electronic concepts, introducing the principles and terminology essential for understanding automotive systems.
The book explores sensors and actuators on a system-by-system basis, including:
Fundamentals of electrical engineering, electromagnetic phenomena, and motor principles
Passive and active electronic components, integrated circuits, protection devices, and automotive-grade electronics
Sensor characteristics, signal conditioning, ADCs, PWM and frequency outputs, and interface adaptation
Automotive communication links and protocols, including LIN and SENT
Engine sensors: air mass, pressure, temperature, speed, position, exhaust and emissions-related sensors
Transmission sensors for manual and automatic systems
Steering and suspension sensors for conventional and active systems
Vehicle body and electrical system sensors for comfort, climate, access, and monitoring functions
Engine actuators such as throttle bodies, injectors, turbo actuators, EGR systems, ignition components, and pumps
Transmission, brake, steering, suspension, and body actuators
Identification and coding of electronic components and packages commonly used in automotive applications
The structure and operating principles of each component are explained, with relevant electronic circuitry illustrated. Its system-oriented organization and practical focus make it a valuable reference for understanding, testing, and troubleshooting automotive electronic systems.
Maker Line is een lijnsensor met 5 x IR sensoren array die in staat is om lijnen te volgen van 13 mm tot 30 mm breedte.
De sensor calibratie is ook vereenvoudigd. Het is niet nodig om de potentiometer voor elke IR sensor aan te passen. U hoeft alleen maar de calibrate knop gedurende 2 seconden in te drukken om de calibratie modus te openen. Daarna moet u de sensoren over de lijn laten vegen, nogmaals op de knop drukken en u bent klaar om te gaan.
De kalibratiegegevens worden opgeslagen in EEPROM en deze blijven intact, zelfs als de sensor is uitgeschakeld. Kalibratie hoeft dus maar één keer te worden uitgevoerd, tenzij de sensorhoogte, lijnkleur of achtergrondkleur is veranderd.
Maker Line ondersteunt ook dubbele uitgangen: 5 x digitale uitgangen voor de status van elke sensor onafhankelijk, wat vergelijkbaar is met conventionele IR-sensor, maar u krijgt het voordeel van eenvoudige kalibratie, en ook een analoge uitgang, waar de spanning de lijnpositie vertegenwoordigt. De analoge uitgang biedt ook een hogere resolutie in vergelijking met afzonderlijke digitale uitgangen. Dit is vooral nuttig wanneer een hoge nauwkeurigheid vereist is bij het bouwen van een lijnvolgende robot met PID regeling.
Kenmerken
Bedrijfsspanning: DC 3,3 V en 5 V compatibel (met omgekeerde polariteitsbeveiliging)
Aanbevolen lijndikte: 13 mm tot 30 mm
Selecteerbare lijnkleur (licht of donker)
Sensor afstand (hoogte): 4 mm tot 40 mm (Vcc = 5 V, zwarte lijn op wit oppervlak)
Sensor Vernieuwingsfrequentie: 200 Hz
Eenvoudig kalibratieproces
Dubbele uitgangstypen: 5 x digitale uitgangen vertegenwoordigen elke IR-sensor staat, 1 x analoge uitgang vertegenwoordigt lijn positie.
Ondersteunt een breed scala aan controllers, zoals Arduino, Raspberry Pi etc.
Downloads
Datasheet
Tutorial: Een goedkope lijnvolgende robot bouwen
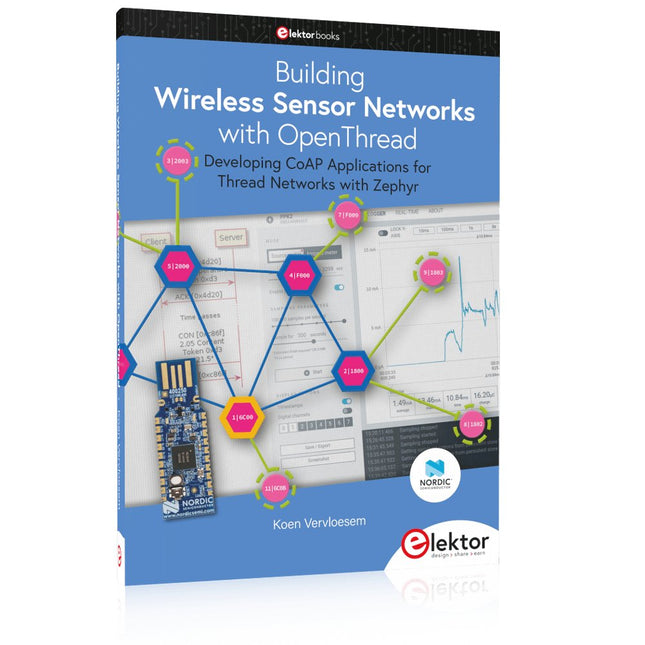
Developing CoAP applications for Thread networks with Zephyr
This book will guide you through the operation of Thread, the setup of a Thread network, and the creation of your own Zephyr-based OpenThread applications to use it. You’ll acquire knowledge on:
The capture of network packets on Thread networks using Wireshark and the nRF Sniffer for 802.15.4.
Network simulation with the OpenThread Network Simulator.
Connecting a Thread network to a non-Thread network using a Thread Border Router.
The basics of Thread networking, including device roles and types, as well as the diverse types of unicast and multicast IPv6 addresses used in a Thread network.
The mechanisms behind network discovery, DNS queries, NAT64, and multicast addresses.
The process of joining a Thread network using network commissioning.
CoAP servers and clients and their OpenThread API.
Service registration and discovery.
Securing CoAP messages with DTLS, using a pre-shared key or X.509 certificates.
Investigating and optimizing a Thread device’s power consumption.
Once you‘ve set up a Thread network with some devices and tried connecting and disconnecting them, you’ll have gained a good insight into the functionality of a Thread network, including its self-healing capabilities. After you’ve experimented with all code examples in this book, you’ll also have gained useful programming experience using the OpenThread API and CoAP.
Principles, Systems, and Electronics
This handbook provides a detailed study of the sensors and actuators at the heart of modern vehicle electronics. It begins with basic electrical and electronic concepts, introducing the principles and terminology essential for understanding automotive systems.
The book explores sensors and actuators on a system-by-system basis, including:
Fundamentals of electrical engineering, electromagnetic phenomena, and motor principles
Passive and active electronic components, integrated circuits, protection devices, and automotive-grade electronics
Sensor characteristics, signal conditioning, ADCs, PWM and frequency outputs, and interface adaptation
Automotive communication links and protocols, including LIN and SENT
Engine sensors: air mass, pressure, temperature, speed, position, exhaust and emissions-related sensors
Transmission sensors for manual and automatic systems
Steering and suspension sensors for conventional and active systems
Vehicle body and electrical system sensors for comfort, climate, access, and monitoring functions
Engine actuators such as throttle bodies, injectors, turbo actuators, EGR systems, ignition components, and pumps
Transmission, brake, steering, suspension, and body actuators
Identification and coding of electronic components and packages commonly used in automotive applications
The structure and operating principles of each component are explained, with relevant electronic circuitry illustrated. Its system-oriented organization and practical focus make it a valuable reference for understanding, testing, and troubleshooting automotive electronic systems.
Build your textbook weather station or conduct environmental research together with the whole world. With many practical projects for Arduino, Raspberry Pi, NodeMCU, ESP32, and other development boards.
Weather stations have enjoyed great popularity for decades. Every current and even every long discontinued electronics magazine has regularly featured articles on building your own weather station. Over the years, they have become increasingly sophisticated and can now be fully integrated into an automated home — although this often requires loyalty to an (expensive) brand manufacturer across all components.
With your own weather and environmental data, you can keep up and measure things that no commercial station can. It’s also fun: expand your knowledge of electronics, current microcontroller development boards and programming languages in a fun and meaningful way. For less than 10 euros you can get started and record your first environmental data — with time and growing interest, you will continue to expand your system.
In this Edition
Which Microcontroller Fits My Project?
The Right Development Environment
Tracking Wind and Weather
Weather Display with OpenWeatherMap and Vacuum Fluorescent Display
Volatile Organic Compounds in the Air We Breathe
Working with MQ Sensors: Measuring Carbon Monoxide — Odorless but Toxic
CO2 Traffic Light with ThingSpeak IoT Connection
An Automatic Plant Watering System
Good Indoor Climate: Temperature and Humidity are Important criteria
Classy Thermometer with Vintage Tube Technology
Nostalgic Weather House for the Whole Family
Measuring Air Pressure and Temperature Accurately
Sunburn Warning Device
DIY Sensor for Sunshine Duration
Simple Smartphone Says: Fog or Clear View?
Identifying Earthquakes
Liquid Level Measurement for Vessels and Reservoirs
Water pH Value Measurement
Detecting Radioactive Radiation
GPS: Sensor Location Service Across the Globe
Saving and Timestamping Log Files on SD Cards
LoRaWAN, The Things Network, and ThingSpeak
Operating a LoRaWAN Gateway for TTN
Defying "Wind and Weather"
Mega Display with Weather Forecasz
Developing CoAP applications for Thread networks with Zephyr
This book will guide you through the operation of Thread, the setup of a Thread network, and the creation of your own Zephyr-based OpenThread applications to use it. You’ll acquire knowledge on:
The capture of network packets on Thread networks using Wireshark and the nRF Sniffer for 802.15.4.
Network simulation with the OpenThread Network Simulator.
Connecting a Thread network to a non-Thread network using a Thread Border Router.
The basics of Thread networking, including device roles and types, as well as the diverse types of unicast and multicast IPv6 addresses used in a Thread network.
The mechanisms behind network discovery, DNS queries, NAT64, and multicast addresses.
The process of joining a Thread network using network commissioning.
CoAP servers and clients and their OpenThread API.
Service registration and discovery.
Securing CoAP messages with DTLS, using a pre-shared key or X.509 certificates.
Investigating and optimizing a Thread device’s power consumption.
Once you‘ve set up a Thread network with some devices and tried connecting and disconnecting them, you’ll have gained a good insight into the functionality of a Thread network, including its self-healing capabilities. After you’ve experimented with all code examples in this book, you’ll also have gained useful programming experience using the OpenThread API and CoAP.
Build your textbook weather station or conduct environmental research together with the whole world. With many practical projects for Arduino, Raspberry Pi, NodeMCU, ESP32, and other development boards.
Weather stations have enjoyed great popularity for decades. Every current and even every long discontinued electronics magazine has regularly featured articles on building your own weather station. Over the years, they have become increasingly sophisticated and can now be fully integrated into an automated home — although this often requires loyalty to an (expensive) brand manufacturer across all components.
With your own weather and environmental data, you can keep up and measure things that no commercial station can. It’s also fun: expand your knowledge of electronics, current microcontroller development boards and programming languages in a fun and meaningful way. For less than 10 euros you can get started and record your first environmental data — with time and growing interest, you will continue to expand your system.
In this Edition
Which Microcontroller Fits My Project?
The Right Development Environment
Tracking Wind and Weather
Weather Display with OpenWeatherMap and Vacuum Fluorescent Display
Volatile Organic Compounds in the Air We Breathe
Working with MQ Sensors: Measuring Carbon Monoxide — Odorless but Toxic
CO2 Traffic Light with ThingSpeak IoT Connection
An Automatic Plant Watering System
Good Indoor Climate: Temperature and Humidity are Important criteria
Classy Thermometer with Vintage Tube Technology
Nostalgic Weather House for the Whole Family
Measuring Air Pressure and Temperature Accurately
Sunburn Warning Device
DIY Sensor for Sunshine Duration
Simple Smartphone Says: Fog or Clear View?
Identifying Earthquakes
Liquid Level Measurement for Vessels and Reservoirs
Water pH Value Measurement
Detecting Radioactive Radiation
GPS: Sensor Location Service Across the Globe
Saving and Timestamping Log Files on SD Cards
LoRaWAN, The Things Network, and ThingSpeak
Operating a LoRaWAN Gateway for TTN
Defying "Wind and Weather"
Mega Display with Weather Forecasz
40+ Projects using Arduino, Raspberry Pi and ESP32
This book is about developing projects using the sensor-modules with Arduino Uno, Raspberry Pi and ESP32 microcontroller development systems. More than 40 different sensors types are used in various projects in the book. The book explains in simple terms and with tested and fully working example projects, how to use the sensors in your project. The projects provided in the book include the following:
Changing LED brightness
RGB LEDs
Creating rainbow colours
Magic wand
Silent door alarm
Dark sensor with relay
Secret key
Magic light cup
Decoding commercial IR handsets
Controlling TV channels with IT sensors
Target shooting detector
Shock time duration measurement
Ultrasonic reverse parking
Toggle lights by clapping hands
Playing melody
Measuring magnetic field strength
Joystick musical instrument
Line tracking
Displaying temperature
Temperature ON/OFF control
Mobile phone-based Wi-Fi projects
Mobile phone-based Bluetooth projects
Sending data to the Cloud
The projects have been organized with increasing levels of difficulty. Readers are encouraged to tackle the projects in the order given. A specially prepared sensor kit is available from Elektor. With the help of this hardware, it should be easy and fun to build the projects in this book.
De mens is van nature uitgerust met sensoren voor geluid, licht, geur, smaak en gevoel. Zintuigen die met elektronica slechts ten dele gekopieerd kunnen worden. Met de Elektor sensorkit kunnen we wel aardig in de buurt komen.
Sensoren kunnen elektronica aansturen, maar ze kunnen ons ook van informatie voorzien. Daarom vormt niet alleen het meten van grootheden, maar ook het zichtbaar maken ervan via de Arduino seriële monitor een niet onbelangrijk deel van dit boek.
De microprocessor ATtiny85 die de Arduino-taal begrijpt, maakt het experimenteren met sensoren gemakkelijk en goedkoop. We zullen niet snel een Arduino-kaartje vast solderen in een permanente opstelling. Bij een achtpotige ATtiny zal dat geen schuldgevoel opleveren. Dat neemt niet weg dat alle sketches gewoon op elk Arduino-board draaien met mogelijk hier en daar een aanpassing van pennummers omdat die kunnen verschillen met reguliere Arduino-boards.
We zullen uitgebreid aandacht besteden aan het programmeren van de ATtiny. Veel schakelingen zijn bruikbaar in het natuurkundepracticum op school of voor bedrijfsmatige toepassingen. Maar de nadruk ligt toch wel op de (beginnende) elektronicahobbyist die zijn vrije tijd op een leuke maar vooral ook nuttige manier wil besteden. Want meer dan ooit tevoren heeft techniek de toekomst.
This is a high-performance cooling solution designed to effectively dissipate heat and ensure optimal operating temperatures for the Raspberry Pi. It is an essential accessory for users who want to enhance the performance and longevity of their Raspberry Pi device.
The compact design of the Water cooling kit for Raspberry Pi 5 allows it to be seamlessly installed on the top and bottom of the Raspberry Pi 5, ensuring efficient heat transfer and perfectly protecting the bottom of the Raspberry Pi. Its simple installation process eliminates the need for complex wiring or additional tools, making it friendly to both beginners and experienced Raspberry Pi enthusiasts.
With its powerful cooling performance, the water cooling kit for Raspberry Pi 5 for effectively dissipates heat generated by the Raspberry Pi during intensive tasks or prolonged usage. This helps prevent overheating and ensures stable performance. Efficient water-cooled cooling will allow you to connect multiple Raspberry Pi boards to a set of cooling devices. When using Raspberry Pi in a cluster, you can use a set of water-cooled devices to effectively cool multiple Raspberry Pi boards.
Features
Made for Raspberry Pi: Specially designed for Raspberry Pi 5, 1:1 mold opening, covering all heat sources, including CPU, Wi-Fi, power chip, and eMMC.
Cooling Performance: Effectively dissipates the heat generated by the Raspberry Pi, ensuring optimal operating temperatures and preventing overheating.
Easy to Use: The integrated design of the water pump and cooling fan is convenient for users to install.
RGB Color Lighting: RGB-colored lights are installed at the fan and water pump locations.
Included
1x Water cooling kit
1x Water cooling radiator
1x Black heatsink
2x Silicone hose
1x 12 V/2 A power adapter (US)
4x Hexagonal screw M2.5x10
1x L-key hex wrench
ModbusRTU and ModbusTCP examples with the Arduino Uno and ESP8266
Introduction to PLC programming with OpenPLC, the first fully open source Programmable Logic Controller on the Raspberry Pi, and Modbus examples with Arduino Uno and ESP8266
PLC programming is very common in industry and home automation. This book describes how the Raspberry Pi 4 can be used as a Programmable Logic Controller. Before taking you into the programming, the author starts with the software installation on the Raspberry Pi and the PLC editor on the PC, followed by a description of the hardware.
You'll then find interesting examples in the different programming languages complying with the IEC 61131-3 standard. This manual also explains in detail how to use the PLC editor and how to load and execute the programs on the Raspberry Pi. All IEC languages are explained with examples, starting with LD (Ladder Diagram) over ST (Structured Control Language) to SFC (Special Function Chart). All examples can be downloaded from the author's website.
Networking gets thorough attention too. The Arduino Uno and the ESP8266 are programmed as ModbusRTU or ModbusTCP modules to get access to external peripherals, reading sensors and switching electrical loads. I/O circuits complying with the 24 V industry standard may also be of interest for the reader.
The book ends with an overview of commands for ST and LD. After reading the book, the reader will be able to create his own controllers with the Raspberry Pi.
Learn programming for Alexa devices, extend it to smart home devices and control the Raspberry Pi
The book is split into two parts: the first part covers creating Alexa skills and the second part, designing Internet of Things and Smart Home devices using a Raspberry Pi.
The first chapters describe the process of Alexa communication, opening an Amazon account and creating a skill for free. The operation of an Alexa skill and terminology such as utterances, intents, slots, and conversations are explained. Debugging your code, saving user data between sessions, S3 data storage and Dynamo DB database are discussed.
In-skill purchasing, enabling users to buy items for your skill as well as certification and publication is outlined. Creating skills using AWS Lambda and ASK CLI is covered, along with the Visual Studio code editor and local debugging. Also covered is the process of designing skills for visual displays and interactive touch designs using Alexa Presentation Language.
The second half of the book starts by creating a Raspberry Pi IoT 'thing' to control a robot from your Alexa device. This covers security issues and methods of sending and receiving MQTT messages between an Alexa device and the Raspberry Pi.
Creating a smart home device is described including forming a security profile, linking with Amazon, and writing a Lambda function that gets triggered by an Alexa skill. Device discovery and on/off control is demonstrated.
Next, readers discover how to control a smart home Raspberry Pi display from an Alexa skill using Simple Queue Service (SQS) messaging to switch the display on and off or change the color.
A node-RED design is discussed from the basic user interface right up to configuring MQTT nodes. MQTT messages sent from a user are displayed on a Raspberry Pi.
A chapter discusses sending a proactive notification such as a weather alert from a Raspberry Pi to an Alexa device. The book concludes by explaining how to create Raspberry Pi as a stand-alone Alexa device.