Functionality, structure and handling of a power module
For readers with first steps in power management the “Abc of Power Modules” contains the basic principles necessary for the selection and use of a power module. The book describes the technical relationships and parameters related to power modules and the basis for calculation and measurement techniques.
Contents
Basics
This chapter describes the need of a DC/DC voltage converter and its basic functionality. Furthermore, various possibilities for realizing a voltage regulator are presented and the essential advantages of a power module are mentioned.
Circuit topologies
Circuit concepts, buck and boost topologies very frequently used with power modules are explained in detail and further circuit topologies are introduced.
Technology, construction and regulation technology
The mechanical construction of a power module is presented, which has a significant influence on EMC and thermal performance. Furthermore, control methods are explained and circuit design tips are provided in this chapter.
Measuring methods
Meaningful measurement results are absolutely necessary to assess a power module. The relevant measurement points and measurement methods are described in this chapter.
Handling
The aspects of storage and handling of power modules are explained, as well as their manufacturing and soldering processes.
Selection of a power modules
Important parameters and criteria for the optimal selection of a power module are presented in this section.
Meer dan 40 volledig geteste ESP32-projecten met Arduino IDE en de LVGL grafische bibliotheek
Deze bundel bevat de ESP32 Cheap Yellow Display (CYD) – een compact ontwikkelbord dat een standaard ESP32-microcontroller combineert met een TFT-kleurendisplay van 320 x 240 pixels. Het bord beschikt ook over meerdere aansluitingen voor GPIO, seriële communicatie (TX/RX), voeding en aarde. Het ingebouwde display is een groot voordeel, omdat gebruikers hiermee complexe, grafische projecten kunnen maken zonder dat er externe LCD's of displays nodig zijn.
Het bijbehorende boek introduceert de hardware en de ingebouwde aansluitingen van het CYD-bord in detail. Het biedt een reeks projecten van beginners- tot gevorderdenniveau, ontwikkeld met de populaire Arduino IDE 2.0. Zowel basis grafische functies als de krachtige LVGL grafische bibliotheek worden behandeld, met praktische projecten die elke aanpak illustreren.
Alle meegeleverde projecten zijn volledig getest en klaar voor gebruik. Het boek bevat blokdiagrammen, circuitschema's, complete codelijsten en stapsgewijze uitleg. Met de LVGL-bibliotheek kunnen lezers moderne, kleurrijke grafische interfaces maken met behulp van widgets zoals knoppen, labels, schuifregelaars, kalenders, toetsenborden, grafieken, tabellen, menu's, animaties en meer.
ESP32 Cheap Yellow Display Board
Dit ontwikkelbord (ook bekend als "Cheap Yellow Display") wordt aangedreven door de ESP-WROOM-32, een dual-core MCU met geïntegreerde Wi-Fi- en Bluetooth-mogelijkheden. Het werkt op een hoofdfrequentie tot 240 MHz, met 520 KB SRAM, 448 KBROM en 4 MB Flash-geheugen. Het bord is voorzien van een 2,8-inch scherm met een resolutie van 240 x 320 en resistieve aanraking.
Bovendien bevat het bord een achtergrondverlichtingsbesturingscircuit, aanraakbesturingscircuit, luidsprekeraandrijfcircuit, lichtgevoelig circuit en RGB-LED-besturingscircuit. Het biedt ook een TF-kaartsleuf, seriële interface, DHT11 temperatuur- en vochtigheidssensorinterface en extra IO-poorten.
De module ondersteunt ontwikkeling in Arduino IDE, ESP-IDE, MicroPython en Mixly.
Toepassingen
Beeldoverdracht voor Smart Home-apparaat
Draadloze bewaking
Slimme landbouw
Draadloze QR-herkenning
Signaal van draadloos positioneringssysteem
En andere IoT-toepassingen
Specificaties
Microcontroller
ESP-WROOM-32 (Dual-core MCU met geïntegreerde Wi-Fi en Bluetooth)
Frequentie
Tot 240 MHz (rekenkracht is maximaal 600 DMIPS)
SRAM
520 KB
ROM
448 KB
Flash
4 MB
Bedrijfsspanning
5 V
Stroomverbruik
ca. 115 mA
Display
2,8" TFT-kleurenscherm (240 x 320)
Touch
Resistief Touch
Driver chip
ILI9341
Afmetingen
50 x 86 mm
Gewicht
50 g
Downloads
GitHub
Inhoud van de bundel
The ESP32 Cheap Yellow Display Book (normale prijs: € 35)
ESP32 Cheap Yellow Display Board (normale prijs: € 25)
1x ESP32 Dev Board met 2,8" display en acryl-behuizing
1x Touchpen
1x Aansluitkabel
1x USB-kabel
Projects Using Arduino IDE and the LVGL Graphics Library
The ESP32 is probably one of the most popular microcontrollers used by many people, including students, hobbyists, and professional engineers. Its low cost, coupled with rich features makes it a popular device to use in many projects. Recently, a board called the ESP32 Cheap Yellow Display (CYD for short) is available from its manufacturers. The board includes a standard ESP32 microcontroller together with a 320x240 pixel TFT display. Additionally, the board provides several connectors for interfaces such as GPIO, serial port (TX/RX), power and Ground. The inclusion of a TFT display is a real advantage as it enables users to design complex graphics-based projects without resorting to an external LCD or graphics displays.
The book describes the basic hardware of the ESP32 CYD board and provides details of its on-board connectors. Many basic, simple, and intermediate-level projects are given in the book based on the ESP32 CYD, using the highly popular Arduino IDE 2.0 integrated development environment. The use of both the basic graphics functions and the use of the popular LVGL graphics library are discussed in the book and projects are given that use both types of approaches.
All the projects given in the book have been tested and are working. The block diagram, circuit diagram, and the complete program listings and program descriptions of all the projects are given with explanations. Readers can use the LVGL graphics library to design highly popular eye-catching full-color graphics projects using widgets such as buttons, labels, calendars, keypads, keyboards, message boxes, spinboxes, sliders, charts, tables, menus, bars, switches, drop-down lists, animations, and many more widgets.
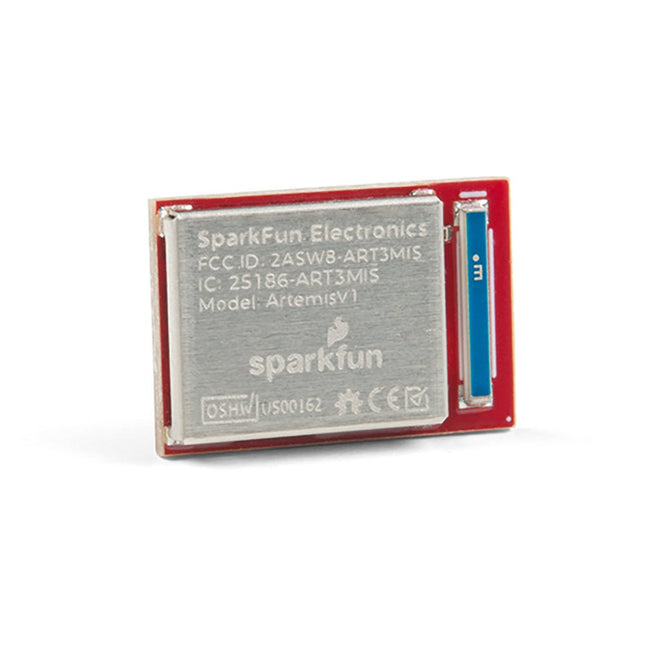
De flexibiliteit van de Artemis module start met SparkFun's Arduino core. Je kunt de Artemis module programmeren en gebruiken net zoals je dat met een Uno of een andere Arduino zou doen. De tijd om voor het eerst te knipperen is slechts 5 minuten verwijderd! We hebben de kern vanaf de grond opgebouwd, om hem snel en zo licht mogelijk te maken.Dan de module zelf. Met een afmeting van 10 mm x 15 mm heeft de Artemis module alle ondersteunende schakelingen die je nodig hebt om de fantastische Ambiq Apollo3 processor te gebruiken in je volgende project. We zijn er trots op te kunnen zeggen dat de SparkFun Artemis module de eerste open-source hardware module is waarvan de ontwerp bestanden vrij en gemakkelijk beschikbaar zijn. We hebben de module zorgvuldig ontworpen zodat het implementeren van Artemis in uw ontwerp gedaan kan worden met low-cost 2-layer PCBs en 8mil trace/space.Gemaakt in de USA bij SparkFun's Boulder productielijn, is de Artemis module ontworpen voor consumer-grade producten. Dit onderscheidt de Artemis echt van zijn Arduino broeders. Klaar om uw product te schalen? De Artemis groeit met u mee buiten de Uno footprint en Arduino IDE. Bovendien, de Artemis heeft een geavanceerde HAL (hardware abstractie laag), waardoor gebruikers de moderne Cortex-M4F architectuur tot het uiterste kunnen drijven.De SparkFun Artemis Module is volledig FCC / IC / CE gecertificeerd en is beschikbaar in volledige tape en haspel hoeveelheden. Met 1M flash en 384k RAM, heb je genoeg ruimte voor je code. De Artemis module draait op 48MHz met een 96MHz turbo mode beschikbaar en met Bluetooth om op te starten!
Dit carrier bord combineert een 2.4' TFT scherm, zes adresseerbare LED's, on-board spanningsregelaar, een 6-pins IO-connector, en microSD slot met het M.2 pin connector slot zodat het kan worden gebruikt met compatibele processorborden in ons MicroMod ecosysteem. We hebben dit carrier board ook uitgerust met Atmel's ATtiny84 met 8kb programmeerbare flash. Deze kleine jongen is voorgeprogrammeerd om met de processor te communiceren en via I2C druktoetsen te lezen. Eigenschappen M.2 MicroMod Connector 240 x 320 pixel, 2.4' TFT display 6 Addresseerbare APA102 LEDs Magnetische Buzzer USB-C Connector 3.3 V 1 A spanningsregelaar Qwiic Connector Boot/Reset toetsen RTC Backup Batterij & laadcircuit microSD Kruiskopschroef M2.5 x 3 mm meegeleverd
Projects Using Arduino IDE and the LVGL Graphics Library
The ESP32 is probably one of the most popular microcontrollers used by many people, including students, hobbyists, and professional engineers. Its low cost, coupled with rich features makes it a popular device to use in many projects. Recently, a board called the ESP32 Cheap Yellow Display (CYD for short) is available from its manufacturers. The board includes a standard ESP32 microcontroller together with a 320x240 pixel TFT display. Additionally, the board provides several connectors for interfaces such as GPIO, serial port (TX/RX), power and Ground. The inclusion of a TFT display is a real advantage as it enables users to design complex graphics-based projects without resorting to an external LCD or graphics displays.
The book describes the basic hardware of the ESP32 CYD board and provides details of its on-board connectors. Many basic, simple, and intermediate-level projects are given in the book based on the ESP32 CYD, using the highly popular Arduino IDE 2.0 integrated development environment. The use of both the basic graphics functions and the use of the popular LVGL graphics library are discussed in the book and projects are given that use both types of approaches.
All the projects given in the book have been tested and are working. The block diagram, circuit diagram, and the complete program listings and program descriptions of all the projects are given with explanations. Readers can use the LVGL graphics library to design highly popular eye-catching full-color graphics projects using widgets such as buttons, labels, calendars, keypads, keyboards, message boxes, spinboxes, sliders, charts, tables, menus, bars, switches, drop-down lists, animations, and many more widgets.
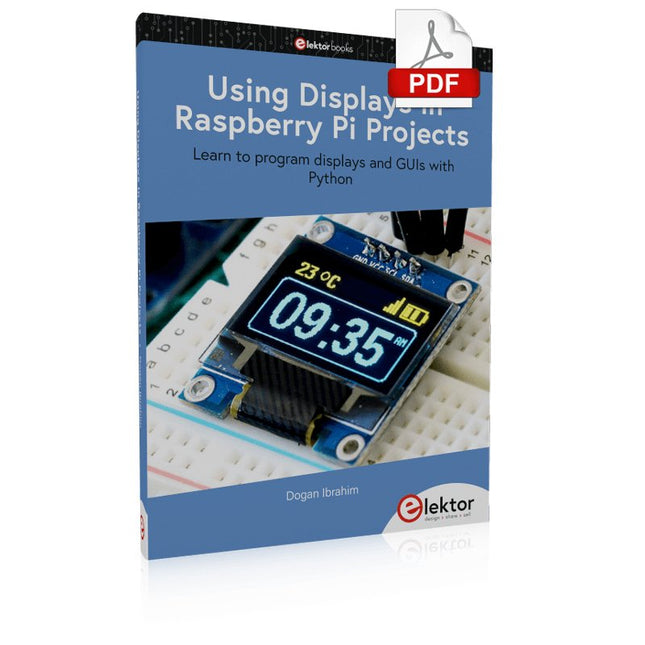
Learn to program displays and GUIs with Python
This book is about Raspberry Pi 4 display projects. The book starts by explaining how to install the latest Raspbian operating system on an SD card, and how to configure and use the GPIO ports.
The core of the book explains the following topics in simple terms with fully tested and working example projects:
Simple LED projects
Bar graph LED projects
Matrix LED projects
Bitmap LED projects
LED strips
LCDs
OLED displays
E-paper displays
TFT displays
7-inch touch screen
GUI Programming with Tkinder
One unique feature of this book is that it covers almost all types of display that readers will need to use in their Raspberry Pi based projects. The operation of each project is fully given, including block diagrams, circuit diagrams, and commented full program listings. It is therefore an easy task to convert the given projects to run on other popular platforms, such as Arduino or PIC microcontrollers.
Python program listings of all Raspberry Pi projects developed in this book are available for download at Elektor.com. Readers can use these programs in their projects. Alternatively, they can modify the programs to suit their applications.
The newcomer to Microchip’s PIC microcontrollers invariably gets an LED to flash as their first attempt to master this technology. You can use just a simple LED indicator in order to show that your initial attempt is working, which will give you confidence to move forward. This is how the book begins — simple programs to flash LEDs, and eventually by stages to use other display indicators such as the 7-segment display, alphanumeric liquid crystal displays and eventually a colour graphic LCD.
As the reader progresses through the book, bigger and upgraded PIC chips are introduced, with full circuit diagrams and source code, both in assembler and C.
In addition, a small tutorial is included using the MPLAB programming environment, together with the EAGLE schematic and PCB design package to enable readers to create their own designs using the book’s many case studies as working examples to work from.
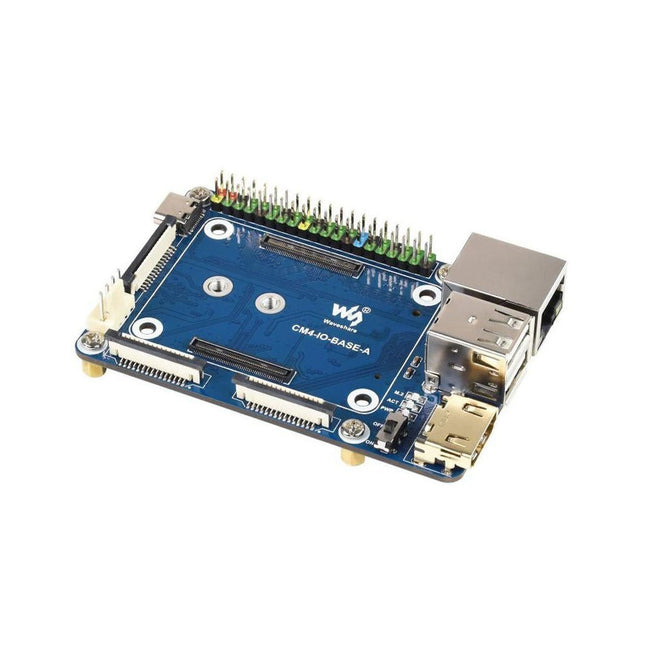
Specifications CM4 socket Suitable for all variants of Compute Module 4 Networking Gigabit Ethernet RJ45 connectorM.2 M KEY, supports communication modules or NVME SSD Connector Raspberry Pi 40-PIN GPIO header USB 2x USB 2.0 Type A2x USB 2.0 via FFC connector Display MIPI DSI display port (15-pin 1.0 mm FPC connector) Camera 2x MIPI CSI-2 camera port (15-pin 1.0 mm FPC connector) Video 2x HDMI port (including one port via FFC connector), supports 4K 30fps output RTC N/A Storage MicroSD card socket for Compute Module 4 Lite (without eMMC) variants Fan header No fan control, 5 V Power input 5 V Dimensions 85 x 56 mm Included 1x CM4-IO-BASE-A 1x SSD mounting screw Downloads Wiki
,
van Mathias Claussen
Review: 2-in-1 SMD Hetelucht Rework Station (ZD-8922)
Een voordelig 2-in-1 SMD hetelucht soldeerstation. De ZD-8922 is een van de gereedschappen voor minder dan 100€ die een soldeerbout en hete lucht biedt. Naast...