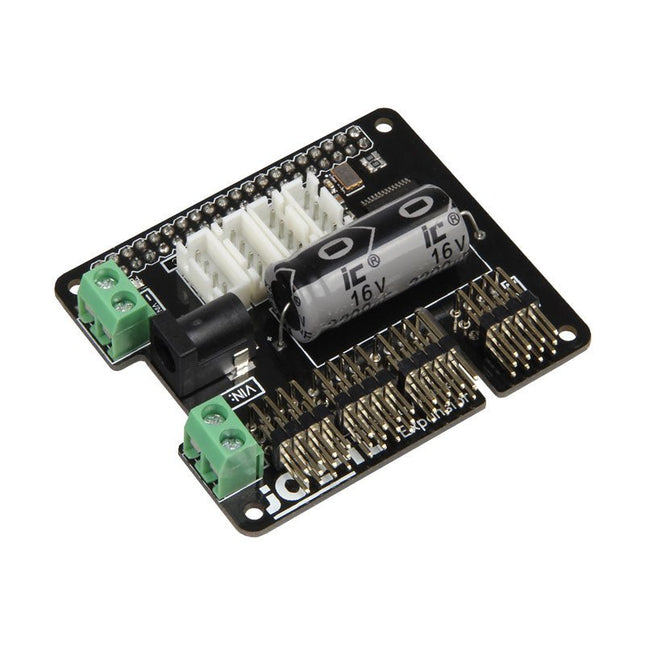
The MotoPi is an extension-board to control and use up to 16 PWM-controlled 5 V servo motors. The board can be additional powered by a voltage between 4.8 V and 6 V so a perfect supply is always guaranteed and even larger projects can be powered. With the additional power supply and the integrated Analog-Digital-Converter, new possibilities can be reached. An additional power supply per motor is not required anymore because all connections (Voltage, Ground, Control) are directly connected to the board. The control and the programing can be directly done, as usual, on the Raspberry Pi. Special features 16 Channels, own clock generator, Inkl. Analog Digital Converter Input 1 Coaxial power connector 5.5 / 2.1 mm, 5 V / 6 A max Input 2 Screw terminal, 4.8-6 V / 6 A max Compatible with Raspberry Pi A+, B+, 2B, 3B Dimensions 65 x 56 x 24 mm Scope of supply Board, manual, fixing material
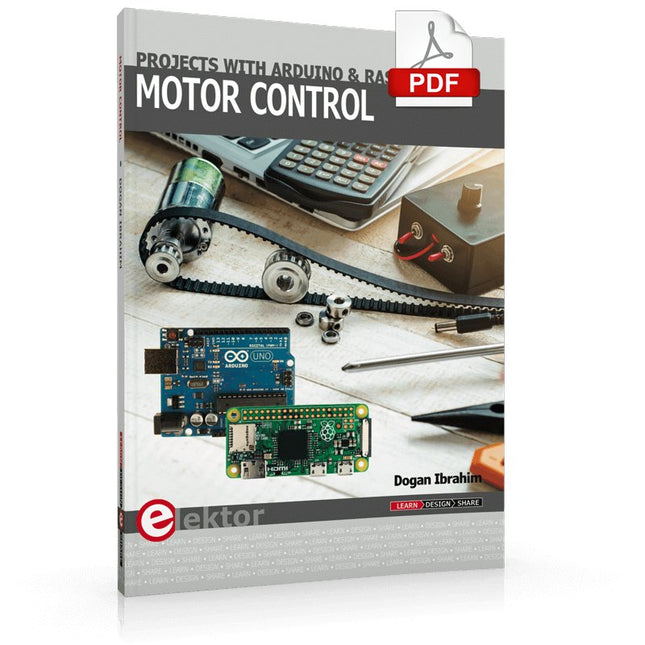
This book is about DC electric motors and their use in Arduino and Raspberry Pi Zero W based projects. The book includes many tested and working projects where each project has the following sub-headings:
Title of the project
Description of the project
Block diagram
Circuit diagram
Project assembly
Complete program listing of the project
Full description of the program
The projects in the book cover the standard DC motors, stepper motors, servo motors, and mobile robots. The book is aimed at students, hobbyists, and anyone else interested in developing microcontroller based projects using the Arduino Uno or the Raspberry Pi Zero W.
One of the nice features of this book is that it gives complete projects for remote control of a mobile robot from a mobile phone, using the Arduino Uno as well as the Raspberry Pi Zero W development boards. These projects are developed using Wi-Fi as well as the Bluetooth connectivity with the mobile phone. Readers should be able to move a robot forward, reverse, turn left, or turn right by sending simple commands from a mobile phone. Full program listings of all the projects as well as the detailed program descriptions are given in the book. Users should be able to use the projects as they are presented, or modify them to suit to their own needs.
Physical Computing met het Arduino-platform
Dit leerboek over het Arduino-platform is uniek en brengt u stap voor stap van beginner tot gevorderde Arduino-gebruiker. Er wordt duidelijk in uitgelegd waarom en waardoor toepassingen werken, ondersteund door gedetailleerde afbeeldingen in kleur. Er is slechts een geringe elektronische basiskennis vereist, omdat de benodigde hardware uitgebreid wordt besproken. Het laatste gedeelte van dit boek bevat een degelijke theoretische verdieping, zodat u een krachtig naslagwerk achter de hand houdt.
Er bestond in het Nederlands nog geen lesboek over dit platform. De didactische opbouw is zodanig dat de vereiste abstracte kennis wordt uitgelegd aan de hand van toepasbare en actuele praktijkvoorbeelden. De meeste toepassingen zijn gericht op ‘physical computing’, dat is de interactie tussen sensoren, actoren, elektronica en software. Hierdoor is het boek ook geschikt voor technisch beroepsonderwijs, o.a. voor de richting mechatronica.
De opbouw van het boek is als volgt:
Algemene introductie microcontrollers.
Informatie over het Arduino-platform.
Oefeningen met uitleg aan de hand van 21 voorbeelden.
Praktijkvoorbeelden met uitleg aan de hand van 5 voorbeelden.
Theoretische verdieping van de software en hardware.
Praktische elektronicaschema´s.
Alle software-voorbeelden in het boek zijn als download beschikbaar.
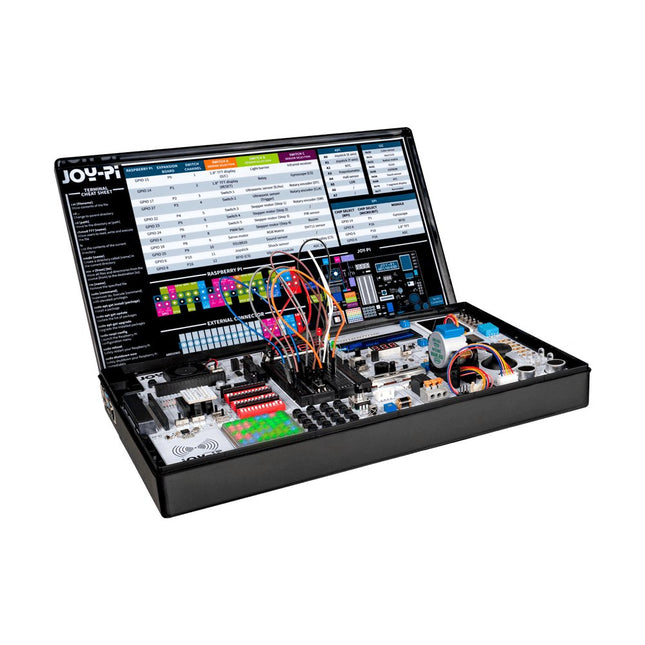
De Joy-Pi Advanced is een compact en krachtig instrument waarmee je snel en eenvoudig je projecten kunt realiseren. Of je nu veel of weinig ervaring hebt, met de Joy-Pi Advanced kun je je creativiteit de vrije loop laten. Dankzij de compatibiliteit met een groot aantal platformen, waaronder Raspberry Pi, Raspberry Pi Pico, Arduino Nano, BBC micro:bit en NodeMCU ESP32, kun je eenvoudig en snel toegang krijgen tot het platform van je voorkeur.
Daarnaast heeft de Joy-Pi Advanced meer dan 30 stations, lessen en modules, waardoor je een onbeperkt aantal manieren hebt om je projecten uit te voeren. Met het zelfontwikkelde leercentrum kun je niet alleen je vaardigheden verbeteren, maar ook nieuwe projecten maken. Het leercentrum biedt een schat aan informatie en tutorials die je stap voor stap door je projecten begeleiden.
Joy-Pi Advanced wordt in het bijzonder gekenmerkt door zijn intelligente schakeleenheden, die een uitgebreid gebruik van de beschikbare pinnen mogelijk maken. In totaal zijn er drie schakeleenheden geïntegreerd, elk voorzien van 12 individuele schakelaars die zorgen voor een nauwkeurige aansturing van de aangesloten sensoren en modules. Dit systeem lost het bekende probleem van het beperkte aantal pinnen op dat optreedt bij conventionele microcontrollers. Met de schakeleenheden kun je een groot aantal sensoren en modules parallel aansturen door ze afzonderlijk aan en uit te schakelen. Dit simuleert meervoudige pintoewijzing, waardoor je het volledige vermogen van je projecten kunt benutten zonder afbreuk te doen aan de functionaliteit.
Door onze innovatieve adapter boards en het micro:bit slot te combineren, bereiken we naadloze compatibiliteit met een breed scala aan microcontrollers zoals Raspberry Pi Pico, NodeMCU ESP32, micro:mit en Arduino Nano. De speciaal ontwikkelde adapterkaarten zijn zo ontworpen dat ze perfect passen bij de betreffende microcontroller. Door de microcontroller op het juiste adapterboard aan te sluiten en deze vervolgens in het micro:bit slot te steken, wordt de Joy-Pi Advanced snel en eenvoudig compatibel met de verschillende microcontrollers. Dit zorgt voor een naadloze integratie van het platform van je voorkeur en de mogelijkheid om de sterke punten van de verschillende microcontrollers te combineren in je projecten. Op deze manier kun je je volledig richten op je creatieve projecten zonder dat je je zorgen hoeft te maken over de compatibiliteit van verschillende microcontrollers. De Joy-Pi Advanced vereenvoudigt het ontwikkelproces en geeft je de mogelijkheid om je projecten flexibel en individueel te ontwerpen.
Kenmerken
Sterk geïntegreerd ontwikkelplatform & leercentrum
Snel, eenvoudig & draadloos combineren van verschillende sensoren & actuatoren
Installatieoptie voor Raspberry Pi 4
Compatibel met verschillende microcontrollers
Zelfontwikkeld, didactisch leerplatform voor Raspberry Pi & Windows
Specificaties
Compatibel met
Raspberry Pi 4, Arduino Nano, NodeMCU ESP32, BBC micro:bit, Raspberry Pi Pico
Geïnstalleerde sensoren, actuatoren & componenten
39
Leerplatform
Meer dan 40 items in de kennisdatabase, 10 projecten, 10 lessen, 14 visies
Displays
7-segment display, 16x2 display, 1,8' TFT-display, 0,96" OLED-display, 8x8 RGB-matrix
Sensoren
DS18B20, schoksensor, hallsensor, barometer, geluidssensor, gyroscoop, PIR-sensor, Lichtbarrière, NTC, Lichtsensor, 6x aanraaksensor, kleurensensor, ultrasone afstandssensor, DHT11 temperatuur- & vochtigheidssensor
Controle
Joystick, 5x schakelaars, potentiometer, draaiencoder, 4x4 knoppenmatrix, relais, PWM-ventilator
Motoren
Servo-interface, Stappenmotorinterface, Trilmotor
Meet- en conversiemodules
Analoog-digitaalomzetter, niveauomzetter, voltmeter, variabele spanningsbron
Andere onderdelen
RTC real-time klok, zoemer, EEPROM-geheugen, infrarood ontvanger, breadboard, RFID-lezer
Adapterkaarten
Adapter voor NodeMCU ESP32, Arduino Nano & Raspberry Pi Pico, Board connectors voor Raspberry Pi & externe boards
Elektronische onderdelen
Infrarood afstandsbediening, RFID-chip, RFID-kaart, 6x krokodillenklemmen, microSD-kaartlezer, servomotor, stappenmotor, 32 GB microSD-kaart
Onderdelen
40x weerstanden, 3x groene LED's, 3x gele LED's, 3x rode LED's, 1x transistor, 5x knoppen, 1x potentiometer, 2x condensatoren
Andere accessoires
Schroevenassortiment, schroevendraaier, accessoire-opbergtas, voeding & voedingskabel, servo bevestiging
Stroomvoorziening
Ingebouwde voeding: 36 W, 12 V, 3 A Behuizingsconnector: Kleine apparaat stekker C8
Spanningsuitgangen
12 V, 5 V, 3,3 V, variabele spanningsuitgang (2-11 V)
Databussen & signaaluitgangen
I²C, SPI, Analoog naar digitaal converter
Batterij (RTC)
CR2032
Afmetingen
327 x 200 x 52 mm
Vereist
Raspberry Pi 4 met minstens 2 GB RAM
Downloads
Joy-Pi website
Datasheet
Manual
Physical Computing met het Arduino-platform
Dit leerboek over het Arduino-platform is uniek en brengt u stap voor stap van beginner tot gevorderde Arduino-gebruiker. Er wordt duidelijk in uitgelegd waarom en waardoor toepassingen werken, ondersteund door gedetailleerde afbeeldingen in kleur. Er is slechts een geringe elektronische basiskennis vereist, omdat de benodigde hardware uitgebreid wordt besproken. Het laatste gedeelte van dit boek bevat een degelijke theoretische verdieping, zodat u een krachtig naslagwerk achter de hand houdt.
Er bestond in het Nederlands nog geen lesboek over dit platform. De didactische opbouw is zodanig dat de vereiste abstracte kennis wordt uitgelegd aan de hand van toepasbare en actuele praktijkvoorbeelden. De meeste toepassingen zijn gericht op ‘physical computing’, dat is de interactie tussen sensoren, actoren, elektronica en software. Hierdoor is het boek ook geschikt voor technisch beroepsonderwijs, o.a. voor de richting mechatronica.
De opbouw van het boek is als volgt:
Algemene introductie microcontrollers.
Informatie over het Arduino-platform.
Oefeningen met uitleg aan de hand van 21 voorbeelden.
Praktijkvoorbeelden met uitleg aan de hand van 5 voorbeelden.
Theoretische verdieping van de software en hardware.
Praktische elektronicaschema´s.
Alle software-voorbeelden in het boek zijn als download beschikbaar.
Clever Tricks with ATmega328 Pro Mini Boards
With a simple Pro Mini board and a few other components, projects that 20 or 30 years ago were unthinkable (or would have cost a small fortune) are realized easily and affordably in this book: From simple LED effects to a full battery charging and testing station that will put a rechargeable through its paces, there’s something for everyone.
All the projects are based on the ATmega328 microcontroller, which offers endless measuring, switching, and control options with its 20 input and output lines. For example, with a 7-segment display and a few resistors, you can build a voltmeter or an NTC-based thermometer. The Arduino platform offers the perfect development environment for programming this range of boards.
Besides these very practical projects, the book also provides the necessary knowledge for you to create projects based on your own ideas. How to measure, and what? Which transistor is suitable for switching a certain load? When is it better to use an IC? How do you switch mains voltage? Even LilyPad-based battery-operated projects are discussed in detail, as well as many different motors, from simple DC motors to stepper motors.
Sensors are another exciting topic: For example, a simple infrared receiver that can give disused remote controls a new lease on life controlling your home, and a tiny component that can actually measure the difference in air pressure between floor and table height!
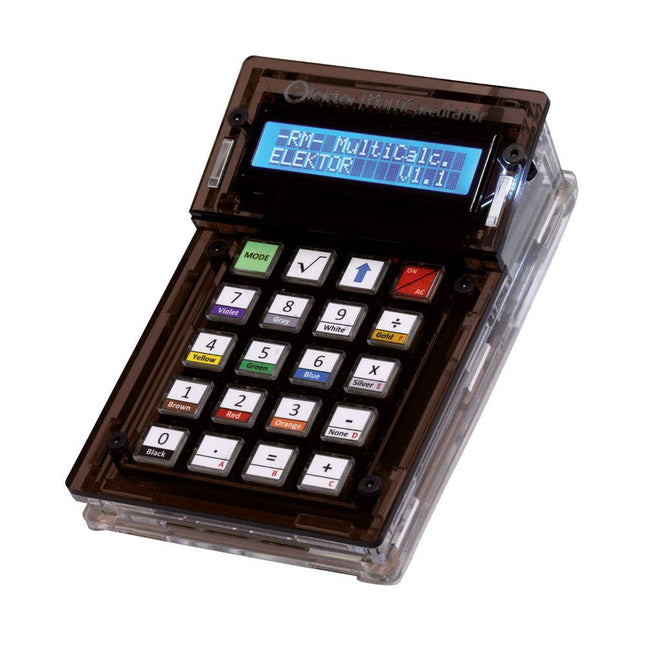
De Elektor MultiCalculator Kit is een op Arduino-gebaseerde multifunctionele rekenmachine die verder gaat dan basisberekeningen. Hij biedt 22 functies, waaronder licht- en temperatuurmeting, differentiële temperatuuranalyse en NEC IR-afstandsbedieningsdecodering. De Elektor MultiCalculator is een handig hulpmiddel voor gebruik in je projecten of voor educatieve doeleinden.
De kit heeft een Pro Mini module als rekeneenheid. De printplaat is eenvoudig te monteren met behulp van through-hole componenten. De behuizing bestaat uit 11 acrylpanelen en montagemateriaal voor eenvoudige montage. Bovendien is het apparaat uitgerust met een 16x2 alfanumeriek LCD-scherm, 20 knoppen en temperatuursensoren.
De Elektor MultiCalculator is programmeerbaar met de Arduino IDE via een 6-weg PCB-header. De beschikbare software is tweetalig (Engels en Nederlands). De calculator kan worden geprogrammeerd met een programmeeradapter en wordt gevoed via USB-C.
Bedrijfsmodi
Rekenmachine
4-ringsweerstandscode
5-ringsweerstandscode
Conversie van decimaal naar hexadecimaal en tekens (ASCII)
Conversie van hexadecimaal naar decimaal en tekens (ASCII)
Conversie van decimaal naar binair en tekens (ASCII)
Conversie van binair naar decimaal en hexadecimaal
Berekening van Hz, nF, capacitieve reactantie (XC)
Berekening van Hz, µH, inductieve reactantie (XL)
Weerstandberekening van twee parallel geschakelde weerstanden
Weerstandberekening van twee in serie geschakelde weerstanden
Berekening van onbekende parallelle weerstand
Temperatuurmeting
Verschiltemperatuurmeting T1&T2 en Delta (δ)
Lichtmeting
Stopwatch met rondetijdfunctie
Artikelteller
NEC IR-decodering van de afstandsbediening
AWG-conversie (American Wire Gauge)
Dobbelstenen gooien
Personaliseer het opstartbericht
Temperatuurkalibratie
Specificaties
Menutalen: Engels, Nederlands
Afmetingen: 92 x 138 x 40 mm
Bouwtijd: ongeveer 5 uur
Inbegrepen
PCB's en componenten met doorlopende gaten
Voorgesneden acrylplaten met alle mechanische onderdelen
Pro Mini-microcontrollermodule (ATmega328/5 V/16 MHz)
Programmeeradapter
Waterdichte temperatuursensoren
USB-C kabel
Downloads
Software
The Arduino Uno is an open-source microcontroller development system encompassing hardware, an Integrated Development Environment (IDE), and a vast number of libraries. It is supported by an enormous community of programmers, electronic engineers, enthusiasts, and academics. The libraries in particular really smooth Arduino programming and reduce programming time. What’s more, the libraries greatly facilitate testing your programs since most come fully tested and working.
The Raspberry Pi 4 can be used in many applications such as audio and video media devices. It also works in industrial controllers, robotics, games, and in many domestic and commercial applications. The Raspberry Pi 4 also offers Wi-Fi and Bluetooth capability which makes it great for remote and Internet-based control and monitoring applications.
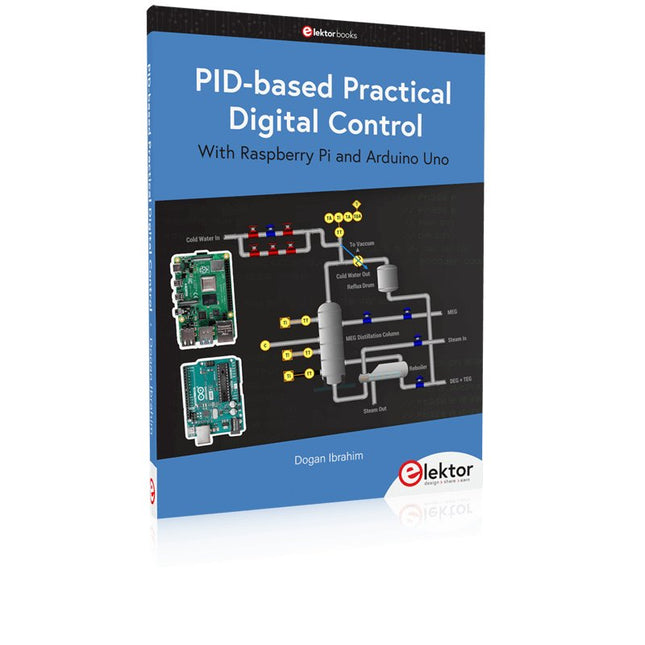
This book is about using both the Raspberry Pi 4 and the Arduino Uno in PID-based automatic control applications. The book starts with basic theory of the control systems and feedback control. Working and tested projects are given for controlling real-life systems using PID controllers. The open-loop step time response, tuning the PID parameters, and the closed-loop time response of the developed systems are discussed together with the block diagrams, circuit diagrams, PID controller algorithms, and the full program listings for both the Raspberry Pi and the Arduino Uno.
The projects given in the book aim to teach the theory and applications of PID controllers and can be modified easily as desired for other applications. The projects given for the Raspberry Pi 4 should work with all other models of Raspberry Pi family.
The book covers the following topics:
Open-loop and closed-loop control systems
Analog and digital sensors
Transfer functions and continuous-time systems
First-order and second-order system time responses
Discrete-time digital systems
Continuous-time PID controllers
Discrete-time PID controllers
ON-OFF temperature control with Raspberry Pi and Arduino Uno
PID-based temperature control with Raspberry Pi and Arduino Uno
PID-based DC motor control with Raspberry Pi and Arduino Uno
PID-based water level control with Raspberry Pi and Arduino Uno
PID-based LED-LDR brightness control with Raspberry Pi and Arduino Uno
Deze USB-stick bevat een selectie van meer dan 300 artikelen over Arduino gepubliceerd in Elektor Magazine. De inhoud bestaat uit zowel achtergrondartikelen als projecten met de volgende onderwerpen:
Software & hardware ontwikkeling: Tutorials over de ontwikkeling van Arduino-software met behulp van Arduino IDE, Atmel Studio, Shields en essentiële programmeerconcepten.
Educatie: Een microcontroller Bootcamp biedt een gestructureerde aanpak voor het programmeren van embedded systemen.
Data acquisitie & meten: Projecten zoals een 16-bits datalogger, draaibank toerenteller en een AC netanalyser voor het vastleggen en analyseren van real-time signalen.
Draadloze communicatie: Leer hoe je draadloze netwerken implementeert, een Android interface maakt en effectief communiceert met microcontrollers.
Robotica en automatisering: Omvat de Arduino Nano Robot Controller, ondersteunende boards voor automatisering, en een verkenning van verschillende Arduino-shields om de functionaliteit te verbeteren.
Zelfbouw-projecten: Unieke projecten zoals laserprojectie, Numitron klok en thermometer, ELF ontvanger, Theremino, en touch LED interfaces laten creatieve toepassingen zien.
Of u nu een beginner bent of een ervaren maker, deze collectie is een waardevolle bron om te leren, te experimenteren en de grenzen van de Arduino-technologie te verleggen.
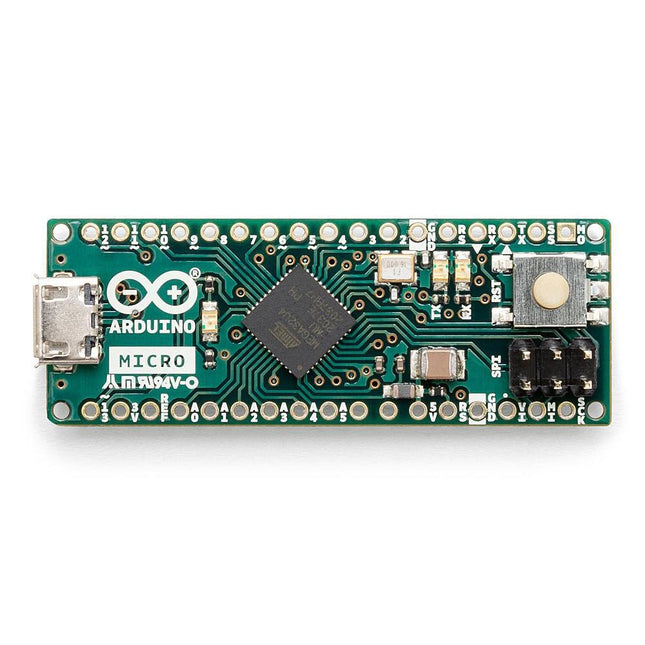
De Micro bevat alles wat nodig is om de microcontroller te ondersteunen; sluit hem eenvoudig aan op een computer met een micro USB-kabel om aan de slag te gaan. Het heeft een vormfactor die het mogelijk maakt om gemakkelijk op een breadboard te worden geplaatst. Het Micro-bord is vergelijkbaar met de Arduino Leonardo in die zin dat de ATmega32U4 ingebouwde USB-communicatie heeft, waardoor er geen secundaire processor nodig is. Hierdoor kan de Micro verschijnen aan een aangesloten computer als een muis en toetsenbord, in aanvulling op een virtuele (CDC) seriële / COM-poort. Microcontroller ATmega32U4 Bedrijfsspanning 5 V Inputspanning 7 V - 12 V Analoge ingangspinnen 12 PWM Pennen 7 DC I/O Pen 20 DC stroom per I/O Pin 20 mA DC stroom voor 3,3 V pin 50 mA Flash Geheugen 32 KB waarvan 4 KB gebruikt door de bootloader SRAM 2,5 KB EEPROM 1 KB Kloksnelheid 16 MHz LED_Builtin 13 Lengte 45 mm Breedte 18 mm Gewicht 13 g
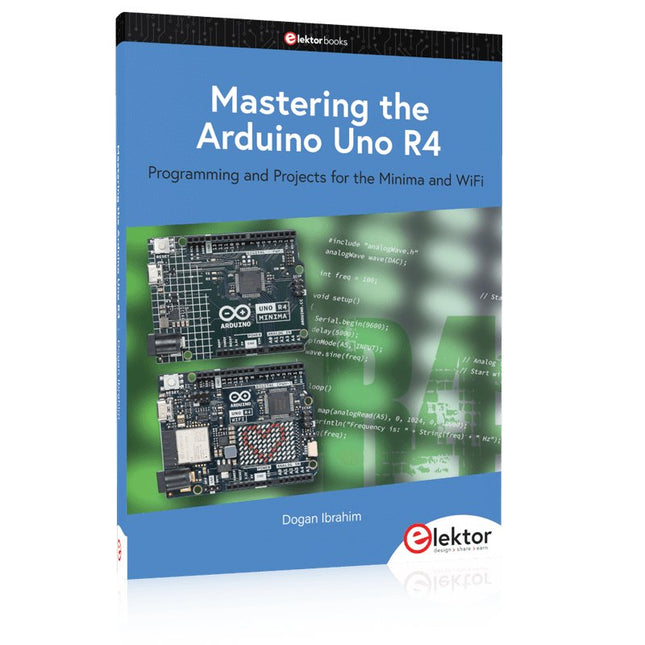
Programming and Projects for the Minima and WiFi
Based on the low-cost 8-bit ATmega328P processor, the Arduino Uno R3 board is likely to score as the most popular Arduino family member, and this workhorse has been with us for many years. Eleven years later, the long-overdue successor, the Arduino Uno R4, was released. It is built around a 48 MHz, 32-bit Arm Cortex-M4 microcontroller and provides significantly expanded SRAM and Flash memory. Additionally, a higher-precision ADC and a new DAC are added to the design. The Uno R4 board also supports the CAN Bus with an interface.
Two versions of the board are available: Uno R4 Minima, and Uno R4 WiFi. This book is about using these new boards to develop many different and interesting projects with just a handful of parts and external modules. All projects described in the book have been fully tested on the Uno R4 Minima or the Uno R4 WiFi board, as appropriate.
The project topics include the reading, control, and driving of many components and modules in the kit as well as on the relevant Uno R4 board, including
LEDs
7-segment displays (using timer interrupts)
LCDs
Sensors
RFID Reader
4x4 Keypad
Real-time clock (RTC)
Joystick
8×8 LED matrix
Motors
DAC (Digital-to-analog converter)
LED matrix
WiFi connectivity
Serial UART
CAN bus
Infrared controller and receiver
Simulators
… all in creative and educational ways with the project operation and associated software explained in great detail.
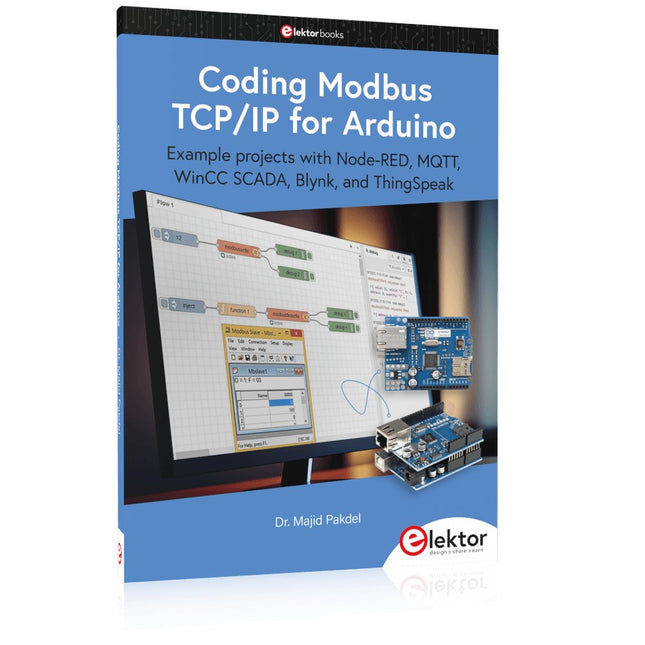
Example projects with Node-RED, MQTT, WinCC SCADA, Blynk, and ThingSpeak
This comprehensive guide unlocks the power of Modbus TCP/IP communication with Arduino. From the basics of the Modbus protocol right up to full implementation in Arduino projects, the book walks you through the complete process with lucid explanations and practical examples.
Learn how to set up Modbus TCP/IP communication with Arduino for seamless data exchange between devices over a network. Explore different Modbus functions and master reading and writing registers to control your devices remotely. Create Modbus client and server applications to integrate into your Arduino projects, boosting their connectivity and automation level.
With detailed code snippets and illustrations, this guide is perfect for beginners and experienced Arduino enthusiasts alike. Whether you‘re a hobbyist looking to expand your skills or a professional seeking to implement Modbus TCP/IP communication in your projects, this book provides all the knowledge you need to harness the full potential of Modbus with Arduino.
Projects covered in the book:
TCP/IP communication between two Arduino Uno boards
Modbus TCP/IP communication within the Node-RED environment
Combining Arduino, Node-RED, and Blynk IoT cloud
Interfacing Modbus TCP/IP with WinCC SCADA to control sensors
Using MQTT protocol with Ethernet/ESP8266
Connecting to ThingSpeak IoT cloud using Ethernet/ESP8266