50+ Android Apps with Raspberry Pi, ESP32 and Arduino
This book is about developing apps for Android compatible mobile devices using the MIT App Inventor online development environment. MIT App Inventor projects can be in either standalone mode or use an external processor. In standalone mode, the developed application runs only on the mobile device (e.g. Android). In external processor-based applications, the mobile device communicates with an external microcontroller-based processor, such as Raspberry Pi, Arduino, ESP8266, ESP32, etc.
In this book, many tested and fully working projects are given both in standalone mode and using an external processor. Full design steps, block programs, circuit diagrams, QR codes and full program listings are given for all projects.
The projects developed in this book include:
Using the text-to-speech component
Intonating a received SMS message
Sending SMS messages
Making telephone calls using a contacts list
Using the GPS and Pin-pointing our location on a map
Speech recognition and speech translation to another language
Controlling multiple relays by speech commands
Projects for the Raspberry Pi, ESP32 and Arduino using Bluetooth and Wi-Fi
MIT APP Inventor and Node-RED projects for the Raspberry Pi
The book is unique in that it is currently the only book that teaches how to develop projects using Wi-Fi and Node-RED with MIT App Inventor. The book is aimed at students, hobbyists, and anyone interested in developing apps for mobile devices.
All projects presented in this book have been developed using the MIT App Inventor visual programming language. There is no need to write any text-based programs. All projects are compatible with Android-based mobile devices. Full program listings for all projects as well as detailed program descriptions are given in the book. Users should be able to use the projects as they are presented, modifying them to suit their own needs.
Open-Source-Code mit Arduino IDE und PlatformIO
Autonomes Fahren: GPS, Accelerometer, Gyroskop
PS3-Controller
Mikrocontroller wie der Arduino und Einplatinenrechner wie der Raspberry Pi haben sich zu beliebten Komponenten entwickelt. Dritter im Bunde ist der ESP32 der Firma Espressif. Mikrocontroller dieser Baureihe zeichnen sich durch eine Vielzahl implementierter Funktionen aus, die bei einem Arduino konventioneller Prägung mit einem Atmel-AVR-Mikrocontroller erst mit weiterer Hardware möglich sind. Prominentes Beispiel sind hier die WiFi- und Bluetooth-Funktionalitäten. Gegenüber einem Raspberry Pi zeichnen sie sich durch einen deutlich geringeren Preis aus.
Allgemeine Informationen für die Realisierung eines Roboterauto-Projekts mit dem ESP32 sind leicht zu finden. Dabei handelt es sich aber oft nur um Ausführungen zu einem Teilaspekt, ohne inhaltliche oder funktionale Abstimmung. So ist nicht nur die Beschaffung der benötigten Informationen mühselig und zeitaufwändig, sie kann auch außerordentlich fehlerträchtig sein.
Ansatzpunkt dieses Buches ist, diese Lücke zu schließen. Es geht auf verschiedene Möglichkeiten eines Chassis ein, vermittelt nötige Kenntnisse und führt schrittweise von einer einfachen Motorsteuerung zu einem komplexen sensor- und sprachgesteuerten Roboterauto. Hacks rund um GPS und eine PlayStation 3 runden die Sache ab.
Inhalt
Bei der Reihenfolge der Kapitel wurde versucht – beginnend bei der Darstellung von grundlegenden Informationen – über die Lösung einfacher Aufgaben zu etwas anspruchsvolleren Techniken zu führen.
Der Mikrocontroller ESP32
Die Software erstellen
Die Stromversorgung
Rund um die Hardware
Das Chassis
Der Gleichstrommotor
Kabellose Steuerung über WiFi
Mit Sensoren Hindernisse erkennen
Eine eigene Roboterauto-App
Servo und Lichtsensor
GPS
Accelerometer / Gyroskop
PS3-Controller
Roboterauto-App
Hinweis zur Software
Die Dateien haben das Suffix (.cpp). Grund ist die Entwicklung mit PlatformIO. Mit Copy & Paste sollten sie auch in der Arduino-IDE verwendet werden können.
From SRPP and Mu-Follower to OTL Designs
Tube amplifiers suffer from distortion. Fortunately, circuits such as the SRPP amplifier, mu-follower, and beta-follower produce minimal distortion even at output voltages of 50 to 100 Vpeak.
These designs are often published with errors. Without a sound understanding of the theory, it is easy to arrive at a flawed design.
In the first section of this book, we investigate the origin of distortion, while in the second we investigate the design of and SRPP and a mu-follower.
On the internet we can find the most exotic designs. Evaluating them teaches us that these designs often make matters worse rather than better. In the chapter on incorrect SRPPs and mu-followers, we sometimes see bizarre and misguided designs where using a simple single-triode amplifier would perform much better.
Push-pull output stages also exist. A great number of them are examined, and their similarity to the SRPP is discussed. This is done especially with the help of the theory behind the OTL based on the ‘mother’ of all OTLs, the Philips HF303.
Finally, attention is given to frequency characteristics and technical matters such as the supply voltage and the filament power supply.
To illustrate these points, there are a few designs covering the subjects discussed.
This book presents much new theory that has not been published before. It is often an eye-opener, showing that many things have a beautiful and unexpected simplicity.
Learn to interface and program hardware devices in a wide range of useful applications, using ARM7 microcontrollers and the C programming language. Examples covered in full detail include a simple LED to a multi-megabyte SD card running the FAT file system.
Features of this book
Build prototype circuits on breadboard or Veroboard and interface to ARM microcontrollers.
A 32-bit ARM7 microcontroller is used in interfacing and software examples.
Interfacing principles apply to other ARM microcontrollers and other non-ARM microcontrollers as well.
Example programs are written in the C programming language.
Use only free or open source software.
Download and install all programming tools from the Internet.
Template project files are provided for easy project creation.
Hardware
Interface to LEDs, transistors, optocouplers, relays, solenoids, switches, keypads, LCD displays, seven segment displays, DC motors, stepper motors, external analogue signals using the ADC, RS232, RS-485, TWI, USB, SPI and SD memory cards.
Software
Once hardware has been interfaced to a microcontroller, software must be written to control the hardware. You will learn how to write programs to operate externally interfaced hardware devices, use timers and interrupts. Also learn how to port FAT file system code for use with an SD memory card, program the PWM to produce an audio sine wave, program the PWM to speed control a DC motor and more.
A chapter on more advanced ARM microcontrollers is included with an overview of some of the newest ARM microcontrollers and their features.
Meertalige DIY-kit (incl. 27 RGB-LED's + Raspberry Pi Pico)
Geef uw kerstperiode een vleugje techniek met de "woordrijke" LED-kerstboom van Elektor. De prachtig ontworpen 3D-kerstboom combineert elf printplaten, een Raspberry Pi Pico en 27 adresseerbare RGB-LED's om feestelijke boodschappen in zeven talen te laten oplichten: Deens, Nederlands, Engels, Frans, Duits, Italiaans en Spaans.
In tegenstelling tot gewone LED-bomen heeft elk woord in de boom zijn eigen lichtkamer, waardoor een verfijnd, zacht gloeiend display ontstaat zonder geluid of flikkering. De LED's zijn volledig WS2812-compatibel en worden aangestuurd via de populaire Adafruit NeoPixel-bibliotheek, waardoor je eenvoudig aangepaste animaties en kleureffecten kunt maken.
Perfect voor makers, knutselaars en fans van feestelijke elektronica. Deze kit is zowel een leuke bouwervaring als een opvallende, gesprekswaardige decoratie. De Elektor LED-kerstboom is het ideale knutselproject voor de feestdagen!
Kenmerken
Meertalige begroetingen (7 talen) gefreesd in het frontpaneel
3D-constructie van 11 in elkaar grijpende printplaten
Aangedreven door Raspberry Pi Pico
27 individueel adresseerbare RGB-leds (voorgemonteerd)
Vloeiende fade-in en fade-out animaties
Volledig programmeerbaar met Arduino IDE
Voor maximale helderheid wordt een 5 V-voeding (met micro-USB-connector) met een capaciteit van ≥1 A aanbevolen (niet meegeleverd)
Afmetingen (H x B x D): 130 x 115 x 75 mm
Inbegrepen
Alle benodigde printplaten met leds en andere SMD-onderdelen gemonteerd
Raspberry Pi Pico (door de gebruiker te solderen en te programmeren)
3-polige pinheader (door de gebruiker te solderen)
3-polige pinsocket (door de gebruiker te solderen)
4x Zelfklevende rubberen buffers
Projectpagina
Elektor Labs
Easy and Affordable Digital Signal ProcessingThe aim of this book is to teach the basic principles of Digital Signal Processing (DSP) and to introduce it from a practical point of view using the bare minimum of mathematics. Only the basic level of discrete-time systems theory is given, sufficient to implement DSP applications in real time. The practical implementations are described in real time using the highly popular ESP32 DevKitC microcontroller development board. With the low cost and extremely popular ESP32 microcontroller, you should be able to design elementary DSP projects with sampling frequencies within the audio range. All programming is done using the popular Arduino IDE in conjunction with the C language compiler.After laying a solid foundation of DSP theory and pertinent discussions on the main DSP software tools on the market, the book presents the following audio-based sound and DSP projects:
Using an I²S-based digital microphone to capture audio sound
Using an I²S-based class-D audio amplifier and speaker
Playing MP3 music stored on an SD card through an I²S-based amplifier and speaker
Playing MP3 music files stored in ESP32 flash memory through an I²S-based amplifier and speaker
Mono and stereo Internet radio with I²S-based amplifiers and speakers
Text-to-speech output with an I²S-based amplifier and speaker
Using the volume control in I²S-based amplifier and speaker systems
A speaking event counter with an I²S-based amplifier and speaker
An adjustable sinewave generator with I²S-based amplifier and speaker
Using the Pmod I²S2 24-bit fast ADC/DAC module
Digital low-pass and band-pass real-time FIR filter design with external and internal A/D and D/A conversion
Digital low-pass and band-pass real-time IIR filter design with external and internal A/D and D/A conversion
Fast Fourier Transforms (FFT)
Met ringkern-uitgangstranformatoren
Buizenversterkers vormen voor velen het neusje van de zalm, wanneer het gaat om de versterking van audiosignalen. De combinatie van klassieke techniek met moderne componenten heeft geleid tot een ware revival van de buizenversterker. De toepassing van de in de afgelopen 15 jaar door de auteur ontwikkelde 'ringkern-uitgangstransformatoren' heeft daar mede toe bijgedragen. Opvallend aan deze transformatoren zijn vooral het extreem grote frequentie bereik en de geringe lineaire en niet-lineaire vervormingen.
Het hoe en waarom van de transformator wordt op verschillende niveaus uitgelegd, beginnend bij inleidende begripsvorming en eindigende bij complete wiskundige beschrijvingen, waarbij ook de samenwerking van de transformator met de buizen en de luidspreker centraal staat. Naast de beschrijving van schematuur en zelfbouw van eenvoudig na te bouwen moderne high-end buizenversterkers met een uitgangsvermogen van 10 tot 100 Watt, worden bijzondere buizenversterkers met ringkerntransformatoren besproken: innovatieve oplossingen voor perfecte audiokwaliteit.
Zowel de zelfbouwer als degene die kennis en inzicht wil verwerven in de complexe materie van transformatoren, buizenversterkers en audiosignaalverwerking zal dit boek met plezier ter hand nemen.
Bouw je eigen vintage radiozender
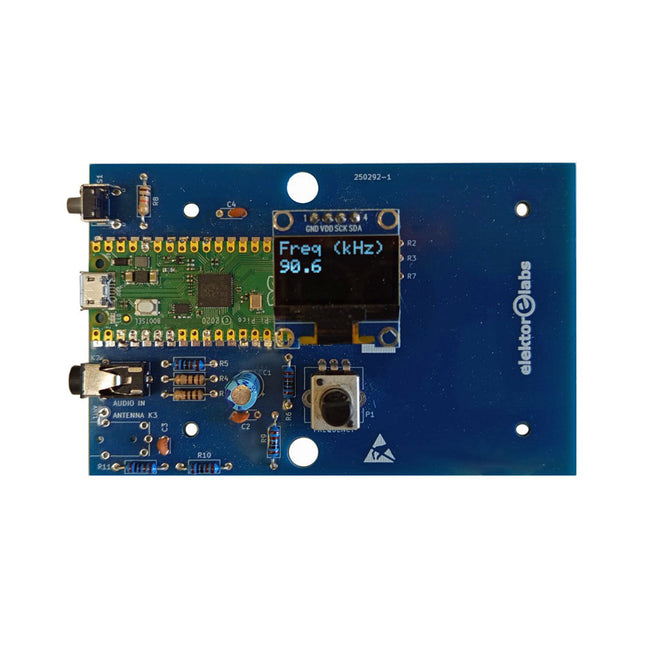
De Elektor AM-zender kit maakt het mogelijk om audio te streamen naar vintage AM-radiotoestellen. Gebaseerd op een Raspberry Pi Pico microcontroller-module kan de AM-zender uitzenden op 32 frequenties in de AM-band, van 500 kHz tot 1,6 MHz in 32 stappen van ca. 35 kHz.
De frequentie wordt gekozen met een potentiometer en weergegeven op een 0,96" OLED-display. Een drukknop maakt het mogelijk om de zendmodus te schakelen tussen Aan en Uit. Het bereik van de zender hangt af van de antenne. De ingebouwde antenne biedt een bereik van enkele centimeters, waardoor de AM-zender dicht bij of in de radio moet worden geplaatst. Een externe lusantenne (niet inbegrepen) kan worden aangesloten om het bereik te vergroten.
De Elektor AM-zender kit wordt geleverd als een bouwpakket dat je zelf op de printplaat moet solderen.
Kenmerken
De printplaat is compatibel met een Hammond 1593N-behuizing (niet inbegrepen).Een 5 VDC-voeding met micro-USB-connector (bijv. een oude telefoonoplader) is nodig om de kit van stroom te voorzien (niet inbegrepen). Stroomverbruik: 100 mA.
De Arduino-software (vereist het RP2040-boards-pakket van Earle Philhower) voor de Elektor AM-zenderkit plus meer informatie is beschikbaar op de Elektor Labs-pagina van dit project.
Componentenlijst
Weerstanden
R1, R4 = 100 Ω
R2, R3, R8 = 10 kΩ
R5, R6, R9, R10, R11 = 1 kΩ
R7 = optioneel (niet inbegrepen)
P1 = potentiometer 100 kΩ, lineair
Condensatoren
C1 = 22 µF 16V
C2, C4 = 10 nF
C3 = 150 pF
Diversen
K1 = 4×1 pinheader
K2, K3 = 3,5 mm-aansluiting
Raspberry Pi Pico
Drukknop, haaks gemonteerd
0,96" monochroom I²C OLED-display
PCB 150292-1
35 projecten met Raspberry Pi en wireless Arduino
Internet of Things (alles aan het internet) is een trend die zich niet meer laat keren. We willen alles in huis met onze mobiel of tablet doen, van Facebook tot TV kijken, van lichten bedienen tot de temperatuur in de gaten houden.
In dit boek laten we in 35 leuke en handige projecten zien hoe u op eenvoudige wijze zelf een Internet of Things systeem kunt aanleggen. We gaan in op de hardware (de perfecte combinatie van Raspberry Pi en Arduino) en de software om bediening via internet mogelijk te maken.
We maken gebruik van Wi-Fi en radioverbindingen zodat er geen kabels dwars door uw huis hoeven. Wanneer u deze projecten maakt heeft u een compleet Internet of Things systeem waarmee u van alles in uw huis kunt bedienen en bekijken. Bijvoorbeeld of er post in de brievenbus ligt en of de auto in de garage staat. U kunt op vanaf de bank het licht aandoen en het alarm bedienen. Door de heldere uitleg kunt u de projecten eenvoudig aanpassen om bijvoorbeeld uw koffiezetautomaat of tv op afstand aan te zetten. Via de index vindt u gemakkelijk creatieve projecten die als voorbeeld kunnen dienen, zodat u zelfstandig alles met het internet kunt verbinden.