Specificaties
Dubbele ARM Cortex-M0+ @ 133 MHz
264 kB on-chip SRAM in zes onafhankelijke banken
Ondersteuning tot 16 MB off-chip Flash memory via speciale QSPI bus
DMA-controller
Volledig aangesloten AHB crossbar
Interpolator en integer divider peripherals
On-chip programmeerbare LDO om spanning voor de core te genereren
2x on-chip PLL's om USB en core kloksignalen te genereren
30x GPIO pins, waarvan er 4 als analoge ingangen kunnen worden gebruikt
Randapparatuur
2x UARTs
2x SPI controllers
2x I²C controllers
16x PWM kanalen
USB 1.1 controller en PHY, met host en device support
8x PIO state machines
Wat je krijgt
10x RP2040 ICs
Technology is constantly changing. New microcontrollers become available every year. The one thing that has stayed the same is the C programming language used to program these microcontrollers. If you would like to learn this standard language to program microcontrollers, then this book is for you!
Arduino is the hardware platform used to teach the C programming language as Arduino boards are available worldwide and contain the popular AVR microcontrollers from Atmel.
Atmel Studio is used as the development environment for writing C programs for AVR microcontrollers. It is a full-featured integrated development environment (IDE) that uses the GCC C software tools for AVR microcontrollers and is free to download.
At a glance:
Start learning to program from the very first chapter
No programming experience is necessary
Learn by doing – type and run the example programs
A fun way to learn the C programming language
Ideal for electronic hobbyists, students and engineers wanting to learn the C programming language in an embedded environment on AVR microcontrollers
Use the free full-featured Atmel Studio IDE software for Windows
Write C programs for 8-bit AVR microcontrollers as found on the Arduino Uno and MEGA boards
Example code runs on Arduino Uno and Arduino MEGA 2560 boards and can be adapted to run on other AVR microcontrollers or boards
Use the AVR Dragon programmer/debugger in conjunction with Atmel Studio to debug C programs
Met deze praktische bundel kun je echte Edge AI-toepassingen bouwen met de Raspberry Pi
Raspberry Pi AI HAT+ (13 TOPS)
De Raspberry Pi AI HAT+ is een uitbreidingsbord ontworpen voor de Raspberry Pi 5, met een geïntegreerde Hailo AI-accelerator. Deze add-on biedt een kosteneffectieve, efficiënte en toegankelijke aanpak voor het integreren van hoogwaardige AI-mogelijkheden, met toepassingen die procescontrole, beveiliging, huisautomatisering en robotica omvatten.
De AI HAT+ wordt aangesloten via de PCIe Gen3-interface van de Raspberry Pi 5. Wanneer de Raspberry Pi 5 een huidige versie van het Raspberry Pi OS draait, detecteert deze automatisch de ingebouwde Hailo-accelerator, waardoor de neurale verwerkingseenheid (NPU) beschikbaar wordt voor AI-taken. Bovendien ondersteunen de rpicam-apps cameratoepassingen in Raspberry Pi OS naadloos de AI-module, waarbij de NPU automatisch wordt gebruikt voor compatibele naverwerkingsfuncties.
Raspberry Pi Camera Module 3
De Raspberry Pi Camera Module 3 is een compacte camera van Raspberry Pi. Hij heeft een IMX708 12-megapixelsensor met HDR, en beschikt over autofocus met fasedetectie. Camera Module 3 is verkrijgbaar in standaard en groothoek varianten, beide met of zonder infrarood filter.
De Camera Module 3 kan worden gebruikt om zowel full HD video als foto's te maken, en heeft een HDR-modus tot 3 megapixels. De werking ervan wordt volledig ondersteund door de libcamera bibliotheek, inclusief de snelle autofocus functie van Camera Module 3: dit maakt het gemakkelijk voor beginners om te gebruiken, terwijl het genoeg biedt voor gevorderde gebruikers. Camera Module 3 is compatibel met alle Raspberry Pi computers.
Boek: Edge AI Made Practical – AI Projects for the Raspberry Pi with the AI HAT+
Edge AI transformeert alledaagse apparaten door intelligentie te plaatsen waar die het meest nodig is: rechtstreeks in de hardware. Met on-device inferentie kan een camera een bezoeker onmiddellijk herkennen, kan een telefoon spraak vertalen zonder audio naar de cloud te streamen, en kan een wearable in realtime afwijkingen detecteren – snel, privé en betrouwbaar, zelfs wanneer de netwerkverbinding wegvalt.
Dit boek is uw praktische gids voor het bouwen van precies dit soort systemen met de Raspberry Pi AI HAT+ en de Hailo-8L-accelerator. U begint met heldere basisprincipes: kernconcepten van AI en machine learning, hoe neurale netwerken werken en wat Edge AI werkelijk onderscheidt van Cloud AI – plus een eerlijke blik op ethische overwegingen en toekomstige impact.
Deze bundel bevat:
Boek: Edge AI Made Practical
Raspberry Pi AI HAT+ (13 TOPS)
Raspberry Pi Camera Module 3
Actieve koeler voor Raspberry Pi 5
FPC Display-kabel voor Raspberry Pi 5 (300 mm)
Elektor Component Kit
40-pins GPIO-header
Verkeerslichtmodule
Rode LED 5 V met ingebouwde weerstand
Gele LED 5 V met ingebouwde weerstand
Groene LED 5 V met ingebouwde weerstand
Blauwe LED 5 V met ingebouwde weerstand
Breadboard (400 aansluitpunten)
10 Dupont-draden (male-female)
DHT22-sensormodule
Servomotor
Vereist
Raspberry Pi 5
PIC und AVR verstehen
In diesem Buch werden wir uns ausschließlich mit 8-Bit-Mikrocontrollern beschäftigen, und zwar mit Mikrocontrollern der 8-Bit-PIC- und der 8-Bit-AVR-Mikrocontroller-Linien. Bei der PIC-Familie handelt es sich dabei um PIC10, PIC12, PIC16 und PIC18; bei der AVR-Familie um ATtiny, ATmega und ATxmega. Die vorgestellten 8-Bit-Chips sind für sehr viele Anwendungen vollkommen ausreichend und preislich auch attraktiv.
Durch die Lektüre des Buches erhalten Sie ein fundiertes Wissen über die genannten 8-Bit-Mikrocontroller, über ihre Architektur, ihre Pinbelegungen und über ihre Programmierung.
Weil wir uns in diesem Buch mit den Grundlagen der Architektur der PICs und AVRs vertraut machen möchten, werden wir auch für alle PIC- und AVR-Anwendungen Assembler einsetzen, denn die Assembler-Sprache erlaubt es, die Technik im Detail kennenzulernen. Wenn man wirklich wissen möchte, was sich im Mikrocontroller abspielt, greift man zu Assembler. Damit hat man die beste Gelegenheit, sehr nah an den Kern zu kommen. Und wenn man schon einen Mikrocontroller-Typ kennengelernt und verstanden hat, ist es bei dem nächsten deutlich einfacher, auch wenn er von einem anderen Hersteller kommt. Bei anderen Programmiersprachen bleibt die Technik immer ziemlich tief versteckt.
Die Assembler-Beispiele sind so einfach gestaltet, dass sie jeder mit den im Buch aufgezeigten Programmiertechniken erstellen kann. Weil es sich um einfache Beispiele handelt, werden wir sie alle auf einer universellen Lochrasterplatine realisieren. Manche sind auch auf einem Experimentier-Breadboard umsetzbar.
The Seeed Studio RF Explorer WSUB1G+ is a powerful, high-performance digital spectrum analyzer covering frequencies from 50 kHz to 1 GHz. The Slim model features a robust design, a more conveniently positioned USB connector on the side, and a larger internal battery capacity.
Kenmerken
Internal LNA amplifier and selectable attenuator
Low frequency support from 50 KHz covering LF, MF, HF, VHF and UHF up to 960 Mhz
New HELP and SET buttons to improve user interface and configuration selection with 2-clicks
Wide band coverage to all popular sub-1 Ghz bands, including FM, TV and DTV, ISM, RFID, GSM, etc.
Ideal choice for HAM bands from 160 m to 33 cm
Pocket size and light weight
Solid metal case
Spectrum Analyzer mode with Peak Max and Hold, Normal, Overwrite and Averaging modes
High capacity internal Lithium battery for 20hs+ of continuous run, rechargeable by USB
Multi-platform Windows/Linux/MacOS Open Source software and API libraries
Can be extended with internal Expansion Modules for additional band and functionality
Specificaties
Frequency band: 0.05 MHz – 960 MHz
Frequency span: 0.1 MHz – 960 MHz
Internal selectable LNA 25 dB gain
Internal selectable Attenuator 30 dB
Graphics LCD 128 x 64 pixels, great visibility outdoors
Support included for Windows, Linux and MacOS X
Backlight for great visibility indoor
Internal Lithium Ion 1800 mA/h rechargeable battery
Standard SMA 50 Ω connector
Wideband 144/433 MHz dual band telescopic antenna included
UHF 400-900 MHz rubber duck articulated antenna included
Amplitude resolution: 0.5 dBm
Dynamic range: -125 dBm to 10 dBm
Absolute Max input power: +30 dBm
Average noise level (typical LNA): -125 dBm
Frequency stability and accuracy (typical): ±10 ppm
Amplitude stability and accuracy (typical): ±2 dBm
Frequency resolution: 1 kHz
Resolution bandwidth (RBW): Automatic 2.6 kHz to 600 kHz
Inbegrepen
1x Seeed Studio RF Explorer WSUB1G+ Slim Spectrum Analyzer
1x Mini USB cable
1x Dual band 144/430 MHz Telescopic antenna
1x UHF 400-900 Mhz antenna
1x EVA case
Home Information SystemUsing Windows on a Raspberry Pi
Starting with Node-REDAn open-source visual block-based programming tool
Elektor Summer GiveAway
Simple Function Generator: With Reverse-Order Signal Creation
GreatScott! Builds a LoRa Alarm System
Review: Joy-iT RD6006 Benchtop Power Supply Kit
Review: The GreatFET One Interface Board
Small Circuits Revival – XXLEscaped from the Suggestions Box
Poorest Man's External 2.4 GHz Wi-Fi Antenna
Simple On-Off Temperature Controller with Raspberry Pi HAT
How to Take (Successful) Photos of ElectronicsShowing your projects in their best light
Review: The I2CDriver Tool
Review: JOY-iT Joy-View Portable Touchscreen
LED Booster for MicrocontrollersWith just one component
Experimental Ultrasonic Clothes Washer
Review: The Joy-iT JDS2915 Signal GeneratorA 2-Channel Signal Generator and Frequency Counter
Traffic Lights Programmed in PIC Assembly Code
E-E-E-ternal Blinker
Experimental Hall Sensor
Tracing Shorts with the Milli-Ohm or ESR Meter
Review: Elektor SDR Hands-on Kit
Elektor Labs Pipeline
Elektor KickstarterWell, you get the idea.
Do You Really Need All That Stuff???This is where I spend many hours working on electronics projects
Homelab Tours: The Kinetic Clock MakerStargate jigsawed!
Hello, World! We’re Elektor, and We’re Social
M4 + 2x A7 + GPU: An Unbalanced Dream TeamLatest STM32MP1-SoCs can tackle demanding applications
Test Rig for 16F18877 & Similar Big PICs
Inter-Microcontroller Traffic with the SPI Bus and ATmega328p
Six Shades of LF/AF OSC (and the Miller’s Tale)
BBC micro:bit Absolute Minimalist Oscilloscope with LED Display
‘Knight Rider’ LED Chaser with the ESP32
LW/MW AM Signal Generator with ATtiny13
Absolute Minimalist Dip Meter
Photovoltaic Regulator UpdateNew function for measuring battery temperature
Wireless SignallingTransmitting switching signals over LPR
Ultrasonic Reverse Parking Aid with Arduino Uno
Distortion Pedal with Op Amp and Space Charge Tubes
Electronics Workspace Essentials
Hexadoku
Artificial Intelligence for Beginners (2)Neural networks with Linux and Python
Elektor GREEN en GOLD leden kunnen deze uitgave hier downloaden.
Nog geen lid? Klik hier om een lidmaatschap af te sluiten.
Audio DSP FX Processor Boarddeel 1: eigenschappen en ontwerp
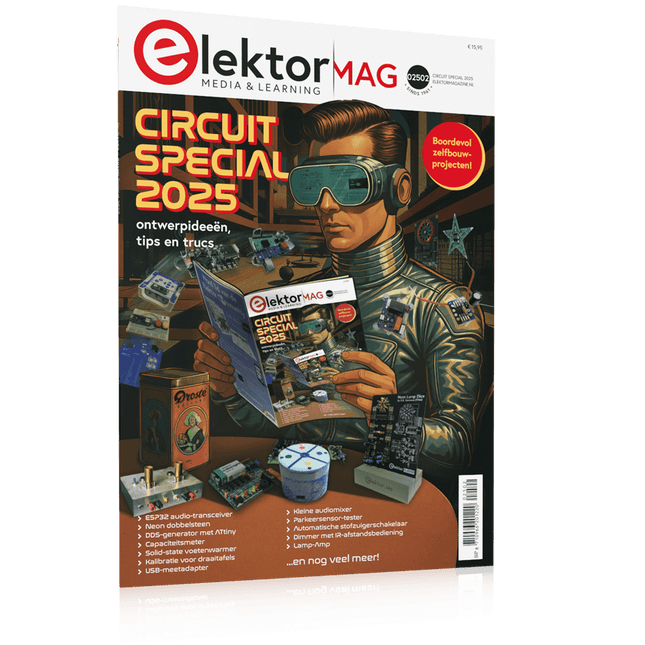
50 jaar Elektor in het Engels
KiCad 8belangrijkste nieuwe en vernieuwde functies
Elektor @ elektronica 2024electronica Fast Forward 2024, Experts on Stage, Influencer Forums, Live Elektor Lab Talk Shows en meer
Elektor MultiCalculator KitArduino-gebaseerde DHZ-calculator voor elektronici
Goedkope GNSS RTK-systemenmet centimeter-nauwkeurigheid
Printlayout en veiligheidtips voor een veilig en duurzaam ontwerp van uw printen
Opamp-testervoor audio en andere toepassingen
Project-update #4: ESP32-gebaseerde energiemeterenergiemonitoring met MQTT
Real-time spectrumanalyzer met golfgeleider-technologie en multi-interface PC’sAaronia introduceert nieuw productsegment en presenteert eerste prototypes op electronica in München
SMT-spoelenspoelen en ferrieten – selectie gemakkelijk gemaakt
EMC-conformiteit bereiken met EMI-afscherming
De perfecte tool voor elke elektronicaliefhebbereindeloze mogelijkheden met Red Pitaya en 1.000+ Click Boards™
HDI in het middeneen nieuwe kosteneffectieve PCB-poolingservice voor kleine BGA’s
Uitdagingen van DFM-analyse voor flex- en rigid-flex-ontwerpen
Open source-toolsantennesimulator, componentenbeheer, rekenmachine en meer
Elektor infographicprototyping en productie
Uit het leven gegrepenmicrotechnofobie
3D-kerstboomdriedimensionale print met een goedkope 32 bit-microcontroller
Alle begin......houdt nog lang niet op(amp)!
Autonome sensor-node (project-update #1)RTC en voedingsschakelaar
2024: een AI-odysseeeen terugblik op de toekomst
LED-displays met de MAX7219aan de slag met een grandioze chip
Project 2.0correcties, updates en brieven van lezers
Vibrotactiele handschoenendoorbraak voor Parkinson-patiënten
Elektor GREEN en GOLD leden kunnen deze uitgave hier downloaden.
Nog geen lid? Klik hier om een lidmaatschap af te sluiten.
USB-meetadaptertest stroom en signaalkwaliteit van USB-poorten
4...20 mA stroom-uitgang voor Arduino Unobetrouwbare, EMI-ongevoelige current loop-interface
Automatische stofzuigerschakelaarhoud uw werkplek schoon
DDS-generator met ATtiny
Opamp-tester v2nieuwe print – nu ook voor SMD’s
550-mW audio ‘Lamp-Amp’voor die warme buizenklank
Zekeringbewakerhoud zekeringen in de gaten met een knipper-LED
Hoogwaardige RIAA-voorversterkerhaal het beste uit uw vinylplaten!
Kalibratie voor draaitafelsArduino-gebaseerde 100/120Hz-stroboscoop
Elektor Classics: Video-versterker
Dimmer met IR-afstandsbedieningcomfortabel en elegant staande halogeen- of LED-lampen regelen
Het gebruik van switch…case bij strings in C++/Arduino IDE
Magneetzoekermet een eenvoudige Hall-effect-sensor
Raspberry Pi: slimme aan/uit-knopeen oplossing voor de Raspberry Pi tot aan model 4
Professionele tipsvan makers voor makers
Praktische projecten met de 555-timerDC-motorbesturing en snelle reactie-uitdaging
Eenvoudige ‘aan-verklikker’spaar energie met een simpele schakeling
Powerpacks parallelschakelendrie dagen ononderbroken stroom
VFO tot 15 MHzimplementatie met Raspberry Pi Pico
Vioolstemmer met ATtiny202
Elektor Classics: Video-ingangsversterker voor zwart/wit-TV
Capaciteitsmeter20 pF tot 600 nF
Quasi-analoog uurwerk Mk IItwee LED-ringen – voor uren en minuten
Niets is onmogelijk(met hulp van het Arduino-ecosysteem)
Neon dobbelsteen
Elektor Classics: RTTY-afstemhulp
Inspirerende hardware-ontwerpen voor uw ESP’s
Elektor Classics: 3 A voeding
RGB-LED’s met geïntegreerde stuurkringlicht met precisie: ICLED’s zetten de standaard
Experiment: een mixed-signal Theremin?moderne time-of-flight sensoren plus de tijdloze analoge XR2206
ESP32 audio-transceiver (deel 1)SD-kaart WAV-speler demo
Elektor infographicschakelingen en schakelingontwerp 2025
Kleine audiomixereenvoudig, veelzijdig en schaalbaar
Slimme timer voor trapverlichtingbespaar op uw energierekening!
Maak uw rolluiken slimmerVelux-hardware besturen met een ESP32 en MQTT
Solid-state voetenwarmercomfortabel en energiezuinig
Is de M5Stamp Fly-quadcopter de nieuwe Tello?
Vergroot het WiFi-bereik van de ESP32-C3 SuperMinieenvoudige en effectieve antennemodificatie
ZD-8968 hetelucht-soldeerstationbudgetvriendelijk werkpaard of gebakken lucht?
Parkeersensor-testervind defecten in het PDC-systeem van een auto
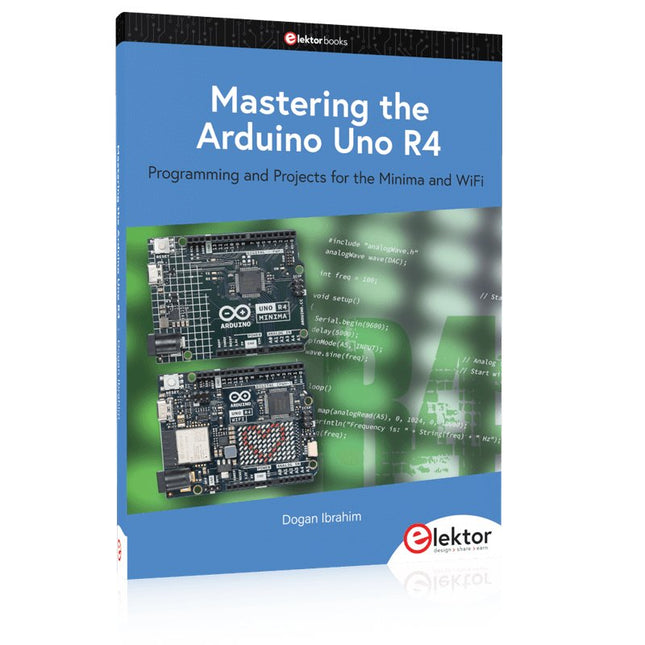
Programming and Projects for the Minima and WiFi
Based on the low-cost 8-bit ATmega328P processor, the Arduino Uno R3 board is likely to score as the most popular Arduino family member, and this workhorse has been with us for many years. Eleven years later, the long-overdue successor, the Arduino Uno R4, was released. It is built around a 48 MHz, 32-bit Arm Cortex-M4 microcontroller and provides significantly expanded SRAM and Flash memory. Additionally, a higher-precision ADC and a new DAC are added to the design. The Uno R4 board also supports the CAN Bus with an interface.
Two versions of the board are available: Uno R4 Minima, and Uno R4 WiFi. This book is about using these new boards to develop many different and interesting projects with just a handful of parts and external modules. All projects described in the book have been fully tested on the Uno R4 Minima or the Uno R4 WiFi board, as appropriate.
The project topics include the reading, control, and driving of many components and modules in the kit as well as on the relevant Uno R4 board, including
LEDs
7-segment displays (using timer interrupts)
LCDs
Sensors
RFID Reader
4x4 Keypad
Real-time clock (RTC)
Joystick
8×8 LED matrix
Motors
DAC (Digital-to-analog converter)
LED matrix
WiFi connectivity
Serial UART
CAN bus
Infrared controller and receiver
Simulators
… all in creative and educational ways with the project operation and associated software explained in great detail.
De OWON SDS1102 is een betaalbare benchtop digitale oscilloscoop die solide prestaties combineert met essentiële meetfuncties. Deze 2-kanaals oscilloscoop biedt een bandbreedte van 100 MHz, een sample rate van 1 GS/s, een 7-inch LCD-display en een geheugendiepte van 10 kpts. Daarmee is het een praktische keuze voor dagelijkse elektronicatests, foutopsporing en onderwijs.
De SDS1102 beschikt over een vereenvoudigd triggersysteem met niveau- en flanktriggering, waardoor gangbare signalen eenvoudig kunnen worden vastgelegd en geanalyseerd. Het apparaat is ontworpen voor toepassingen waarvoor geen grote geheugendiepte of geavanceerde triggerfuncties nodig zijn, en biedt een eenvoudige en kostenefficiënte oplossing voor basis-signaalanalyse.
Kenmerken
Bandbreedte: 100 MHz
2 kanalen
Bemonsteringssnelheid: 1 GS/s
Ultradunne behuizing
7-inch lcd met hoge resolutie
Ondersteuning voor SCPI en LabVIEW
Specificaties
Bandbreedte
100 MHz
Horizontale schaal (s/div)
5 ns/div - 1000 s/div
Kanalen
2
Verticale gevoeligheid
5 mV/div - 5 V/div (bij ingang)
DC Gain nauwkeurigheid
3%
Verticale resolutie (A/D)
8 bits (2 kanalen tegelijk)
Ingang
Ingangsimpedantie
1 MΩ, 10 pF
Ingangskoppeling
AC, DC, GND
Max ingangsspanning
± 400 V, CATI, CATII
Passieve probes
x1; 10
Probe verzwakkingsfactor
x1; x10; x100; x1000
Triggersysteem
Trigger mode
Auto, Normal, Single
Trigger type
Flank, Video
Flank triggerbron
CH1, CH2
Video trigger
Sampletype
Real-time
Samplefrequentie
1 GS/s
Equivalente samplesnelheid
No
Golflengte
10K pts
Interpolatie
sin(x)/x
Meet- en rekenkundig bewerkingssysteem
Automatische meting
Vpp, Vavg, RMS, Frequency, Period, Vmax, Vmin, Vtop, Vbase, Width, Overshoot, Pre-shoot Rise time, Fall time, +Width, -Width, +Duty, -Duty, Delay A->B, Delay A->B, area, cycle area
Rekenkundige functies
Addition, Subtraction, Multiplication, Division, FFT
Algemene kenmerken
Display maat
7" color LCD
Display resolutie
800 x 480
Voeding
100-240 V, 45-440 Hz, <15 W
Afmetingen
301 x 70 x 152 mm
Gewicht
1,1 kg
Inbegrepen
1x OWON SDS1102 Oscilloscoop
2x Oscilloscoopsonde
1x Sonde aanpassen
1x Netsnoer
1x USB-kabel
1x CD-Rom
1x Snelstartgids
Downloads
Quick Guide
Manual
PC Software
SCPI Commands
Deze doorzichtige acryl behuizing is de officiële behuizing voor het HackRF One/Pro board. Hij kan de standaard zwarte plastic behuizing van de HackRF One/Pro vervangen.
Montage-instructies
Gebruik een plectrum of spudger om de HackRF One/Pro printplaat uit de zwarte plastic behuizing te halen.
Steek een lange schroef in elke hoek van het onderste acrylpaneel. Zet elke lange schroef vast met een kort afstandsstuk (5 mm) aan de tegenoverliggende kant van het paneel.
Plaats de HackRF One/Pro printplaat (naar boven gericht) bovenop het onderpaneel en steek de uiteinden van de lange schroeven door de bevestigingsgaten in de hoeken van de print.
Zet de printplaat vast met een lang afstandsstuk (6 mm) in elke hoek.
Plaats het bovenste acrylpaneel op de printplaat en lijn de uitsparingen uit met de extension headers op de print.
Zet elke hoek vast met een korte schroef.
Opmerking: Niet te strak aandraaien! Na elke stap alleen met de hand aandraaien.
Programming and Projects for the Minima and WiFi
Based on the low-cost 8-bit ATmega328P processor, the Arduino Uno R3 board is likely to score as the most popular Arduino family member, and this workhorse has been with us for many years. Eleven years later, the long-overdue successor, the Arduino Uno R4, was released. It is built around a 48 MHz, 32-bit Arm Cortex-M4 microcontroller and provides significantly expanded SRAM and Flash memory. Additionally, a higher-precision ADC and a new DAC are added to the design. The Uno R4 board also supports the CAN Bus with an interface.
Two versions of the board are available: Uno R4 Minima, and Uno R4 WiFi. This book is about using these new boards to develop many different and interesting projects with just a handful of parts and external modules. All projects described in the book have been fully tested on the Uno R4 Minima or the Uno R4 WiFi board, as appropriate.
The project topics include the reading, control, and driving of many components and modules in the kit as well as on the relevant Uno R4 board, including
LEDs
7-segment displays (using timer interrupts)
LCDs
Sensors
RFID Reader
4x4 Keypad
Real-time clock (RTC)
Joystick
8×8 LED matrix
Motors
DAC (Digital-to-analog converter)
LED matrix
WiFi connectivity
Serial UART
CAN bus
Infrared controller and receiver
Simulators
… all in creative and educational ways with the project operation and associated software explained in great detail.