Zoekresultaten voor "analog audio input for rpi"
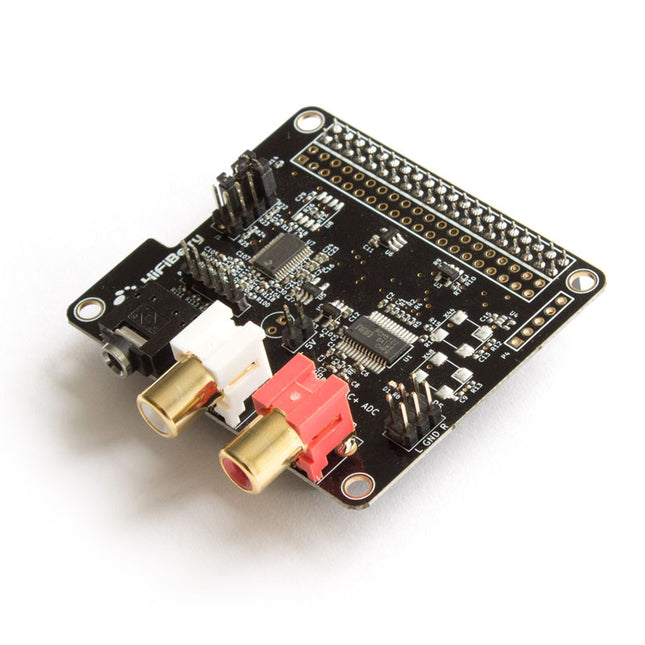
HiFiBerry HiFiBerry DAC+ ADC
Features Stereo input and output Dedicated 192 kHz / 24-bit high-quality Burr-Brown DAC Dedicated 192 kHz / 24-bit high-quality Burr-Brown ADC Hardware volume control for DAC. The output volume can be controlled using “alsamixer” or any application that supports ALSA mixer controls. Connects directly onto the Raspberry Pi. No soldering required. Compatible with all Raspberry Pi models, that have a 40-pin GPIO connector No additional power supply required. Three ultra-low-noise linear voltage regulators. HAT compliant, EEPROM for automatic configuration. Gold plated RCA output connectors. Includes 4 M 2.5 x 12 mm spacers. Analogue input, phone jack 3.5 mm Analogue output RCA Analogue output (P5) Input configuration jumper (J1) Connector for balanced input (P6) Please note: Layout and components might change without further notice. Balanced/unbalanced input connector (P6)The 5-pin connector can be used to connect a balanced input. Please note that the balanced input has to be selected with the jumpers and will always have a 12 dB gain. It shouldn't be used with line-level inputs.Pin 1 is on the left. right + right – GND left – left + Output connector (P5)The output connector realizes connections to external components like an amplifier.Pin 1 is on the top left. +5V 1 2 R GND 3 4 GND +5V 5 6 L Input gain settings (J1)The jumper block is responsible for the input configuration. It is recommended to use the default setting without additional input gain. 32 dB gain can be used to connect dynamic microphones.Jumpers are numbered from top to bottom. 1 2 3 4 function 1 0 0 – 0 dB gain 0 1 1 – 12 dB gain 0 1 0 – 32 dB gain 0 0 1 – balanced input, 12 dB gain Specifications Maximum input voltage: 2.1 Vrms - 4.2 Vrms for balanced input Maximum output voltage: 2.1 Vrms ADC signal-to-noise ratio: 110 dB DAC signal-to-noise ratio: 112 dB ADC THD+N: -93 dB DAC THD+N: -93 dB Input voltage for lowest distortions: 0.8 Vrms Input gain (configurable with Jumpers): 0 dB, 12 dB, 32 dB Power consumption: < 0.3 W Sample rates: 44.1 kHz - 192 kHz In order to use the HiFiBerry DAC + ADC, your Raspberry Pi Linux kernel must be at least version 4.18.12. Click here to learn how to update the Raspberry Pi kernelUsing microphones with the DAC+ ADCThe DAC+ ADC is equipped with a stereo analogue input that can be configured for a wide range of input voltages. It performs best with line-level analogue sources. However, it is also possible to use it as a microphone input. You can only use dynamic microphones. Microphones that require a power supply are not supported. The microphone output voltage is very low. This means you need to amplify it. The DAC+ ADC has the necessary pre-amplifier already equipped. You will have to set the jumpers correctly. The sound from the input won’t be played back automatically on the output. You will have to use some software that reads the input and outputs it again. Setting the correct input amplifier settings for a microphoneBy default, the input sensitivity is matched for line-level audio sources. This is done via a jumper on the J1 header.In order to use a microphone, the jumper needs to be set up as shown below.Audio input to outputThere is no direct connection between the input and the output. That leads to the input from the connected microphone to not be played back automatically. If you want to hear it on the output, you need to use the command line tool alsaloop can be used for this.
€ 89,95
Leden € 80,96

Elektor Summer Circuits 2022
Over 50 Circuits & Projects US-Style Siren Two Rotary Encoders on One Analog Input How to Build a Digital 220-V AC Dimmer with Arduino Current Source for LEDs Detect Four Switches with 1 Pin Tiny On/Off Switch with Battery Level Check DIY Hand Sanitizer Dispenser A Simple Electronic Organ Ultra-Simple Stereo Amplifier Sound Activated Switch for Amplifiers Balanced/Unbalanced Converter External Mains Filter Button-Free Door Control DI Box for a Smartphone Fun With Running Lights One-Button Thyristor Control Quasi-Analog Exposure Timer for the Dark Room Circuits Galore From the Hackster.io Community Analog Tanning Timer Yet Another Single-Wire LCD Interface Simple AVR ATtiny13-Based PWM Generator Second Life for Batteries Touch Switch for LED Lights Tester for LEDs and DIP Switches Go/No-Go IR Control Tester Power Semiconductor Tester SPI for WS2812(B) LEDs Measuring Power Inductors One Plug for Raspberry Pi and Audio DAC DIY Test Fixture for the LCR Meter Arduino Ammeter Two-Finger Organ Low Noise ADC Calibrator DC/DC Boost Converter Two Potentiometers on One Digital Input Acoustic Proximity Sensor Battery-Free Radiator Sensor A Circuit for Detecting Bugs and Wireless Cameras Car Interior Light Timer Candle Simulator Digital Kitchen Timer Milliohm Meter Hot Water Production Delay Timer Simple Charger for 2S 18650 Cells Tiny Frequency Reference Low-Power IR Switch Recycle Your Car’s Telephone Charger Microphone Pre-Amp for Arduino DIY EMI Filters Electronic Dice Without an MCU Finger Capacitor A Self-Charging LED Flasher Also in this edition KiCad 6 – Five Features to Consider Flashback – The Elektor SC/MP Computer Interview – Making Art with Electricity My First PCB – Going Head First Into KiCad Minimizing Hardware with Smart Software Infographics – Facts and Figures New Devices from Analog Flashback – The Elektor Metal Detector Hexadoku – The Original Elektorized Sudoku
€ 10,95
Leden € 9,86

Elektor Digital Elektor Summer Circuits 2022 (PDF)
Over 50 Circuits & Projects US-Style Siren Two Rotary Encoders on One Analog Input How to Build a Digital 220-V AC Dimmer with Arduino Current Source for LEDs Detect Four Switches with 1 Pin Tiny On/Off Switch with Battery Level Check DIY Hand Sanitizer Dispenser A Simple Electronic Organ Ultra-Simple Stereo Amplifier Sound Activated Switch for Amplifiers Balanced/Unbalanced Converter External Mains Filter Button-Free Door Control DI Box for a Smartphone Fun With Running Lights One-Button Thyristor Control Quasi-Analog Exposure Timer for the Dark Room Circuits Galore From the Hackster.io Community Analog Tanning Timer Yet Another Single-Wire LCD Interface Simple AVR ATtiny13-Based PWM Generator Second Life for Batteries Touch Switch for LED Lights Tester for LEDs and DIP Switches Go/No-Go IR Control Tester Power Semiconductor Tester SPI for WS2812(B) LEDs Measuring Power Inductors One Plug for Raspberry Pi and Audio DAC DIY Test Fixture for the LCR Meter Arduino Ammeter Two-Finger Organ Low Noise ADC Calibrator DC/DC Boost Converter Two Potentiometers on One Digital Input Acoustic Proximity Sensor Battery-Free Radiator Sensor A Circuit for Detecting Bugs and Wireless Cameras Car Interior Light Timer Candle Simulator Digital Kitchen Timer Milliohm Meter Hot Water Production Delay Timer Simple Charger for 2S 18650 Cells Tiny Frequency Reference Low-Power IR Switch Recycle Your Car’s Telephone Charger Microphone Pre-Amp for Arduino DIY EMI Filters Electronic Dice Without an MCU Finger Capacitor A Self-Charging LED Flasher Also in this edition KiCad 6 – Five Features to Consider Flashback – The Elektor SC/MP Computer Interview – Making Art with Electricity My First PCB – Going Head First Into KiCad Minimizing Hardware with Smart Software Infographics – Facts and Figures New Devices from Analog Flashback – The Elektor Metal Detector Hexadoku – The Original Elektorized Sudoku
€ 7,50
Leden € 6,75


-
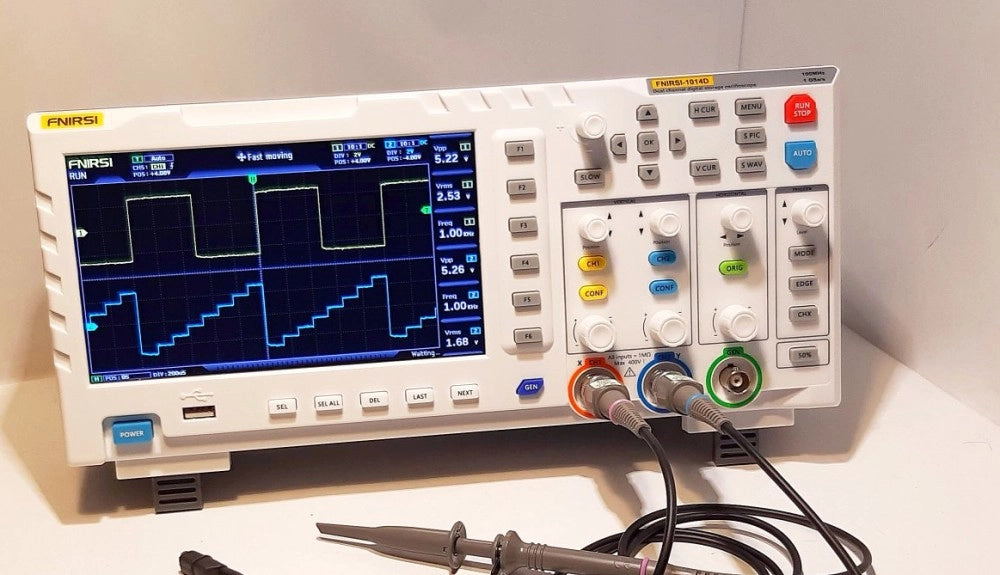
, van Günter Spanner FNIRSI 1014D digitale geheugenoscilloscoop: Goede prestaties voor weinig geld
Voor activiteiten zoals knutselen aan versterkers, sensoren en microcontrollers zoals Arduino's, ESP's, Raspberry Pis of het repareren van consumentenelektronica zijn een bandbreedte van 100 MHz...
